Foodiva's Kitchen: lemongrass
Showing posts with label lemongrass. Show all posts

Sunday, July 24, 2011

Lemongrass Chilli Lime Ice Cream with Black Sesame Langues de Chat

I break tradition
Sometimes my tries
Are outside the lines

We've been conditioned
To not make mistakes
But I can't live that way, no
~ Lyrics from Unwritten, Natasha Bedingfield

My friend Nancy of Spicie Foodie blog is currently running a fun recipe contest with a giveaway which runs until July 27, 2011. The winner she eventually chooses will win a copy of her brimming-with-spices cookbook, An Epiphany of the Senses and the great news is, it's open to everyone. Yep, all of us on this planet are eligible to enter. Well, the catch is that you'd have to write up a post featuring a recipe that makes Nancy hungry and also uses several of your favorite spices. If it's your original creation, all the better!

Friday, July 22, 2011

French Fridays with Dorie - Coconut Lemongrass-Braised Chicken with Pink Fettuccine

There is hope in every heartbeat
Tiny as it seems
You're a beautiful seed
~ Beautiful Seed lyrics, Corrinne May

If you're a regular here on Fridays, you'll probably do a double-take on my new banner. Overnight, it looks as if I've turned into an anime version of myself. Wearing pearls and a pink apron as per real life, but 20lbs thinner. I really like it! The banner is actually a gift from my friend, Nic in Singapore. I can't say 'thank you' enough times, Nic. In case you're all wondering, yes, I do have a bunch of fabulous and selfless friends like him. I try to surround myself with the real deal, or maybe they come to me. I really can't say for sure. 

Anyway, back to the business at hand. There was no ducking out of this week's French Fridays with Dorie recipe without seeming a bit lame (after last week's absence). Coconut, lemongrass, turmeric, coriander, cardamom...I have them all; these ingredients form the hallmarks of my territory. In a twee twist, for there is always at least one, Dorie's Coconut Lemongrass-Braised Pork recipe was chicken-fied under my pork-less abode, but the rest of the ingredients remained. Oh, except for the turmeric, which Diva D threw out because she thought it had expired (I bought it just last year!). While writing this up, I did a quick research to see if turmeric in its powder form really does expire and came across this anecdote entitled Old Spice. You must click on the link and read it because it cracked me up...the things we women hoard in our kitchens!

Sunday, April 17, 2011

Lemongrass and Lime Birthday Cake Pop for the International Incident Party


This month's International Incident Party is special on two counts. First, we are celebrating our energetic host, Penny-of-Jeroxie.com's birthday. Secondly, the theme is Cake Pop, that cutesy ball-of-cake-on-a-lolly-stick made famous by the enormously talented Angie of Bakerella. My inner child just couldn't wait to get both its (my?...its?) hands dirty!

Though I've admired and frequently ogled at Bakerella's cake pop creations for a while, this was only the second time that I've attempted making them myself. Hmm...maybe the first in the strictest sense of the word as I had only made cake balls before this. Once you start inserting sticks into cake balls, it's a different game altogether and I later found out that it takes considerable skill to keep the compacted cake mix stuck onto the sticks!

My chocolate-coating technique had plenty of room for improvement, for as you'll soon witness, the surface of my cake pops had more lumps and bumps than a teenager's troubled complexion. After this experience, I bow down to Bakerella and talented others for their skills in making smooth, perfect-looking cake pops.

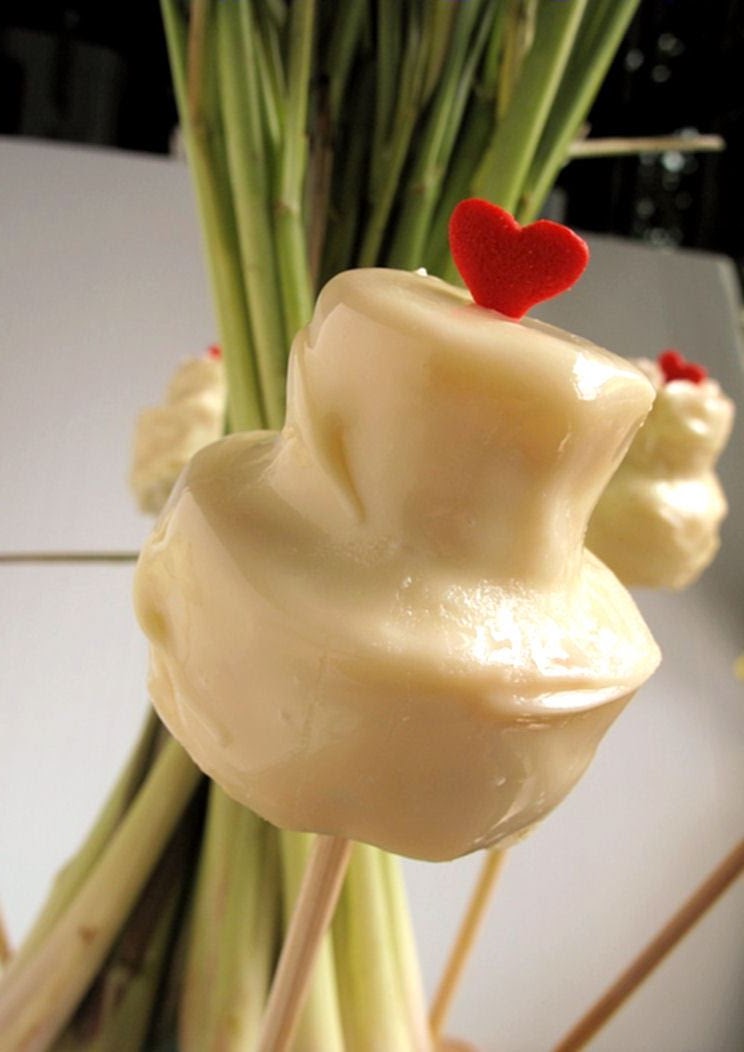
I thought at length about how I wanted to shape my cake pops, and I was rather torn between the traditional (spherical) or funky (other shapes). Eventually, I went with the funky, but something that's not too out-there so as to become unrecognizably cake pop-like. To celebrate your special day, Penny, here are my two-tiered Birthday Cake Pops!


For the cake itself, I opted for an unusual combination of flavors (in desserts, at least) which also proved surprisingly delicious - the kids at home devoured these, that's how I know. Lemongrass and lime cake, crumbled, compacted and later covered in pristine white chocolate and decorated with red sugar hearts and tiny birthday candles. I used both fresh and dried lemongrass as I wasn't too sure if using all fresh would make the cake flavor too intense and overpowering. Both lemongrass and lime have strong, distinct fragrances and flavors - lemongrass having a slightly citrusy-sweet and pungent, earthy aroma, while lime has a sharp and refreshing scent. Taking a bite out of these cake pops will stimulate and keep you wide-eyed with alertness. Never again will you leave your fate in the hands of that doctor fellow who quoted us over the years that eating too much carbs makes you feel sluggish!
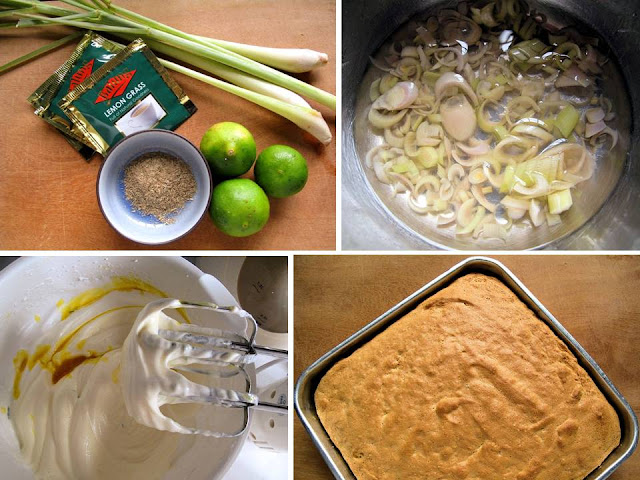

Lemongrass and lime cake


The cake itself was light and airy in texture. I omitted the butter and reduced the sugar to compensate for the fact that I would be mixing in dense, sweet cream cheese frosting to bind the cake mixture together. I also squeezed extra lime juice into the frosting to give it more zing! As these Birthday Cake Pops were a bit larger in size than cake balls, I knew that regular pop sticks weren't sturdy enough to hold them up. So what's a girl to do? I used short, disposable wooden chopsticks instead. They worked out quite well, just look at the size of these momma cake pops!

Some industrial strength pop sticks!
A large-holed colander worked well as a stand for these cake pops


I can't wait to see what my fellow bloggers have brought along by way of Cake Pops, and I'd be honored if you will join me by clicking here or the thumbnails below to check them out. Without further ado, let me light the birthday candles and share the recipe with you...

Happy Birthday, Penny!
"Whadd'ya lookin' at?"
As I had some leftover cake mix, I couldn't help but make my very own Gangsta Chix ball!

Lemongrass and Lime Birthday Cake Pops
Lemongrass and Lime Cake
Ingredients:
3 eggs, separated
1/2 cup caster sugar
1 teaspoon grated lime zest
1 cup self-rising flour
2 teaspoons ground lemongrass*
3 tablespoons hot lemongrass juice**

*For the ground lemongrass, I used dried lemongrass enclosed in teabags (herbal infusion) and ground it finely in a grinder.
**If you can't find ground or dried lemongrass, you can chop 1 tablespoon fresh lemongrass finely and boil for 10 minutes in 1/2 cup water. Allow to steep for 10 minutes, strain, and use the reserved liquid as the hot lemongrass juice for the sponge mix. I used both the dried and fresh lemongrass in the ingredients list above.

Method:
1. Preheat oven to 175ÂșC/350 F. Grease and flour a 9-inch cake pan.
2. Beat the egg whites until stiff peaks form. Gradually add the sugar and continue beating until dissolved. Add the yolks and lime zest and beat just to combine.
3. Sift together flour and lemongrass and gently fold through the egg mixture followed by the lemongrass juice.
4. Spoon mixture into prepared pan and bake for 20-25 minutes or until golden and cake springs back when pressed gently. Leave in pan for 5-10 minutes before turning onto a wire rack to cool.

Lime Cheese Frosting
Ingredients:
250g/8oz cream cheese, softened
2 cups confectioner's sugar
4 tablespoons butter
1 tablespoon lime juice

Method:
In a bowl, whip the cream cheese, butter, powdered sugar and lime juice together until smooth. Use immediately to bind the cake mix.

Making the Birthday Cake Pops
You will need:
250g/8oz white chocolate candy melts
2 tablespoons Crisco or shortening (optional)
Round cookie cutters, 2 sizes (5cm/2in and 2.5cm/1in)
Lollipop or ice cream pop sticks (I used small, disposable wooden chopsticks)
decorative hearts or sprinkles

1. Make the cake mixture first. When the above cake is completely cool, crumble it with forks or your fingers in a bowl until it becomes fine crumbs.
2. Pour the lime cheese frosting into the cake crumbs and mix with a spoon. Then continue mixing with your fingers, kneading and mixing until fully incorporated into the cake. Check to see if it will roll into a ball. It should be a malleable, easy-to-handle cake mixture. Cover with plastic wrap and refrigerate until firm. You can leave the mix refrigerated for several days at this point.
3. Prepare a large baking sheet by covering with wax paper or parchment. On a clean surface, roll or pat the compact cake mixture flat to a thickness of 1 inch. Use a large cookie cutter and a smaller cookie cutter alternately to cut round shapes in the cake mix. This ensures that you have equal numbers of large and small discs. Place discs on the lined baking tray and place in the refrigerator while you melt your white chocolate coating.
4. Melt white chocolate in a double boiler. If you want to make the coating a little more runny for even, smoother coating, add a tablespoon of Crisco to the pot and let it melt. Stir well.
5. Take a small disc and dab one side with melted white chocolate. Immediately press gently on top of a larger disc - you've now got your two-tier 'birthday cake'! Leave to set for a few minutes.
6. Take a pop stick and dip one end in the white chocolate about 1-inch deep. Poke this end into the base of the larger disc. Refrigerate for 15 minutes. Once the chocolate 'glue' has set, you can dip the cake pop into the chocolate until fully covered. Anchor the cake pops by poking the sticks upright into thick styrofoam blocks or sturdy boxes with makeshift holes.
7. Decorate each cake pop by placing a red candy heart on top. Don't refrigerate these as it will cause the coating to weep or melt. They can however be frozen, undecorated.


Wednesday, October 6, 2010

Satay Pizza Bites


Just to let you know that I'm no longer a contestant in Project Food Blog because of a technical glitch, ie. I had actually forgotten to submit my 3rd challenge post to the contest organizers. LOL. Somehow that hadn't made it  on to my extensive To Do list! Honestly, with 1001 things to remember for my last Open House party, this was the one thing I had to do that slipped my mind. Yes, I learnt severely from it, but decided to take the whole snafu with good grace and humor (I mean, it was a great party!). I've taken off my contestant widget from the right side-bar in case any of you are still wanting to vote for me. *grins*

However, I did promise you some more recipes from that party. These satay pizzas were made with two reasons in mind:
1. There would be a number of kids at the party, and I wanted to entice them with food they would love to eat. Homemade pizzas seemed a much better option than many of our traditional greasy foods normally served during the festivity.
2. I still wanted the pizzas to carry the festive note and so decided to replace the traditional tomato sauce with satay (savory peanut) sauce, but kept the Mozarella topping for that Italian feel.


I'd written a previous post about satay sauce here. For this pizza, I'd kept the sauce very minimally spicy so the kids could hardly taste the heat of chillies in it (oh, but they were there!). I also made the pizzas in a square baking tray for ease of portioning it later into bite-sized pieces.


This will be sent to Yeastspotting because I haven't contributed in a while! Please do go and check out the other fabulous 'yeasty' submissions to the Wild Yeast blog this week.

Here is a simple pizza dough recipe you could use, or else, a store-bought dough would also work fine.

Satay Pizza Bites
Ingredients:
Dough
2 cups of all-purpose flour
1 1/2 teaspoon dried instant yeast
1/2 teaspoon salt
1 tablespoons sugar
1 tablespoon olive oil
lukewarm water, enough to form dough

Topping:
satay sauce
200g minced chicken (or other meat or vegetables)
3 tablespoons olive oil
3 cloves garlic, chopped finely
1 onion, chopped finely
salt and pepper, to taste
Mozarella cheese, grated

Method:
1. Place flour, yeast, salt, sugar and olive oil in a mixing bowl and using a dough hook start to mix on slow speed.
2. Gradually add the warm water, all the while mixing until a dough forms. Add more flour if necessary to adjust the dough texture. It should be smooth and not sticky.
3. Leave dough in a well-oiled bowl to rise to double its size for 1 hour. Cover bowl with a clean, damp cloth and leave in a warm spot.
4. Punch the dough to let the air out, then press into a rectangular or square baking tray. Leave to rise for the second time for about an hour. 
5. In the meantime, prepare the satay sauce to use as a topping. Click here for recipe.
6. Saute the garlic and onion in hot olive oil, and add the minced chicken. Stir for about 10-15 minutes until the chicken is thoroughly cooked and the juices have dried up. Season with salt and pepper. Set aside for assembly.
7. To assemble: take the risen dough and spread the cooled satay sauce on top of it. Sprinkle the cooked minced chicken on the sauce layer and lastly, sprinkle the Mozarella to cover the dough.
8. Cook in a preheated oven at 250C for 20-25 minutes. Take it out of the oven and leave to cool slightly before slicing into bite-sized pieces. 

Thanks for coming by. Now, I'm going to sit back and enjoy my lovely morning glories..;-)

Friday, September 24, 2010

Poetry Thursday #4 and Spicy Thai Red-Brown Rice with Grilled Eggplant and Apples

Poetry Thursday #4:
It grew in the black mud.
It grew under the tiger's orange paws.
Its stems thinner than candles, and as straight.
Its leaves like the feathers of egrets, but green.
The grains cresting, wanting to burst.
Oh, blood of the tiger.

I don't want you just to sit down at the table.
I don't want you just to eat, and be content.
I want you to walk out into the fields
where the water is shining, and the rice has risen.
I want you to stand there, far from the white tablecloth.
I want you to fill your hands with the mud, like a blessing.

Rice by Mary Oliver


It's time for Poetry Thursday again, except it's already Friday. Okay, so I had missed my deadline for posting this, but I didn't want to miss the opportunity of sharing this poem and recipe with you. Better late than never, as they say!

Mary Oliver's poem sums up my feelings about rice, what a blessing it is to be able to have it. Whenever I eat rice, it's normally the white or polished variety, because that's what I was brought up on and for a long time, that was the only kind of rice I thought existed. Well, that was all before I went off to study and live abroad. Then on, I discovered there are actually a mind-boggling variety and categories of rice such as wholegrain, black, brown, red, long/medium/short-grained and fragrant, with names such as Wehani, Forbidden, Basmati, Jasmine, even Risotto Rice. Rice is not just a cereal, it seems; it's also the powerful seed of civilization.

Monday, August 2, 2010

Battle Strategy: Cucumber-Mascarpone, Lemongrass Chicken and Potato-Capsicum Tower with Black Pepper-Lime Dressing

Vote for ME!

As soon as I found out last week that I was to compete in the next Foodie Fights battle, I went searching for my dusty Battle Cap, already long ago discarded to a distant corner of my memory. Preparing to go into battle, I was reminded of the heart of the message contained in Sun Tzu’s Art of War – “To thine own self be true”. Hell, I even own a ring bought from The Barber’s Daughter that depicts this phrase, so convinced was I that Shakespeare had penned this line just for me! Whatever. I shall be true to myself and push the envelope for this battle.

After having a rather restless night, I started strategizing about what dish I was going to push forward to the frontline. The two ingredients that are a must: Cucumber and Black Pepper. Cool and hot. The two extremes, so far so good.


Whipped out my notebook and began brainstorming up something I’ve never made before (and hopefully, have never been made by anybody else, although I would never really know. Even Google has its limitations!). This process is called “Learning how to make a meal without looking at a cookbook". LOL. 

After working the chemistry out in my head, I’d decided on a SmörgĂ„sbord of flavors packaged into a deliciously comforting appetizer called (brace yourself!) : Cucumber-Mascarpone, Lemongrass Chicken and Potato-Capsicum Tower with Black Pepper-Lime Dressing. A mouthful certainly, but I really wanted to showcase the main ingredients in it!


  The star players.

Cucumber-Mascarpone, Lemongrass Chicken and Potato-Capsicum Tower with Black Pepper-Lime Dressing
Makes: 16 “Towers”

Ingredients:
Cucumber-Mascarpone Layer
1 cucumber
1 teaspoon salt
125g Mascarpone cheese
1 egg-white

Lemongrass-Chicken Layer
3 pieces boneless chicken breasts, sliced
2 sticks lemongrass, sliced
1 carrot, peeled and grated
3 cloves garlic, sliced
2 shallots, sliced
1 egg
1 tablespoon olive oil
salt and pepper

Potato-Capsicum Layer
1 red pepper
4 medium potatoes
100g butter

Black Pepper-Lime Dressing
4 limes
2 tablespoons peppercorns, cracked
5 tablespoons olive oil
½ teaspoon salt

Method:
This is a relatively easy and tasty appetizer to make and truthfully, it really helps if you’re organized and seasoned at the biz of multitasking. I say this not to put you off but the preparation process for the three layers are staggered and everything only comes together at the end for the baking part. This is the order of the baking process: Lemongrass chicken first, Potato layer second, then all three layers together. Hope you’re still with me! *grins*

First things first - preheat the oven to 200°C, then prepare the layers as follows:

Lemongrass-Chicken Layer
1. Place the chicken meat, carrots, lemongrass, garlic, shallots, egg and olive oil in a food processor and mix until it becomes a paste. Season with salt and pepper and process further. (Note: For the lemongrass, slice thinly towards the root end and discard the green leafy end).
2. Press a tablespoonful of the mixture into the bottom of a muffin cup and push down lightly to flatten. Cook the chicken patties in the preheated oven for 15 minutes.
3. Turn the patties out of the muffin tray, set aside and go cook the potato layer.


Lemongrass-Chicken patties, good enough to eat on their own. That lemongrass flavor is so seductive, the chicken has no choice but to feel (and taste) sexy around it!

Capsicum-Potato Layer
1. Roast the capsicum under a hot grill/broiler until the skin chars and splits. Let it cool slightly, then peel off skin and dice the capsicum.
2. Peel the potatoes, cut into chunks and boil until cooked. Drain the water and place the potatoes in a bowl.
3. Add the butter and diced capsicum to the potatoes and blend everything together with a potato-masher. There will still be chunky bits of capsicum in there, and that’s ok, it’s part of the masterplan.*winks*
4. Press a tablespoonful of the potato-capsicum layer into the bottom of a muffin cup and bake for 10 minutes.
5. Remove from the oven, place a chicken patty on top of the potato layer and set aside while you prepare the last stage which is the cucumber layer.

The act of mashing was good, cheap therapy. I thought of all the people who'd ever been rude to me and oh, how wonderful it would be to just squish them like so!

Cucumber-Mascarpone Layer
1. Peel the cucumber and slice into thin strips along its length, discard seedy core. My favourite way to produce these thin strips is to use a potato peeler. Add salt to the cucumber and leave in a bowl for 15 minutes to draw the moisture out. Squeeze cucumber, drain the water and set aside. (Do this part while the potatoes are boiling and the chicken patties are in the oven – Multitasking, see?).
2. Just before baking, beat the Mascarpone lightly to soften it. In another bowl, whisk the egg-white into stiff peaks and fold gently into the Mascarpone.
3. Take the muffin tray with the potato and chicken patty layer already in it and place a few strips of cucumber on top of the patty. Spoon the Mascarpone mixture on top of the cucumber julienne and bake for 20 minutes until golden brown and puffy. Leave in the tray to cool for 10 minutes before turning out carefully. Serve with black pepper-lime dressing to bring out the different flavours.


Black Pepper-Lime Dressing
1. Squeeze lime juice into a small bowl. Add olive oil and salt.
2. Crack black peppercorns in a grinder or using a pestle and mortar. Add this to the lime dressing and drizzle over the cooked "tower" just before serving.

Cracked black peppercorns in a tangy lime-olive oil dressing. Sizzle, Crackle and Zinggggg!

Oh, you're still here? Thought I'd lost you at the first layer! Anyway, you can serve and enjoy the dish like this but if you're a masochist like me, then you'll go on and make the phyllo "wings" to embrace this dish. It's easy, just take a sheet of phyllo pastry and rub olive oil on both sides. Cut into 1-inch wide strips and drape into the muffin cups (below). Bake at 200°C for about a minute, keep an eye as it burns fast!

Carefully insert a tower in between the wing, garnish with some more cucumber strips and finally drizzle some dressing on top.


PS. Hope you enjoyed the post, and apologies if it was starting to read like an epic. I wanted you to feel the pain. LOL! Don't forget to go to Foodie Fights and vote for me... Heart ya!
Related Posts with Thumbnails