Foodiva's Kitchen: garlic
Showing posts with label garlic. Show all posts

Tuesday, December 6, 2011

Crispy Spiral Garlicky Mustard and Rosemary Murukku

It's unrealistic to live your life within such strict parameters.
~ David Sedaris

It's safe to say that this blog leans towards the sweet more than savory side of things. However, despite still baking desserts and sweet breads regularly in my kitchen, I have produced nothing that I truly wanted to post up here. Uninspired baking, I call these wasted sessions. So imagine my surprise when an exciting recipe idea suddenly popped up in my head that was not sweet (and therefore not my forte) but the exact opposite - savory.


I had been wanting to try my hand at making the spicy Indian snack, Murukku, for a while but the thought had been withheld by my lack of a press or a sev maker used to churn out perfect murukku spirals. That is, until I stumbled across a YouTube video showing that it can all in fact be done...solely by hand! Of course, my first attempts at twisting the pliable rice flour dough are not very pretty but at least there is some semblance to the murukkus made by the pros in Indian kitchens across the globe! 


Now, flavor-wise was where I had purposely decided to make it un-Indian. My tastebuds had experienced a sensorial shift recently when a friend gifted me with a substantial packet of crispy, floury tidbits from her travels abroad. The snack was so addictive that I really wanted to recreate it once I ran out of the stuff (which didn't take very long - less than two days). I  tried to dissect the flavor profile and deduced that the snack must've contained a healthy dose of mustard and garlic because no one in the house wanted me to smother them with my enthusiastic kisses even long after the packet had run empty...


So, when the murukku-without-a-press video came along, I immediately knew I wanted to incorporate mustard and garlic in the soft dough and dispense with the traditional Indian spices. I also wanted to utilize my latest fresh herb, rosemary - sown by my mama, of course, and passed over to me so it doesn't wilt and die off at the seedling stage. (To all of you with green fingers, I envy your gift!)

My thriving rosemary plant, photo taken from Instagram (@divababu)

Along this process, there were several other things I discovered:
  • my handling and twisting of the dough was genuinely as pathetic as it looked in the video. That's okay though, I'm not into beating myself up over nothing and will probably get better with practice.
  • when I got tired of the twisting and turning, I made simple snake-like spirals but these unfortunately didn't remain crisp for very long after cooling. Perhaps the dough was still too moist inside, I must investigate this further.
  • this spiral snack does double-duty as the perfect fashion accessory. The fact that you can munch on them in between photoshoots make them extra-covetable. Yep, there will never be any skinny girls on my set!

These are best consumed right after they've cooled down and are still crisp. The flavors meld really well together that the exact combo could be adapted to other cracker recipes as well. The murukku tasted incredibly cheesy, a pleasant surprise, while texture-wise they are very similar to thin breadsticks. Once I figure out how to make them stay crisp when stored in an airtight package or container, I'll be packing them to be presented as gifts over the festive season!

Crispy Spiral Garlicky Mustard and Rosemary Murukku
Makes: 16 spirals (2-inch)

Ingredients:
3/4 cup sour cream
1 tsp finely chopped Rosemary leaves
2 garlic cloves, minced
1 teaspoon mustard powder
1 teaspoon brown sugar
1 tsp salt
3/4 cup rice flour
2 tablespoons all-purpose flour
ground pepper, to taste
2-3 tablespoons extra rice flour, to add if dough is too sticky
oil, for deep frying

Method:

1. In a medium mixing bowl, add all ingredients except the extra rice flour and oil and mix well with a spatula.
2. Knead to form a soft dough using your hands. If dough is still too moist and sticky, add rice flour a tablespoon at a time and knead in.
3. Place a plastic bottle cap on a napkin or serviette. The napkin prevents the dough from sticking to the working surface. Form small balls with the dough and twist out each one into a spiral rope around the bottle cap (please refer to the video above).
Note: The thinner the ropes, the crispier will be the murukku.
4. Heat oil on medium high heat in a pan. Carefully lift the napkin to turn the spirals onto your palm and gently lower into the hot oil. Do this slowly or you will be sad if any of the hot oil lands on your skin :).
5. Fry as many spirals as will fit into the pan without overlapping each other. Once they turn light golden, flip them over and fry other side until light golden. (about 3 minutes each side)
6. Remove spirals from oil onto a paper-towel lined plate. Cool completely before eating. Store in an airtight container or ziploc bag at room temperature. Good for consumption up to a week.

Tuesday, May 31, 2011

Pull-Apart Tomato Bread with Feta, Garlic and Herb Filling


Our Brunei Armed Forces turns 50 years old today. It is older than our independent country, which is only 27. Yes, we are a young country... I was born when we were not yet completely autonomous and free. To celebrate the military's Golden Anniversary as well as honor the selfless men and women who have served to protect and maintain peace for this country, I'm going to bake something special today.

Pull-apart bread...I've been seeing a lot of them around lately - being written about, baked and I presume, eaten. What's going on? Is there a secret that bakers are revelling in which I'm totally clueless about? Those breads that I've seen via my computer screen sure do look good. My blogger friends, Nancy (Spicie Foodie), Gina (SPCookieQueen) and Lora (Cake Duchess) have all recently made their own versions of pull-apart bread. And then there were also several others' take on it that I dare to imagine this style of bread becoming the newest rage in baking. Step aside, macaron. Go on..scoot over, cake-pop. Your time is up. Pull-apart bread's here and it's going to rip our world! Pun intended, of course.

Monday, May 2, 2011

The Cloth-Maker and Talam Ebi (Spicy Shrimp Rice Cake)


I've always been attracted to strong women. There I've said it - not with the intention, of course, of implying anything misleading about my sexual orientation, but with the intention of letting you know a little bit more about myself. Strong women, they always have a way of finding me. Which is something I find slightly odd, but I get to pick which ones should stay and inspire me, and which ones should go and continue to shape their lives with testicles in their brains. 

Over the course of my three careers, I've met a number of influential women... powerful beings in heels, they were. Most of them were intelligent, some were extremely beautiful (and knew it, used it) while many were too full of themselves to feel compassion beyond their well-powdered noses. Very few managed to serve as my source of inspiration. However, there have been one or two. 

When I was in my early 20s, I met one such woman. I was on a plane heading to Japan for work and just as I was starting to feel pleased at having a full row to myself, this lady walked out of the first class cabin and asked if she could sit next to me. There goes my extra leg-space, I thought. She explained that some young children were making a ruckus in her cabin and since she had a bit of a headache, she wanted to be someplace quieter - ironically that happened to be where I was, where the commoners sat. Anyway, she seemed nice and we quickly fell into a conversation. It turned out that she was a batik textile-designer, or in her words, cloth-maker from Indonesia on her way to Japan to exhibit some of her designs. We exchanged cards with the promise that next time we were in each other's countries, we would look the other one up. That woman's name was Josephine or Obin Komara (featured below in a recent Julius Baer advert) .


The following year, I found myself in Jakarta, also (sigh) for work. We arranged to meet and when I arrived at her boutique in my very unclassy jeans and black t-shirt, I was attended to by her snooty assistants who most likely thought I had come to ask for a job..LOL. Well, they certainly couldn't do enough for me once Bin came out and gave me the warmest hug! As I flipped though and wrapped myself with her luxurious silk batiks, I found out that it took at least 3 months to 2 years to weave a piece of cloth (they even breed the silkworms!) and that Bin employed around 2,500 artisan weavers and designers to help in their production. Needless to say, each cloth costs along the same lines as a high-end kimono. No way could I possibly afford them on my then paltry income!
All wrapped up in Bin Komara's signature batiks.

But I learnt a lasting lesson that day when Bin took me out for a stroll and then on to high tea at a prominent hotel. It seemed that everyone we met who knew her were falling over themselves to say hello or serve her in one way or another...and they genuinely looked like they enjoyed doing it. Then I saw what it was, this woman, who was both powerful and influential but best of all, fun to be with, seemed to wear her intelligence and compassion right on her bra straps. She looked people in the eyes and respected them back, no matter who they were. It was there and then that I decided that when the time came to grow up, I wanted to be just like Bin Komara.

Some of the biggest chillies I've ever seen... they were like huge, red fingers.

Bin fled to Singapore when the social and political unrest happened in Indonesia, and we sadly lost touch. I think of her often and subconsciously I may have bettered myself as a person because of her. I know this because people, even strangers, are always very nice to me and I often get the very best service wherever I go, be it a restaurant, an airline, a spa or a corporate organisation! Just ask some of my grouchy friends, they'll tell you it's true :-).

So what has this Ebi Talam recipe got to do with Bin Komara? Well, this is an Indonesian delicacy, for a start and I wanted to pay tribute to Bin's heritage. It's a colorful and tasty appetizer or finger-food and most joyous of all, it's people-friendly (especially towards those making it). Literally translated from the Indonesian language, Ebi means dried shrimp and Talam means tray, the tray here being the rice cake. The rice cake mixture contains coconut milk and aromatic pandan which give it a salty-sweet, creamy vanilla-ish flavor while the rice and tapioca flours turns this into a chewy cake. 


I used my silicone rose molds to form the rice cakes, but of course you can use anything on hand. Cups and muffin tins are also good options.


This rice cake mixture is steamed for 20 minutes and then simply topped with cooked dried shrimps spiced up with some chillies, garlic and spring onions. It's amazing how you find bits of sweetness, heat, fragrance and saltiness in every bite. Just like a strong woman I once knew, this dish proved to be quite an inspiration!


Talam Ebi
Ingredients:
Rice Cakes
Makes: 4 (cup-sized)
100g rice flour
25g tapioca flour
350ml thick coconut milk
1/2 teaspoon salt
1 pandan leaf (optional)

Ebi Topping
50g dried shrimp, soaked and chopped finely
1 stalk spring onion, chopped
1-2 fresh red chillies, deseeded and sliced thinly
3 cloves garlic, chopped finely
1 teaspoon sugar
4 tablespoons olive oil

Method:
Rice Cakes
1. In a bowl, combine rice flour and tapioca flour, add about half of the coconut milk and stir until well combined. Set aside.
2. Place the remaining coconut milk, salt and pandan leaf and bring to the boil. Slowly pour this hot coconut milk mixture into flour mixture above. Stir with a spoon until it resembles a slightly runny pancake batter.
3. Pour the rice cake batter into small molds or cups until full. Place these in a preheated steamer for 20 minutes until thoroughly cooked.
4. Remove the molds from the steamer and leave to cool completely before turning out the rice cakes onto serving plates. Spoon about a tablespoon of ebi topping on each rice cake and serve immediately.

Ebi Topping
1. In a small pan, heat olive oil over medium heat. Stir in red chillies and garlic and saute until fragrant.
2. Add the chopped dried shrimp, stir for 1 minute. Add in spring onion and sugar and cook for another 3 minutes until the dried shrimp is crisp. The topping is now ready for use.

Monday, February 14, 2011

Tropical Valentine: Tuna Cakes with Banana Chutney and Green Curry Dip


Blue waters. Sunny, clear skies. Warm, breezy weather. Check.
Cold, tall thirst-quencher in hand. Check.
Valentine's Day. Check.
Spicy nibbles, condiments and dip. Double-check
Hot, sizzling date. Uncheck.

Okay, so today is Valentine's Day. Not a day that's normally commemorated in our household, but on this blog, nothing's truly normal. You know that saying, "Two's company, three's a crowd"? You'd think that would be an apt phrase for Valentine's when lovebirds (traditionally two people) have a good excuse to cozy up to each other. But not in this realm.

Today, three of us are paying tribute to a day reserved for love (not that everyday isn't) by each trying out a recipe from the Tropical Asian Cookbook compiled by Wendy Hutton. Our tasteful threesome is made up of Trix (Tasty Trix), Penny (Jeroxie.com) and myself, blogging out of three of the most happening spots on this planet (see below). Well, okay.... maybe two.


How did this come about? On the very last day of 2010, I held my first giveaway which was this beautiful cookbook, and the happy winner was Trix. Since we both have a copy of the same book, we thought why not cook something tropical-themed together out of it? And as we are of the "three's company, two's a bore" school-of-thought, we roped Penny in to join us! 


The book is a compilation of recipes from the prestigious Four Seasons Hotels all over Southeast Asia and South Asia. It features dishes from Singapore, Thailand, Malaysia, Indonesia, Vietnam, Maldives and India. My tuna cake with its simple homemade paratha-like pastry and chutney is reminiscent of a South Asian/Indian dish, while its green curry dip is distinctly Thai. I chose this tropical noon nibbles because I admit, it was the visual that first drew me in. The way the chef (and I presume, the food stylist) presented the dish in the book was stunning... my pictures here don't even come close.

Then I got to studying the recipe and went "Oh my gawd!". No, it wasn't too complex to make, it just seemed that the list of ingredients went on and on and on... On the bright side, everything listed there was easily accessible to me (and you too, I imagine). And so quickly running out of excuses, I decided to forge ahead and make this. Let me tell you, regret it I did not, for the flavors of the tuna cakes when combined with the kick-ass spiciness of the green curry and the sweet heat of the banana chutney were out of this world! Imagine a fireworks display taking place in your mouth, it's not the heat you're concentrating on but the beauty of the explosions.

Tuna cake ingredients

I shall not say too much more but leave you to lovingly stare at all the ingredients. My kitchen was turned upside down for an afternoon making these, but the thought of lovingly handfeeding these tuna cakes to some  (mythical, hot) loved one overrode all painful thoughts of cleaning up. In the end, it was my nephew who scoffed about six of these tuna cakes in one sitting. He declared them "really yummy",  so I guess I can officially elect him my Valentine this year.

Banana chutney ingredients, using curry leaves and bananas from my garden.

Green curry dip ingredients.
I somehow forgot to take a shot of the cilantro and mint - the two major green contributors!
Chilies galore!

Trix has made the spinach kofta with eggplant puree, a delight for vegetarians, while Penny made a lovely thirst-quencher, rose flavored lassi with pistachios to wash all the tropical flavors down. For a complete picture of our Valentine's Day meal inspired by the tropics, remember to head over to their blogs and check out their posts too!

Tuna Cakes with Banana Chutney and Green Curry Dip
Makes 8
Ingredients:
Pastry
1 cup flour
Pinch of salt
1/3 cup water
1 tablespoon vegetable oil

Tuna Filling
2/3 cup (100g) firmly packed drained canned tuna
2 tablespoons very finely chopped onion
2 tablespoons very finely chopped cilantro (coriander) leaves
2 tablespoons freshly grated or moistened desiccated coconut
2 teaspoons lime juice
Salt to taste

Banana Chutney
2 teaspoons vegetable oil
1 teaspoons mustard seeds (I used Nigella seeds)
10 curry leaves
2 dried red chilies, soaked in water 5 minutes, roughly chopped
2 medium ripe but firm bananas, roughly mashed
6 tablespoons fresh orange juice
1 teaspoon turmeric powder (optional)
Salt and black pepper to taste

Green Curry Dip
4 teaspoons finely chopped ginger
4 teaspoons finely chopped garlic
1 large green chili, chopped
1 cup coarsely chopped fresh cilantro (coriander) leaves and fine stems
1 cup coarsely chopped fresh mint leaves
2 tablespoons coconut or vegetable oil
1 teaspoon brown mustard seeds
1 teaspoon cumin seeds
1 large onion, chopped
10 curry leaves
1 large tomato, peeled and chopped
2 teaspoons curry powder
3/4 cup coconut milk
1/2 teaspoon salt

Method:
1. Prepare the tuna filling by combining all ingredients in a bowl, mixing well. Set aside.
2. Combine flour, salt and water in a bowl. Knead for 5 minutes to make a pliable dough. Divide into 8 balls, then flatten each with the palm of your hand. Press with the thumbs and fingers to make each ball into a circle about 3 1/4 in (8cm) in diameter. Fill each circle with one-eighth of the tuna, then lift up the sides, pleating and squeezing them to the centre to enclose the filling. Flatten gently into a cake about 2-in (5cm) in diameter , then heat 1 tablespoon oil on a large skillet and sear the tuna cakes until golden brown, about 1 ½ minutes on each side. Transfer tuna cakes to a baking tray and bake in an oven at 350F (180C) for 8 minutes.
3. To prepare the banana chutney, heat oil in a small pan and add mustard seeds, curry leaves, and dried chilies. Stir-fry until the seeds crackle, then add the banana and mix well with a wooden spoon, cooking for 1 minute. Stir in the orange juice and turmeric, and season with salt and pepper, then transfer to a bowl. Cool, then chill in the refrigerator.
4. For the green curry dip, process Ginger, garlic, chili, cilantro and mint leaves together to make a smooth paste. Heat the oil in a pan and add mustard and cumin seeds. Stir-fry over medium heat until they crackle, then add onion and curry leaves. Stir-fry until the onion softens, 3-4 minutes, then add tomato and cook 5 minutes.
5. Add the blended paste and cook, stirring frequently, 4-5 minutes. Pour in coconut milk, add salt and bring slowly to a boil, stirring. Simmer uncovered until the sauce thickens, about 8 minutes. Taste and add more salt if desired.
6. Serve the tuna cakes with banana chutney and green curry dip.

Tuesday, November 2, 2010

Savory Onion, Garlic and Purple Sweet Potato Pie


I can't even remember how long ago it was that I had learnt to make this pie. All I remember was that the first time I made it, it actually tasted better than it looked and much, much better than I had thought it would. Somehow at the time, I had been more of a pie person than a cake person - as far as baking them was concerned. There could be several reasons for my pie-affinity: pies don't sink, they always look warm and inviting on a table, they are easy to make and hard to get very wrong that they're rendered inedible. Pies and I, we have a good history together and we are that (links index fingers) tight.


 Fresh lemon basil and oregano from my garden

Of course, years ago, purple sweet potatoes were not part of this recipe. However today, I am still very much enamored by these purple beauties, and so have decided that they will add an extra, sweetish dimension to this savory pie. Unfortunately, I only had about half the amount of purple sweet potatoes required left in my kitchen, but if this pie were to be redone another day, I would definitely add more potatoes.

The best bits about this pie are the oregano-flavored crust and a hint of lemon basil in the sweet-savory filling. If you're wondering about this herbal combination, well, oregano and basil are the only herbs currently thriving in my garden and are therefore the most obvious choices. Previously, I'd always used dried oregano to flavor the crust, but using fresh leaves this time around gave the pie that extra kick.

Butter, black pepper, flour and salt for the crust
 Oregano strips kneaded into the pastry
My masseuse taught me that if you soak your onions and garlic in water for about 30 mins,
the skins slip off effortlessly. Funny the sort of things you can learn on the massage table!

Quite purposely, I left the garlic cloves whole and they cooked beautifully and became so tender in the pie. Bite into a slice of this creamy pie and you can immediately savor how the softened garlic and onions lend their very subtle but distinct flavors. Of course, the Purple Queen of Carbs (but good carbs!) adds beauty and interest to an otherwise just rustic-looking dish. The beauty of this pie is that it also keeps well for up to 3 days in the refrigerator, so you can have a slice for breakfast, bring it into the office for lunch or pack it up for a picnic in the park. Want your guests/family/friends to come back for seconds? Go on and make this versatile pie!


Savory Onion, Garlic and Purple Sweet Potato Pie
Ingredients:
Pastry Base:
250g plain flour
125g cold butter, cubed
1/4 teaspoon salt
1/4 teaspoon ground black pepper
1 egg
4 fresh oregano leaves, julienned

Filling:
2 large onions, sliced
10 cloves garlic, leave whole
10 basil leaves
3 tablespoons olive oil
200g purple sweet potatoes, sliced and steamed
250ml heavy cream
4 eggs
salt and pepper, to taste

Method:
1. Preheat oven to 200C.
2. Make pastry crust first: Put flour, salt, pepper and butter into a large bowl. Rub cold butter into flour until it resembles breadcrumbs, then add the sliced oregano. Crack the egg into a well made in the flour mixture and knead with your hands for about 2 minutes until it forms a smooth dough. Add a bit of flour if necessary, the pastry should still be pliable but not sticky.
3. Roll  the pastry out to line greased a 9-inch pie tin (I found it easier to press the pastry in using my palm and finers). Trim the edges of the crust by pressing down on the sides of the tin and breaking off the dough.
4. Prick the base of the crust with a fork, line with baking paper or aluminium foil and bake for 10 minutes.
5. Reduce temperature to 180C, take pie tin out of the oven and remove the paper or foil.
6. For the filling, slice the purple sweet potatoes into round pieces and steam for 30 minutes until cooked through. Set aside to cool.
7. Saute the onions, garlic and basil leaves with olive oil for 5 minutes until the onions are soft and translucent. Leave to cool slightly. Spoon this mixture into the pie crust, making sure the ingredients are fairly evenly distributed. Arrange the sweet potato slices around the pie evenly before pouring over the cream topping.
8. For topping, whisk together heavy cream, eggs, salt and pepper in a bowl until fully combined. Pour this carefully into the crust, making sure the potatoes stay in place.
9. Bake for 25 minutes until the topping is just firm to the touch and a skewer inserted into the centre comes out clean. Serve warm or cold with salad or soup. 

Tuesday, August 10, 2010

Puffed Up Lurrvve Pastry


I just looked back at my last three posts and these are what I made and blogged about:
  1. a purple-colored pie,
  2. black-colored sushi, and 
  3. frozen pink-red colored fruit named after a fiery animal!
Pretty random, don't you think? Ahh yes, colorful too. I very much like to play with color, and the natural colors of food allow me to go crazy with my some of my, ahem, creations. Then there's the taste factor. I have to make sure the flavors go together too, and not just have a visually enticing dish. Otherwise, my nibbles will be like those 3rd and 4th runners-up in beauty pageants... unmemorable and never to be heard of again.

Yesterday, I decided to experiment with puff pastry, not for the first time but probably the first time in many moons, or light years. Long time ago, anyway. I made it from scratch (yeah, I wish!) store-bought frozen puff pastry. For the record, I have NEVER attempted to make puff pastry in my entire life. The thought of rolling, folding, rolling, layering the butter in between the dough sheets over and over and over again scares the apron off of me! I mean, I can't even pronounce the darn dough in French - Pâte feuilletée - my eyes read the words, yes, but my brain and mouth wouldn't compute. My tongue just cannot seem to wrap itself around all those dashes, umlauts and silent "e"s and "l"s. The fact that I never progressed beyond the Beginner's Level at the Alliance Francaise has something to do with this, I suppose. I totally reek in French, sad... because I do love their culture, food, chicness and all that. 

Diva D, my fellow home dweller, on the other hand, HAS made puff pastry in our Red Kitchen! This momentous occasion took place a few weeks ago, and although the puff pastry was not perfect, she was very patient and persistent in her efforts. Below was the result - breakfast Croissants. Completely unglazed, because I'd forgotten to remind her about this step... 


The pastry was light and flaky and was simply fab! I was both proud (that Diva D did it on her own with only a cookbook and YouTube as references) and ashamed (that I still can't get over my puffpastryphobia). How did it get to be this way? 

That was a slight detour from my recipe for this post. Yesterday, I had sent some of these baked puff pastry parcels to the office (not mine, since I no longer work there) and my ex-colleagues dug in and well, really dug them. Only one problem, I had no clue what this dish was called when queried by friends! You see, I'd only just invented the munchies in my head, then in my kitchen, but the recipe itself had not yet been committed to paper.

Postman's Surprise? No, Puffed Up Lurrvve sounds much better!

Since there are so much good flavors and even more love in this pastry parcel, how about we just nick it "Puffed Up Lurrvve?". LOL! The names get crazier each time. Admittedly, the puff pastry was ready-made but if you're interested in making it yourself, here's a recipe by Chef Carla Pelligrino of Rao's in Las Vegas. If the culinary terms detrempe and beurrage don't put you off, maybe the level (Difficult) and prep time (almost 2 hours) will. You get a medal for bravery if you complete this task, just please let me know and yeah, you're completely entitled to rub it in.

Well, I did make the filling....does that count? I used bulgur wheat, and mixed it up with beef rashers, Feta cheese, yellow capsicum, black olives and seasoned it with garlic, shallots and coriander leaves. Delish-shuz! Here's the low-down:

Puffed Up Lurrvve Pastry
Makes: 18 pieces

Ingredients:
2 sheets frozen puff pastry (10"x10")
125g bulgur wheat
600ml water
4 strips beef rashers
100g Feta cheese, crumbled
8-10 canned black olives, pitted and sliced
2 yellow capsicums, roasted, deskinned and diced
3 cloves garlic, diced
2 shallots, diced
4-6 stems coriander leaves, chopped
salt and pepper, to season
1 egg, for glazing

Method:
1. Preheat oven to 200C, and thaw frozen puff pastry for 5-10 minutes before using.
2. Boil the bulgur wheat for 15 minutes until most of the water has been absorbed, then drain. While it is still hot, add the beef rashers, garlic, shallots, coriander, capsicum, olives and mix gently until evenly distributed. When the mixture has cooled, add the Feta cheese and mix further. Season with salt and pepper, set aside.
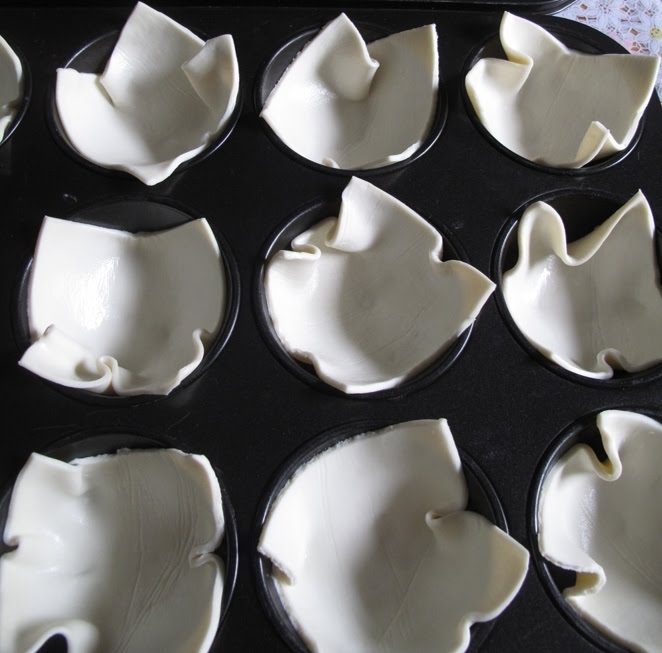
3. Cut each pastry sheet into 9 equally-sized squares while still slightly frozen, then place each small square in a muffin cup (below).


4. Place a heaped tablespoon of filling into each pastry cup, then pull the 4 corners of the pastry towards the middle to "seal" the parcel. Brush top with beaten egg to give it a golden glaze when cooked.


Tuesday, July 20, 2010

Parmesan Crusted Fish with Carrot Flowers


Funnily enough, ever since Ivanka Trump tweeted that this was one of her favourite dishes (not that she actually cooks it, of course. She has people to do that!), I've been wanting to try it out. Maybe my inner psyche was in actual fact wanting to experience what it must be like to be Ivanka, even if it's only through this one dish and even though I have to cook it myself.  Sigh...

Luckily, she had posted the recipe up on her FB profile, so off I went to the kitchen to ahem... be Ivanka's chef, and later on, her. Lol! At least she has a good head on her shoulders and is a great role model for women everywhere.

Parmesan Crusted Fish with Carrot Flowers
Ingredients:
1 large (1 inch thick) cod fillet (or you can use sea bass, halibut, even grouper)
3 cloves garlic
2 shallots
1 tsp grated ginger
1 lime, squeezed
Ground pepper salt

For the crusted topping:
2 tblspn grated Parmesan cheese
2 tblspn butter
2 tblspn plain yoghurt
½ cup breadcrumbs

For the carrot flowers:
1 medium carrot, grated thinly lengthwise
1 egg

Method:

1. Preheat broiler/oven to high.
2. In a small bowl combine parmesan, butter, yoghurt and set aside.
3. Chop the garlic and shallots and mix together with the grated ginger. Set aside.

I love the smell of fresh ginger!
This one's just after being grated, with the fibres standing upright at the top.

4. Season fillet with lime juice, salt and pepper, then place it on a lightly greased broiler pan. Sprinkle garlic, shallots and ginger mix over the top and broil 6 inches from heat for 10 minutes.


5. Remove from oven and spread cheese mixture on top of the fillet - top that with a sprinkling of breadcrumbs.

6. Return to the oven and broil for about 3 minutes, or until the tops are lightly browned and bubbly. The breadcrumbs burn easily so do keep an eye on it.

7. While the fish is cooking, prepare the carrot flowers. Use a potato peeler to thinly slice carrot strips along the length of the carrot.


8. Arrange carrot strips in a microwave egg poacher (below), spoon in the egg white that has been separated from the yolk and season with black pepper. If you don't have this poacher kitchen gadget thing, just use a shallow bowl.

9. Microwave for about 1 minute and it’s done. Take this out and arrange on top of each other to form “carrot flowers” and serve with the crusted fish fillet.


I retired to the dining table and ate this accompanied by some iced jasmine green tea laced with lime and  raspberries. 


Like Ivanka, I'm a very happy girl indeed! (To The Donald - If I can't be your daughter, can I at least be your Apprentice?)
        
Related Posts with Thumbnails