Foodiva's Kitchen: pears
Showing posts with label pears. Show all posts

Friday, November 11, 2011

French Fridays With Dorie - Spiced Squash, Fennel and Apple-Pear Soup

Soup is cuisine's kindest course. It breathes reassurance; it steams consolation; after a weary day it promotes sociability, as the five o'clock cup of tea or the cocktail hour.
~ Louis P. De Gouy, ‘The Soup Book’

I've been really atrocious at catching up on everyone else's blogs this past fortnight or so and therefore am surprised (and majorly touched) that people still do come over and leave comments on mine. To all those kind souls who have visited this site and taken the time to let me know you were here, a very big thank you. And apologies that I have been a rude hostess and not acknowledged your visits until now. When I'm mentally "back in the zone", I'll make an effort to come around to yours and give you a big, massive hug :-). 


Until then, you can take some comfort in this soup I made specially for French Fridays with Dorie - Spiced Squash, Fennel and Apple-Pear Soup. It contained everything listed in the title, plus more...and it this case, 'plus more' meant slight improvisations on the original ingredients. For the squash, Dorie recommended we use the Long Island Cheese Squash but I wasn't quite sure whether we could get that variety over here. So I went down to my mom's farm to pick a Kabocha squash to use in this recipe instead.    


Another ingredient I didn't have was fresh fennel, but I had tons of fennel seeds in my spice cupboard so I simply assumed they were interchangeable? Anyway, for the spices part of the recipe, I ground the fennel and cumin seeds together in a grinder and sieved the resulting powder to eliminate any chunky bits. The ginger, nutmeg and black pepper were freshly grated/ground in order to extract their strongest aroma. 
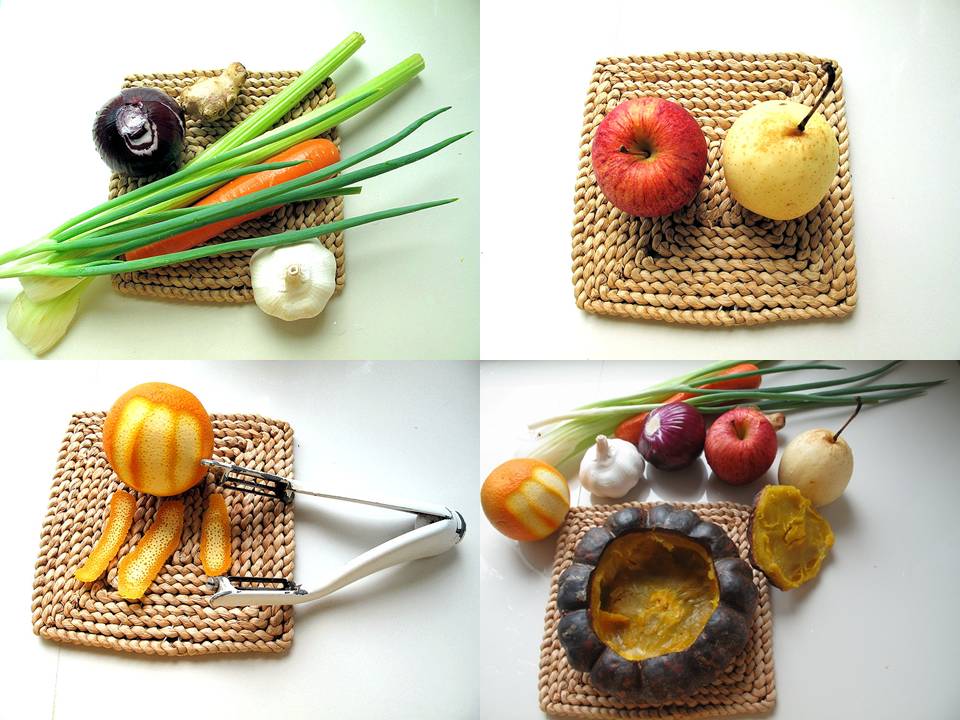

At the time of making this, I didn't have any regular green pears but what I did have was a sole Asian (or Chinese) pear in the fridge that knew it was somehow destined to be part of this soup. A red apple was also tossed in there to keep the pear company, as was a carrot because I had this theory that: 1. it (ie. the carrot) would add a lovely orange hue to the yellowish squash soup and 2. it would make up for the lack of mass due to using fennel seeds instead of the bulb. Of course, the whole theory bombed, as you may already have gathered.

Hearty goodness in 6 easy steps

By the way, ever notice how  I like to list my points down in numerical form just to make things clear (in my head more than anything else)? It's an annoying, slap-worthy habit but I can't always stop myself from running off all these lists in my head...and yes, they invariably come out while I'm typing up my posts ;).

Garnish - the spring onion strips curled up when immersed in iced water


After blending, I found the soup to be the exact texture and consistency I wanted it to be. Not too thick nor too thin, which was absolutely lucky on my part, I suppose. The murky beige color was slightly off-putting though, probably the result of mixing the greens with orange-yellow squash, and not forgetting purple from the big onion!. Nevertheless, when the first spoonful entered my mouth... I found the euphony of flavors to be very pleasant and so comforting that my lips involuntarily turned upright into a big grin :-).

Singapore Airlines must be missing a soup spoon right now.

My online cooking group or Doristas will be rustling up their own variations of this squash soup, so if you would like to hop over here, you can have a look at theirs.

Have a gorgeous weekend!


pumpkin

Monday, June 20, 2011

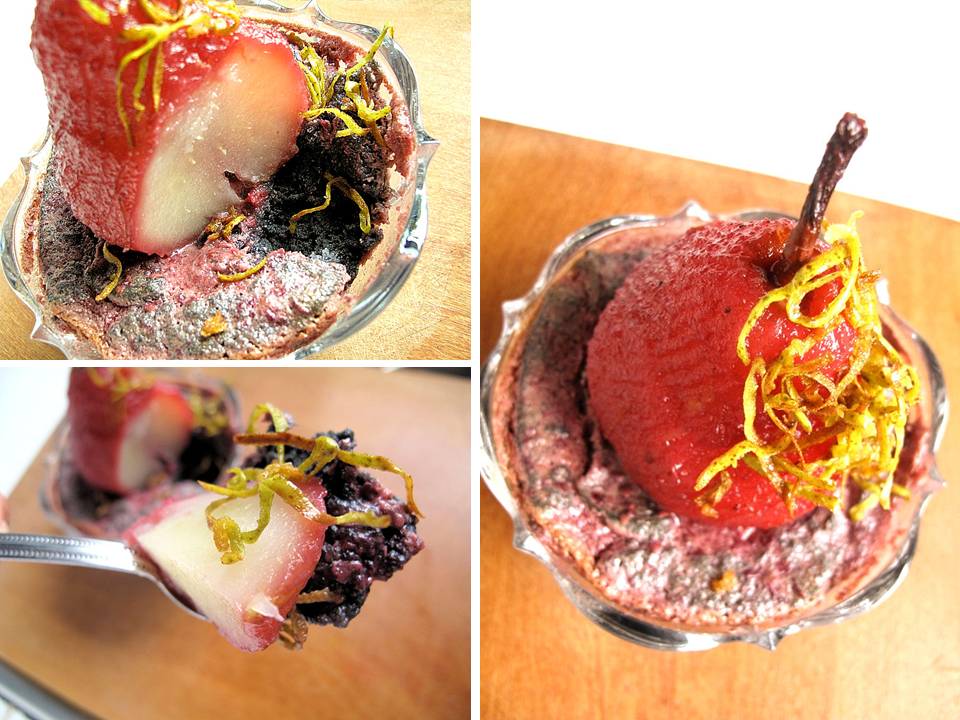
Blackberry Bread Pudding with Bamboo Charcoal Bread and Poached Pear, and Giveaway Winner!

Here's a slightly alien-looking bread pudding I made. Alien not in the way of flavors, but in the type of bread used. It's greyish-black and made with bamboo charcoal powder. The bakeries sell these breads here, they come as sliced loaves, burger or hot dog buns. Bamboo charcoal is supposedly good for health, as it helps clean up toxins in our body. If you can get past the psychological hurdle of eating this healthy version of 200-day-old bread, there really isn't any difference in taste to regular bread. It's just like eating Century Egg...easy once you've prepared yourself mentally, that is :-).

Monday, April 11, 2011

Matcha Cendol and Faux Red Ruby Dessert - A twist on two Asian classics


The great thing about living in Asia, particularly Southeast Asia, is that you can get several versions of the same dish. Usually by the way it's served, you can tell which country it is from. Same, same….but different, as the popular phrase goes.

L-R: Rice flour, mung bean flour and matcha powder

Take cendol, for example. This is a Malay dessert - short, green noodles made from mung (or green) bean flour, served with palm sugar syrup and coconut milk. Pandan (screwpine leaves) are used to flavor the noodles and impart the green color. The Singapore version uses only green bean flour, but the Malaysian version uses rice flour and sometimes tapioca starch as well. Tapioca starch makes the noodles more stretchable, whereas green bean flour gives the cendol a slightly springy texture. The Indonesian version often uses a mix of rice flour and sago flour. The Singaporeans and Malaysians serve their cendol with red beans over crushed ice while in Indonesia, cendol is served with sliced jackfruit. As for us in Brunei, we tend to eat our cendol plain because that’s how we like it. The simpler things we know are often the best, although a heavy dose of coconut milk helps too (bad, bad, bad for the heart…I know!)


For this post, I wanted to do a fun take on two classic Asian desserts: Malay Cendol and Thai Red Ruby or Tub Tim Grob. Tub Tim literally means 'ruby', and Tub Tim Grob means 'crunchy ruby'. Red Ruby is essentially chopped water chestnuts encased in tapioca flour and served with coconut milk. The chestnuts are colored red and when they are cooked, the tapioca coating turns translucent, making them look like shining rubies. The first time I had this dessert, I was only a tiny tot and forgivably mistook the rubies for pomegranate seeds!


I’m always up to playing around with ingredients in my kitchen so for the cendol, I did away with the pandan flavoring and substituted matcha (green tea) powder instead. That gave the resulting cendol an ever so slighty bitter matcha taste but hey, still maintaining the traditional green color. For the Red Ruby, I couldn’t be bothered to mess around with water chestnuts (the dastard peeling….gah! Luckily, I didn’t have any in the house), so I replaced that with a crisp, green pear instead. I liked that the pear retained some crunchiness after being boiled for only a few minutes, and it also gave a soft fragrant to the rubies upon chewing.


Now you and I know that everything tastes a gazillion times better when it’s frozen. With this valuable insight in hand, I decided to freeze the accompanying condiments of coconut milk and palm sugar in pretty ice cube moulds to make them more interesting – plus you can actually see that they are part of the dessert. It’s just a whole lot more fun to eat this slowly in pace with the melting of the ice cubes!

Okay, let me focus on some technicalities here, in order to make those cendol noodles you would need special equipment. The pros use a cendol press, but not everybody has one at home. I will therefore make life easier for you (and me) by recommending that you use one of these makeshift equipment* that works wonders as well:
  • A large holed potato ricer
  • A colander with round holes
  • A metal ladle with holes (I used this)
  • A cookie press using the attachment with many small holes
  • A clean, durable, food grade ziplock plastic bag (To make a hole, snip off a small corner about 2-3mm) 
Did you get the key word? HOLES…the more the better! The last suggestion is probably the best because ziplock bags are available everywhere so now there's no reason for you not to try out this recipe!


Matcha Cendol and Faux Red Ruby Dessert
Serves : 4
Matcha Cendol “Noodles”
½ cup rice flour
½ cup mung/green bean flour
2 tablespoons matcha powder
3 cups water*
3-4 cups soybean milk

1. Before you start, prepare a basin of ice water. You will need to press the cooked flour mixture straight into this mixture to solidify it into cendol.
2. Mix all the above ingredients together and cook on low heat until mixture thickens, stirring constantly to prevent burning.
3. Fill mixture into the equipment* you're using (see post above). Press dough down with a spoon or squeeze, dropping the mixture into the ice water. Work fast as the mixture solidifies quite quickly!
4. When the cendol mixture has all been squeezed into the ice water, keep cendol in the fridge together with the ice water until ready to use. Use a slotted spoon or sieve to scoop cendol out.
5. Reserve soybean milk for the dessert assembly.
* You can substitute the water with pandan juice: Just blend 1 cup loosely packed pandan leaves - washed, snipped with scissors - with 3 cups water and strain to get the pandan juice. If fresh pandan juice is not available, just use 2 teaspoons green pandan paste/essence with 3 cups of water.

Palm sugar ice cubes
150g palm sugar
2 tablespoons caster sugar
500ml water

Place palm sugar, caster sugar and water in a saucepan and boil until sugar has melted. Continue to simmer for 2-3 minutes until syrupy. Let the mixture cool in pan to room temperature, then pour into ice cube trays and place in the freezer until frozen solid.

Coconut Milk Ice Cubes
500ml coconut milk
Pinch of salt

Simply add the salt to the coconut milk and stir until dissolved. Warm mixture in a pan on low heat, if necessary, them cool. Pour mixture into ice cube trays and place in the freezer until frozen solid.

Faux Red Ruby
1 cup chopped pear (pea-sized)
1 cup tapioca flour
5 drops red food coloring (or 1/2 cup beetroot juice)

1. Place pear pieces into a bowl and add red food coloring, mix well and leave to soak for 5 minutes.
2. Next, turn the pear pieces into 'rubies' - Spoon tapioca flour into a ziplock bag and add the pears. Shake well to coat the fruit pieces, leaving them in the bag until required. Remember to shake off excess flour using a sieve before cooking.
3. Bring a large pan of water to a rolling boil and add half the pears at a time. Stir to separate while cooking, it should be ready when the flour coating becomes translucent and the pear pieces float to the surface (2 minutes).
4. Scoop out rubies with a strainer and place into a basin of ice cold water. Drain and add to the final dessert.

Planning and assembling dessert
1. Make the Palm Sugar and Coconut Milk Ice Cubes a day ahead. On the day of serving, make the Matcha Cendol first, then the Red Ruby.
2. To assemble, you would need soy bean milk as a liquid base. Pour about 1/3 to 1/2 cup soy milk into each bowl, add the strained Matcha Chendol and Ruby Reds and dump in the ice cubes (a piece each of coconut milk and palm sugar, or to individual taste). Serve immediately.


Sunday, September 26, 2010

Eggs On a Cloud


International Incident Eggs Party

My second International Incident Party - the theme this month is *Eggs* and the party's co-hosted by Penny of  Jeroxie and and Trix of Tasty Trix. Wonderful, the culinary intepretation of this theme is greater than our outer galaxy (custards, souffles, cheesecake, French toast, creme brulee, bla, bla, etc), so how do I go about this? Thanks Penny, the egg theme has really made me think... hard.

Okay, so this is it. I decided to depict the humble egg in as narrow an intepretation as I could muster - it still looked very much like an egg. Have you ever tried the breakfast dish, Eggs On A Cloud? Not the French version of oeufs à la neige (snow eggs or floating islands on crème anglaise), no, that's way too hard/early for breakfast. Mine is an easy, breakfast eggs-on-toast version and it looks... interesting.  And more than a little pretty. I mean, can you just imagine cutting through a runny, half-baked egg yolk sitting amidst an airy, cloud of egg-white? Mmmmm.... I definitely can.

Eggs on a Cloud with Tomato-Pear Stack topped with Buttered Mashed Potatoes

I started with the bread, and reckoned that since the egg was going to be light, the base has got to be quite sturdy and filling. Multigrain wholemeal bread seemed to fit the bill, so I went ahead and baked a lovely loaf. What can I say? I had time to kill.

I lurrrve my bread fresh!

Tomatoes usually feature in this type of breakfast dish, so I sliced some, coated them in white rice crumbs (gluten-and-everything-free; it's my recent great find!) and toasted them under a grill. There was this pretty Forelle pear sitting forlornly in the fridge and so like a fairy Godmother-wannabe, I decided it should join the Eggs party. Skin on, cored and sliced, I stacked the pear up alternately with the tomatoes and topped it all with some (very runny) mashed potato. Not even an oil drop in sight, and if that's not a healthy breakfast, I don't know what is.

If you're wondering what Eggs on a Cloud tastes like, well, it tastes very much like egg. LOL, well what did you expect? Saying that, texturally the airy egg cloud feels much like cotton candy does in your mouth! That's the best description I can think of. Thanks again to Penny and Trix for being the perfect hosts of this eggstraordinary party. Now go and check out what the other participants did with their eggs (scroll right down to the bottom for the links).


Tomato slices encrusted with white rice crumbs


Tomato-Pear Stack

 
Before and after

Eggs On a Cloud
Serves: 4
Ingredients:
Eggs
4 slices bread
4 large eggs, separated
salt and pepper, to taste

Stack:
4 tomatoes, sliced thickly
2 large pears, cored and sliced across
2 large potatoes, sliced, boiled and drained
2 tablespoons butter

Method:
1. Preheat oven to 180C/350F.
2. Prepare the stack first. Dip the cut sides of the tomatoes in white rice crumbs and toast under a hot grill for about 10 minutes until the crumbs turn golden. Remove from the oven and stack the pears in between the crusted tomatoes.
3. Blend the hot, boiled potatoes with the butter and spoon on top of the stack. If it is still hot, it will be runny. Cool slightly if you want it to stay on top of the stack.
4. Using an electric mixer, beat egg whites in a mixing bowl until fluffy and stiff peaks have formed. Spoon egg whites and shape into pretty "clouds" on each slice of bread, forming a dent in the center. Slide an egg yolk into the center of each egg white well. Sprinkle with salt and pepper to season or if you want, some grated Parmesan or chilli powder for a bit of spiciness!
5. Place bread and egg slices on a baking tray and bake for 10-15 minutes until the egg whites are lightly golden and egg yolks are just set. Remove tray from oven and using a large, sturdy spatula, plate Eggs on a Cloud immediately. Serve warm with the tomato-pear-potato stacks.


Saturday, August 28, 2010

My Way With Pear Pt. 2 - Pear and Cashew Cream Sorbet


Remember this beautiful pear? Well, the fantasy continues. For my second pear recipe installment, I decided to make a lovely, tangy pear-lime sorbet. But wait, I say "sorbet" quite liberally here because after I threw in the roasted cashew nuts into the mix, the texture of this frozen dish turned cream-like. So I'm not quite sure if there's ever such a thing as a creamy sorbet, but  here it is. It's naturally sweetened, and melts lingeringly on the tongue (or, in my case, on the dish, in the bright sunlight).


On their own, the pear and cashew flavors are fairly subtle. This is where the lime came into play, because the tanginess of the citrus somehow enhances the sweet-tartness of the pear and the sweet-creaminess of the cashew nuts. Don't ask me how, it just does.

Pear and Cashew Cream Sorbet
Ingredients:
2 Forelle pears
1-2 large limes, squeezed
2 tablespoons honey
1/2 cup water
1 cup cashew nuts, unsalted and roasted

Method:
1. Peel, core and slice pears, place in the water and honey in a pan and poach for 10-15 minutes until the pears are soft. Leave to cool completely.
2. When cool, pour pears and poaching liquid into a food processor, add the lime juice and cashew nuts and blend until the nuts are finely ground.
3. Freeze in an ice cream maker, or if you don't have one, just freeze the mixture for an hour in a suitable, covered container. When the ice crystals start to form, scrape down the sides and blend again until smooth. Repeat this process two more times over the next 2-3 hours, then leave to freeze for 4 hours or overnight.
4. Serve on its own or with some thinly sliced pears soaked briefly in salted water.

I used small jelly molds to shape the sorbet. It was less messier to serve up and didn't melt as quickly!

Tuesday, August 17, 2010

Tamarind Pasta with Muscovado Chilli Sauce


Hoping that I'd learnt something from my last Foodie Fight (Battle Cucumber and Pepper), I've signed up again for a new battle - Tamarind and Sugar. The possiblities of creating a myriad of dishes with these two adaptable ingredients seem endless, but I decided to go for a savory main course. 

Tamarind has a very distinctive sharp, sour and hmm...salty-ish taste. It therefore goes well with sweet and/or spicy dishes so those are the flavors I would play with. A pasta dish seemed to make the most sense to me, however instead of incorporating the tamarind in just the sauce, I decided to make a tamarind-flavored pasta and then make a sweet-spicy sauce to accompany it. I figured the pasta would only contain a mild taste of tamarind, so I made sure the tarmarind-ness permeated throughout this dish, being in the sauce as well as the poached pears. Subtle but viral.


The sweetness of the sauce, of course, comes from the brown sugar and in this case, I used Muscovado which is dark brown, moist sugar because it would give the sauce a slightly darker appearance and distinct taste (it still contains molasses in it). Two chillies were used to provide the heat, I just wasn't brave enough to throw in more than that!

Now, the pears. They were actually a mistake gone right. You see, originally, I was going to make a dessert and the poached pears were supposed to compliment the sweet pasta sauce. However, my sweet brown sugar sauce had a mind of its own and couldn't, wouldn't turn out exactly the way I'd wanted it, so it was on to Plan B. The pears were already poached though! No sweat, they could still be used to lighten up the heavy, rich texture of the rest of the dish. No wastage here after all, phew.


Using the pasta maker reminded me not to take our dexterity for granted. I really wished I had 4 hands to do all the work! The flecks in the pasta and the sharp, tamarind aroma while boiling was well worth the effort.

Tamarind Pasta with Muscovado Chilli Sauce
Ingredients:
Serves 2 persons

Tamarind Pasta
2/3 cup plain flour
1 tablespoon plain flour, to adjust dough consistency
1 egg
1 tablespoon tamarind paste

Poached Pears
250ml water
¼ cup brown sugar
2 tablespoon tamarind paste
2 small pears, peeled, cored and quartered

Muscovado Chilli Sauce
1 red onion, chopped
3 cloves garlic, chopped
2 red chillies, sliced thinly
2 tablespoons virgin olive oil
1 cup tomato puree
¼ cup rice vinegar
½ cup Muscovado sugar
½ cup tamarind liquid from poaching pears

Method:
Tamarind Pasta
1. Rub the tamarind paste into the flour to remove seeds, then place in a food processor. Add egg and process for 10 seconds until the flour is moist and crumbly. Adjust by adding some more flour to the dough if it is extra sticky and process further. Each time you stop the machine, pinch the dough between your fingers, it should feel firmer each time. After about 30 seconds of processing, the dough should come together and form a loose ball on top of the blade, and feel moist but not sticky when pinched.
2. Sprinkle some flour on a hard wood surface and start to knead the dough. With the heel of one hand, push the ball of dough away from you. Fold it back toward you and rotate the dough a quarter turn. Repeat this process until the dough feels damp without being sticky, then stop kneading (about 1-2 minutes). Shape dough into a ball and cover with a large overturned bowl, let it rest for 30 minutes.
3. Run dough through pasta machine as per the instructions and leave to dry for about 30 minutes before cooking.
Poached Pears
1. Mix the water, brown sugar and tamarind paste in a pan and bring to the boil. Lower the heat and add sliced pears to the hot liquid. Let it simmer for about 20 minutes until the pears become soft. Cover top of liquid with greaseproof paper with a hole on top to prevent the pears from sticking out of the water (which, btw, will oxidize them and turn them a darker color).

Pears poached under the cover of greaseproof paper

2. Drain the water but do not throw it away, as you will need it to make the pasta sauce below. Discard the tamarind seeds and leave the pears to cool before slicing thinly. Set aside for assembly.

Muscovado Chilli Sauce
1. Fry the red onion garlic and chillies in the olive oil until fragrant.
2. Add the tomato puree, rice vinegar and poaching liquid, stir in the Muscovado sugar. Lower the heat and continue to stir mixture until it becomes thick and more sauce-like.

Assembly:
Plate the cooked tamarind pasta in a shallow bowl and pour the sweet-spicy Muscovado sauce around the pasta. Place the sliced pears on and around the pasta, then serve. If you wish, garnish the dish with chopped cilantro and cherry tomatoes.

Ahhhh yes, don't forget to stop and smell the flowers...

Finally, I just wanted to share with you how beautiful the weather was on the day I made this dish. The sky was a brilliant blue and my garden looked so gor-jusss, here's a shot just for you!


If you want to check out my competition and vote for me (and I know you want to ;-)), please click this link to Foodie Fights on Tuesday. Thanks for your love and support!

Related Posts with Thumbnails