Foodiva's Kitchen: July 2010

Saturday, July 31, 2010

Very Berry Blueberry Oreo Muffins


My two finds this week were probably not terribly exciting nor original. However, discovering them at the same time and in an unplanned manner at the store seem to imply that I've been living in a well and haven't ventured out that much. Both are oh dear, processed items - Oreos with a blueberry-icecream filling, and mixed berry tea granules.


Blueberry Oreos & Mixed Berry Tea Granules 

Now I'm not saying that processed foods and the Foodiva's Kitchen do not ever cross each other's universe (oh noooooo... far from it!), it's just that I try to steer more towards fresh stuff that actually look like food, you know. OK, to be fair, I do love good chocolate and that must have gone through some form of treatment, for sure. Oh well, no point in either beating myself up or being self-righteous about this. I admit that when I'd typed out the ingredients for my muffins below, it was glaringly obvious that the only fresh, unprocessed items in there were the two eggs! LOL. Hypocrite.

Very Berry Blueberry Oreo Muffins
Ingredients:
100g butter
200g sugar
2 large eggs
250ml milk
225g plain flour
1 teaspoon baking soda
100g mixed berry fruit tea granules/powder
12 pieces” Blueberry Ice Cream” Oreo biscuits

Method:
1. Preheat the oven to 180°C. Grease a muffin tray with some softened butter.
2. Sift the flour and baking soda in a bowl and set aside.
3. Whisk the butter and sugar in a separate bowl until it becomes light in colour and airy.
4. Add eggs one at a time, then add the milk gradually, alternating with the flour mixture. Fold in the berry fruit tea granules.
5. Scoop a tablespoonful of the mixture and drop them into the bottom of the muffin tray. Place one Oreo biscuit on top of the batter and cover up to ¾ full with batter.
6. Bake for 25 minutes until a skewer inserted into the muffin comes out clean.


Oreos in the middle, then topped with more batter.


Topped with dried figs. Yes, I had a processed berry overload.
I'm so uninspired today - I'm done.

Friday, July 30, 2010

Cucumber-Rambutan Julienne Salad with Baked Lotus Chips


With the weather in the tropics being what it is (blazing!), every day is an occasion to eat a refreshing salad to cool things down. For this particular julienne salad, I didn't have to think very hard - not very. What vegetable is cooler than a cucumber, anyway? No brainer, Cuke's clearly the salad Hero. What's more Zen than a lotus root? Well, Lotsy just became Cuke's reliable sidekick. LOL. Are these ingredients starting to sound like some characters I'm inventing for a comic strip? Well, I don't know how it got there, but no, I'm describing my tropical salad: Cucumber-Rambutan Julienne Salad with Baked Lotus Chips.

Cucumber-Rambutan Julienne Salad with Baked Lotus Chips
Ingredients:
1 cucumber, peel skin and make into julienne strips
4-5 rambutans, peel and remove seed
1 lotus root, peel and slice
2 tablespoons olive oil
2 tablespoons biryani spice powder
3 tablespoons breadcrumbs
1/2 teaspoon peppercorns, cracked
1 lime

Now, the rambutans. The season for these red, hairy fruits has just started over here. Sweet, juicy and thoroughly addictive, rambutans are quite irresistable and during season, many of its fans will develop painfully sore throats. Yep, very heaty, those dang fruits! They look and taste enticing but an overdose of rambutans can potentially make you feverish. By too much, I mean if you ate a whole bunch all by yourself! If this salad was a James Bond movie, then the rambutan must surely be the Miss Moneypenny. Discreet, but you know she's there. Sweet, but yeah, just watch out for your throat!

RAMBUTAN = MONEYPENNY


CUCUMBER = SUPERHERO CUKE

Okay, I admit that the post title may be a bit of an overkill because the only julienne part of this salad is the cucumber (sans skin). Using a potato peeler, I carefully stripped away long, thin strips of translucent cucumber flesh along its length, stopping just short of the seedy core. Added a sprinkling of salt to the cucumber to draw the moisture out, although on hindsight, I could've just left it as it was and the dish would've been equally wonderful. After about 5 minutes, I squeezed and drained the cucumber water. Peeled and pitted a couple of rambutans, tore them into small pieces and added those into the cucumber bowl. Squeezed lime juice and sprinkled freshly cracked peppercorns over the whole thing, and we were ready to rock! Hang on a sec, have I forgotten something??

LOTUS ROOT = LOTSY

Ah yes, the lotus root. It turned out that Lotsy had its own thing going on while I was busy with Cuke and Moneypenny! Cut the root into 1/8" slices and parboiled these for about 4 minutes to soften them up. Drained and dried the slices with a paper towel, before coating them in about 2 tablespoons of olive oil. You can season yours with salt, cajun pepper or other favourite spices. Mine, I sprinkled with some biryani spice powder and with breadcrumbs, for that extra ooomphh, you know. Then placed the 'chips' on an unlined baking tray and baked at 175C for 20 minutes, turning over once after 10 minutes. I loved, loved, loved Lotsy as the crispy, flavourful sidekick to cool Cuke and his Moneypenny.

SUPERCOOL SALAD!

  
To bring out the flavours of cucumber and rambutan, I added a dash of green lime and freshly cracked peppercorns. Nyummm.... I can't even begin to describe how this tasted, and how sublime the textures were...*long dreamy sigh*.

If you do try making this heroic salad and can't get any rambutans (not even canned ones?) where you're at, then sheez, throw in some other fruit!


Thursday, July 29, 2010

Fennel~Anise~Caraway Meringue Tower, anyone?


What a peculiar combination of flavours for a dessert, you might wonder? Well, maybe not really, since I was inspired to make this meringue whilst drinking an equally peculiar but delicious brew called (surprise!) Fennel-Anise-Caraway Herbal Tea. Yes, the mix came packaged in lovely, green 'teabags' which was a bit of a misnomer because there wasn't really any tea in there. Next time though, I'll go out and get handfuls of these seeds so I can blend them to the proportions I want myself.

I really liked the liquorice-ish flavour of these three spices, and they have proven health benefits too, such as easing menstrual cramps, flatulence, indigestion - all those tummy region discomforts. Back to the dessert, the meringues were great on their own but I found them very sweet so I paired them up with some sour cherries to balance the sweetness. Yes, it's all about balance, people. That, and beauty, oh, and pleasure. Always try to feel pleasure when eating a great dessert!

What I love: The blended seeds gave a crunchy, liquorice-like taste to the meringue biscuits. Chic!
What I hate: Making the meringue part. Egg-whites, I think, hate me. They rise to an airy perfection when first beaten, then deflate defiantly as soon as I add sugar into it. As a result, my meringue mixture was a bit on the runny side, however, everything worked out well in the end. There, there's my disclaimer. Somebody out there please teach me the correct technique for next time.

The spices blended with sugar

That's how many teabags I desecrated to get this amount of spices!

~ Love me, love me, saaaayyy that you love me! ~


Have them plain.....

 
....or all dressed up to the nines.

Beautiful, even in devastation!

Fennel~Anise~Caraway Meringue Tower
Ingredients:
• 4 large organic egg whites, at room temperature
• 115g caster sugar
• 115g icing sugar
• 2 tablespoons fennel, anise & caraway seeds
• Whipped cream and sour cherries, to decorate

Method:
1. Preheat the oven to 110°C. Line a baking sheet with non-stick baking paper (meringue can stick on greaseproof paper and foil).
2. Tip the egg whites into a large clean mixing bowl (not plastic). Beat them on medium speed with an electric whisk until the mixture resembles a fluffy cloud and stands up in stiff peaks when the blades are lifted.
3. Turn the speed up and start to add the caster sugar, a teaspoonful at a time. Continue beating for 3-4 seconds between each addition. It's important to add the sugar slowly at this stage as it helps prevent the meringue from weeping later (my bad!). Don't over-beat. When ready, the mixture should be thick and glossy.
4. Grind the spices finely together with the icing sugar, then gently fold in this mixture with a big metal spoon or rubber spatula. Continue to fold in the icing sugar a third at a time. Again, don't over-mix.
5. Scoop up a heaped tablespoonful of the mixture and drop them into rough rounds on the tray. Bake for 1 ½ -1 ¾ hours until the meringues are crisp and are a pale coffee colour. Leave to cool on the trays or a cooling rack. (The meringues will now keep in an airtight tin for up to 2 weeks, or frozen for a month.)
6. Serve three meringues together with a generous dollop of whipped cream and pitted sour cherries sandwiched in between.

Remember, pleasure is not a sin, so enjoy!

Wednesday, July 28, 2010

Crusty Avocado Treasure Balls


I cook exactly the same way I work – literally, by throwing my whole being into the task at hand. Nothing is too difficult or complicated or even impossible if you break it down into small steps. Oh, having a strategy, being well-informed and organised helps too, as does good delegation. Well, perhaps there is one difference in that when cooking, I NEVER delegate. I am the female Gordon Ramsay of my own kitchen, trusting only my own tastebuds, my own heart and no-one else’s. Having other people around when I'm cooking just makes me agitated – never a good thing when one is yielding a sharp knife! *grrrrrrh* *grins*

Anyway, I’ve been meaning to write about this dish for ages but haven’t yet been able to find any decent avocadoes in the market. Either they’re rock-hard or mushy-like - why do people sell these sub-standard produce? - and nothing much can be done with them except play hand-ball (with the hard ones) or make guacamole/facemask (mushy ones). But today, today I found perfect ones for my Treasures recipe! Well, almost perfect because they’re a tad on the small side. Still, good enough to throw my whole being into making this eye-candy of a dish.

Why the impossible title? Well, I had wanted it to be longer to include the description of the filling, but my sensible side stopped me from embarrassing myself (further). Here’s the title reasoning:

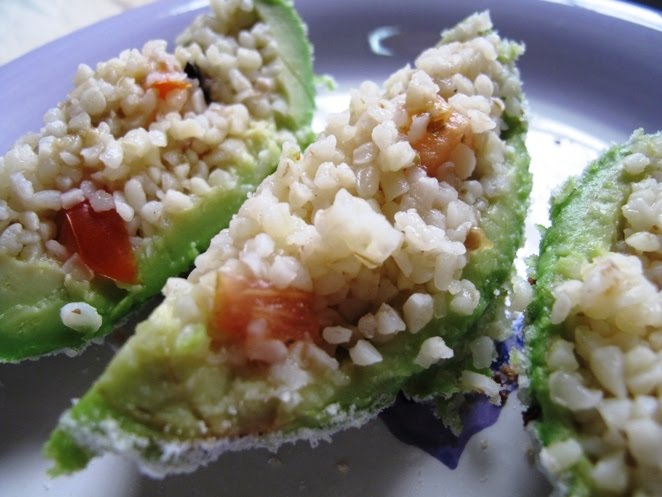
Crusty - The de-skinned avocadoes were coated in white rice crumbs (breadcrumbs will also do).
Avocado – Well, it’s the main player in this show, of course!
Treasure – Describes the filling, made up of tabbouleh – bulgur wheat, tomatoes, olives, shallots, pesto. Fresh coriander and mint would have made it more authentic and brilliant, but I had neither, so there.
Balls – The split avocado was put back together into a ‘ball’ shape before being encrusted.

At centrestage: Avocado, tomato, lemon, white rice crumbs, black olives, bulgur wheat, basil pesto, shallots


              Cooked bulgur wheat

 
 The Bald and the Crustyful.


Okayyyy…. Let’s move on from this nonsense and get on with the recipe.


Crusty Avocado Treasure Balls
Ingredients:
8 small or 4 large avocadoes
White rice crumb or breadcrumbs, enough for coating avocadoes
1 egg, lightly beaten

For the filling:
125g bulgur wheat
600ml water
10 black olives, chopped
1 large tomato, diced
2 shallots, finely diced
1 tablespoon pesto sauce
½ lemon, squeeze for juice

Method:
1. For tabbouleh filling, add bulgur wheat to water and bring to the boil. Let it simmer for 15 minutes until most of the water is absorbed. Drain and set aside.
2. In a large bowl combine chopped olives, tomato, shallots and pesto sauce. Add the cooked bulgur wheat to the bowl and then add lemon juice. Mix tabbouleh gently, season with salt and pepper to taste.
3. Prepare the avocado ‘shells’. Slice each fruit into two and carefully peel the skin by hand, remove seeds. Scoop out a portion of the core of each avocado half, still leaving a thick layer to hold in the filling. Add the scooped-out avocado to the tabbouleh.
4. Spoon the filling into each shell and after that’s done, press the two halves together to form what looks like a ‘whole’ avocado.
5. Carefully dip the avocado in the beaten egg and then roll it in the crumbs.
6. Place avocado in a broiler for about 3-5 minutes to just brown the crumbs. Roll over once and do not let the avocado cook or split! Serve immediately.

Even if you’d stopped at Step No. 4, this dish would still be the “Wow, Homaygad!” talk of the table. Eat it as an appetizer, mains or just to curb that hunger whenever it hits. I have a big smile every time I make this (not very often) because I know the effort, no, the LOVE, is just so worth it!


Just some post Posting notes:

White rice crumbs are my new discovery. They look like dessicated coconut except they have a rather neutral taste. Wonderfully crispy, I didn't even wait till they were properly browned before chowing these down! Can't find these? Just use regular breadcrumbs or even toasted nuts, chopped very finely. If your imagination is as wild and uncontrollable as mine, the possibilities for the coating and the filling are endless! 

Tabbouleh is just the best combination with avocado. Just in case, in case you didn't know, this is a Middle-Eastern salad - more about it on Wiki. Okay, I'll stop insulting your intelligence now.

Tuesday, July 27, 2010

Miniature Apricot Tarts with Coconut-Rose Custard


Many years ago, I had stayed briefly with a French family in Alsace and along the way learnt how to make rustic Alsatian desserts from their gentle grandmother. She spoke no English and I spoke hardly any French, but bless her, she had really wanted to teach me so learnt I did. Those were the days when my cooking/baking repertoire was virtually nil, but I was a keen student and eager to impress. I therefore absorbed her traditional way of baking by carefully observing her firm, beautifully knobbly hands knead through the dough and memorizing by heart every step of the recipes. Of course, she was babbling away while doing all this and I simply nodded in agreement to whatever it was she was telling me. I remember us both laughing at the absurdity of it all, knowing that we didn’t really understand what the other was saying. However, we both understood food, and that in itself created our bond.


Everything in my Alsatian grandmother’s kitchen was done by hand, there wasn’t a single Kitchen Aid in sight. Oh no. Her massive oven… it was a cast-iron AGA, powered by burning logs! Fast forward many years later, I'm still baking her Alsatian Tart recipes, albeit in my electric-powered oven (phew).

Today, I was reminded of that wonderful time and wanted to honor “grandma” by baking a tropical version of her Plum Tart. I substituted just two of the ingredients: the vanilla sugar and double cream, and in place of those, I used rose sugar and coconut cream. For the fruit, I’d earlier spotted some miniature apricots on the supermarket shelves so I grabbed and used those.

As I wasn’t sure if this updated dish would be a hit, I decided to make them as tartlets in muffin trays instead of the standard pie tin. That way, should there be any adverse reactions to the dessert, it's small enough that people can discreetly spit it into their hankies or slip the tartlets into their trouser pockets without me noticing. Well.

As it turned out, the tartlets were scrumptious. The rose sugar offers beautiful flecks of pink and flavour to the tartlet while the coconut cream makes you think of the Bahamas or Bali when you bite into one. If you ever want to come up with a totally fearless dessert, this is the one!


Rose sugar = dried rosebud petals blended with caster sugar

Can't decide which shape looks prettier.

Miniature Apricot Tarts with Coconut-Rose Custard
Ingredients:
Makes: 12 muffin-sized tartlets

Pastry base:
250g plain flour
125g butter
100g rose sugar
1 egg

Custard filling:
2 eggs
25g rose sugar
200ml coconut cream
6 miniature apricots, pitted & halved

Method:
1. Preheat the oven to 200°C.
2. Make the rose sugar first by grinding together dried rose-bud petals with all the sugar you need. For this recipe, I used about 15 rosebuds, minus the green stalks. If you happen to make extra rose sugar, keep it in an airtight container for future recipes or to use in your hot beverage.
3. For the pastry, rub the butter into the flour until it resembles breadcrumbs, then rub in the rose sugar. Make a well in the centre of the bowl and break one egg into it. Knead with your fingers until you get a pliable dough mixture.
4. Roll dough into little balls and press into the base and sides of a muffin or tartlet tray. Prick the base with a fork and bake in the oven for about 5 minutes. If you’re using a standard pie-tin, bake blind for 15 minutes. Remove from oven and reduce heat to 180°C.
5. For the filling, beat the eggs, rose sugar and coconut cream in a bowl until fully combined. Spoon or pour mixture into each tartlet crust up to ¾ full. Place one half of the miniature apricot in the middle of the custard pool and return tray to the oven.
6. Bake at 180°C for 15 minutes until custard is firm. Remove from oven and cool for 5 minutes before turning tartlets out.

Related Posts with Thumbnails