Foodiva's Kitchen: cheese
Showing posts with label cheese. Show all posts

Friday, October 28, 2011

French Fridays With Dorie - Pumpkin Stuffed With Everything Good


Dorie wasn't kidding when she said this recipe was good. It was SO good... I made it twice in one week! Admittedly, I used Kabocha squash instead of pumpkin, and it was only teeny-weeny that I can finish the whole thing in one sitting. In Around My French Table, Dorie had likened this dish to an arts and craft project and it's really up to our own creativity what we want to stuff into the pumpkin (I'll just call it this because 'stuffed squash' just doesn't sound as aesthetic and welcoming, don't you think?).


Well, I made this the very day I picked the pumpkins from my mother's farm...I couldn't wait to stuff them with everything good! Or rather, everything I had in the kitchen that seemed good and tempting and more importantly, got along well together flavor-wise. There was actually a lot more that I wanted to insert in that hollowed out pumpkin, but the hole just wasn't big enough. Darn you, Kabocha....err, I mean, tiny pumpkin!


So these were my stuffing ingredients - very tender sweet corn and long beans (from the same farm), cooked rice, carrots, apple slices, mature cheddar and heavy cream. I decided to forego the meaty bits and it still tasted great, the very sweet pumpkin flesh contrasting rather nicely with the savory filling.


As you can see, I seemed to have overstuffed the small cavity (and I also couldn't fathom how the apples should fit in there) but after 'squashing' (haha...private giggle here) everything down with the pumpkin lid and baking it, the filling sunk way down and actually looked quite presentable. The baked pumpkin smelled utterly wonderful and this dish really did its title justice. I'm tempted to make it a third time this week, but I fear my fellow home-dwellers may consider hiring a new short order cook to replace me instead!


Anyway, I felt so excited about this recipe that I even had my friend Kate make it and she too was in awe of how good it tasted. I'm hoping my fellow Doristas feel the same way! You can check out their stuffed pumpkins (or squashes) here.


pumpkin

Friday, September 9, 2011

French Fridays with Dorie - Creamy, Cheesy, Garlicky Rice with Spinach, Mushrooms and Beetroot

The idea is to write it so that people hear it and it slides through the brain and goes straight to the heart.
~ Maya Angelou

Just a few weeks back, my father met this man. He is 111 years old... I'm not kidding you, there's proof he is "of that certain age". They both attended a group that read scriptures together (a kind of spiritual support group with a therapist called God). These gatherings took place in the evenings and by the time they finished, it was usually close to 11pm. This guy, who's still too young to make it into the Guinness World Records apparently, was always sent to and picked up from the site by his son. But on the few occasions when his son was going to be late, my father offered to send the man home. Listen, if you're 111 years old, you don't want to be hanging around outside on your own near midnight - anywhere. 

Sunday, April 17, 2011

Lemongrass and Lime Birthday Cake Pop for the International Incident Party


This month's International Incident Party is special on two counts. First, we are celebrating our energetic host, Penny-of-Jeroxie.com's birthday. Secondly, the theme is Cake Pop, that cutesy ball-of-cake-on-a-lolly-stick made famous by the enormously talented Angie of Bakerella. My inner child just couldn't wait to get both its (my?...its?) hands dirty!

Though I've admired and frequently ogled at Bakerella's cake pop creations for a while, this was only the second time that I've attempted making them myself. Hmm...maybe the first in the strictest sense of the word as I had only made cake balls before this. Once you start inserting sticks into cake balls, it's a different game altogether and I later found out that it takes considerable skill to keep the compacted cake mix stuck onto the sticks!

My chocolate-coating technique had plenty of room for improvement, for as you'll soon witness, the surface of my cake pops had more lumps and bumps than a teenager's troubled complexion. After this experience, I bow down to Bakerella and talented others for their skills in making smooth, perfect-looking cake pops.

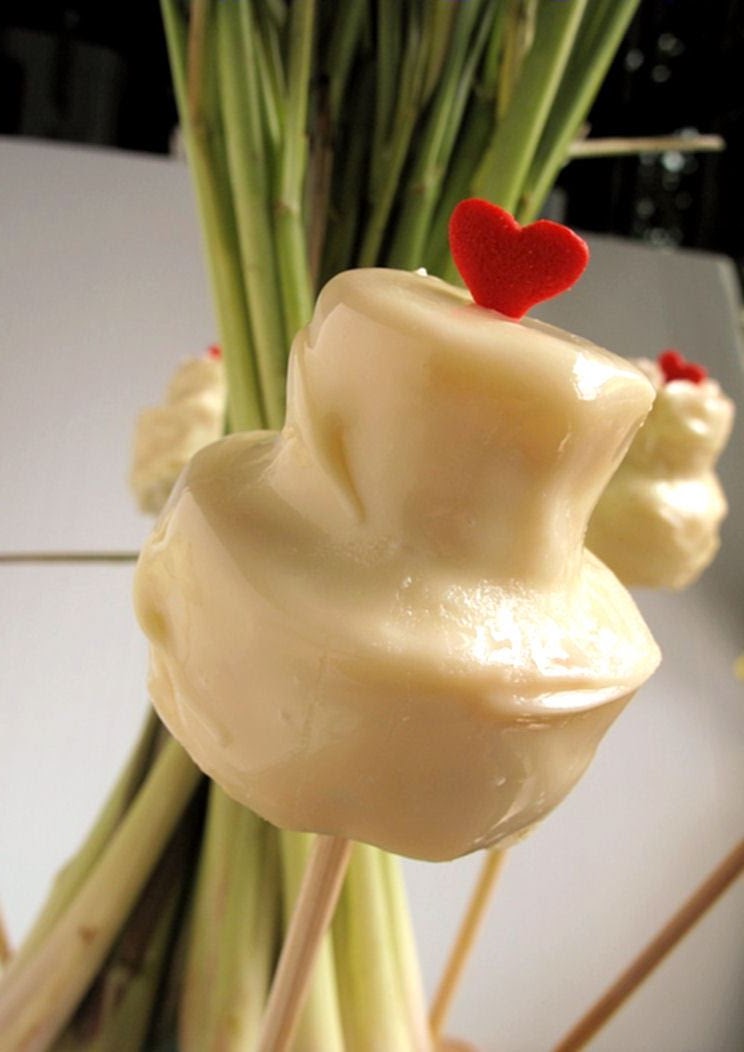
I thought at length about how I wanted to shape my cake pops, and I was rather torn between the traditional (spherical) or funky (other shapes). Eventually, I went with the funky, but something that's not too out-there so as to become unrecognizably cake pop-like. To celebrate your special day, Penny, here are my two-tiered Birthday Cake Pops!


For the cake itself, I opted for an unusual combination of flavors (in desserts, at least) which also proved surprisingly delicious - the kids at home devoured these, that's how I know. Lemongrass and lime cake, crumbled, compacted and later covered in pristine white chocolate and decorated with red sugar hearts and tiny birthday candles. I used both fresh and dried lemongrass as I wasn't too sure if using all fresh would make the cake flavor too intense and overpowering. Both lemongrass and lime have strong, distinct fragrances and flavors - lemongrass having a slightly citrusy-sweet and pungent, earthy aroma, while lime has a sharp and refreshing scent. Taking a bite out of these cake pops will stimulate and keep you wide-eyed with alertness. Never again will you leave your fate in the hands of that doctor fellow who quoted us over the years that eating too much carbs makes you feel sluggish!
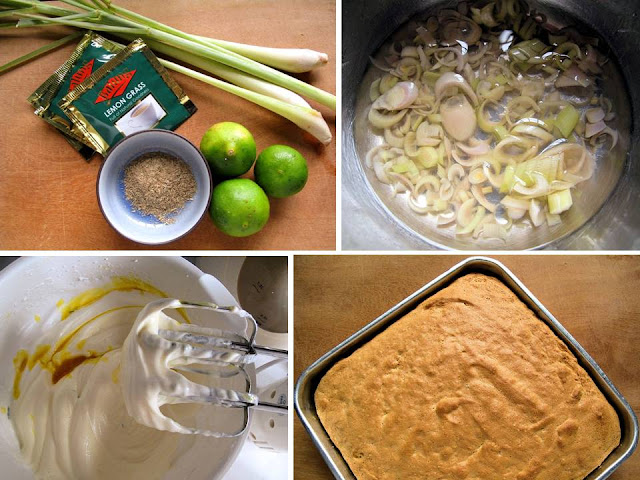

Lemongrass and lime cake


The cake itself was light and airy in texture. I omitted the butter and reduced the sugar to compensate for the fact that I would be mixing in dense, sweet cream cheese frosting to bind the cake mixture together. I also squeezed extra lime juice into the frosting to give it more zing! As these Birthday Cake Pops were a bit larger in size than cake balls, I knew that regular pop sticks weren't sturdy enough to hold them up. So what's a girl to do? I used short, disposable wooden chopsticks instead. They worked out quite well, just look at the size of these momma cake pops!

Some industrial strength pop sticks!
A large-holed colander worked well as a stand for these cake pops


I can't wait to see what my fellow bloggers have brought along by way of Cake Pops, and I'd be honored if you will join me by clicking here or the thumbnails below to check them out. Without further ado, let me light the birthday candles and share the recipe with you...

Happy Birthday, Penny!
"Whadd'ya lookin' at?"
As I had some leftover cake mix, I couldn't help but make my very own Gangsta Chix ball!

Lemongrass and Lime Birthday Cake Pops
Lemongrass and Lime Cake
Ingredients:
3 eggs, separated
1/2 cup caster sugar
1 teaspoon grated lime zest
1 cup self-rising flour
2 teaspoons ground lemongrass*
3 tablespoons hot lemongrass juice**

*For the ground lemongrass, I used dried lemongrass enclosed in teabags (herbal infusion) and ground it finely in a grinder.
**If you can't find ground or dried lemongrass, you can chop 1 tablespoon fresh lemongrass finely and boil for 10 minutes in 1/2 cup water. Allow to steep for 10 minutes, strain, and use the reserved liquid as the hot lemongrass juice for the sponge mix. I used both the dried and fresh lemongrass in the ingredients list above.

Method:
1. Preheat oven to 175ÂșC/350 F. Grease and flour a 9-inch cake pan.
2. Beat the egg whites until stiff peaks form. Gradually add the sugar and continue beating until dissolved. Add the yolks and lime zest and beat just to combine.
3. Sift together flour and lemongrass and gently fold through the egg mixture followed by the lemongrass juice.
4. Spoon mixture into prepared pan and bake for 20-25 minutes or until golden and cake springs back when pressed gently. Leave in pan for 5-10 minutes before turning onto a wire rack to cool.

Lime Cheese Frosting
Ingredients:
250g/8oz cream cheese, softened
2 cups confectioner's sugar
4 tablespoons butter
1 tablespoon lime juice

Method:
In a bowl, whip the cream cheese, butter, powdered sugar and lime juice together until smooth. Use immediately to bind the cake mix.

Making the Birthday Cake Pops
You will need:
250g/8oz white chocolate candy melts
2 tablespoons Crisco or shortening (optional)
Round cookie cutters, 2 sizes (5cm/2in and 2.5cm/1in)
Lollipop or ice cream pop sticks (I used small, disposable wooden chopsticks)
decorative hearts or sprinkles

1. Make the cake mixture first. When the above cake is completely cool, crumble it with forks or your fingers in a bowl until it becomes fine crumbs.
2. Pour the lime cheese frosting into the cake crumbs and mix with a spoon. Then continue mixing with your fingers, kneading and mixing until fully incorporated into the cake. Check to see if it will roll into a ball. It should be a malleable, easy-to-handle cake mixture. Cover with plastic wrap and refrigerate until firm. You can leave the mix refrigerated for several days at this point.
3. Prepare a large baking sheet by covering with wax paper or parchment. On a clean surface, roll or pat the compact cake mixture flat to a thickness of 1 inch. Use a large cookie cutter and a smaller cookie cutter alternately to cut round shapes in the cake mix. This ensures that you have equal numbers of large and small discs. Place discs on the lined baking tray and place in the refrigerator while you melt your white chocolate coating.
4. Melt white chocolate in a double boiler. If you want to make the coating a little more runny for even, smoother coating, add a tablespoon of Crisco to the pot and let it melt. Stir well.
5. Take a small disc and dab one side with melted white chocolate. Immediately press gently on top of a larger disc - you've now got your two-tier 'birthday cake'! Leave to set for a few minutes.
6. Take a pop stick and dip one end in the white chocolate about 1-inch deep. Poke this end into the base of the larger disc. Refrigerate for 15 minutes. Once the chocolate 'glue' has set, you can dip the cake pop into the chocolate until fully covered. Anchor the cake pops by poking the sticks upright into thick styrofoam blocks or sturdy boxes with makeshift holes.
7. Decorate each cake pop by placing a red candy heart on top. Don't refrigerate these as it will cause the coating to weep or melt. They can however be frozen, undecorated.


Thursday, December 23, 2010

Coconut-Cheese Ice Cream with Thyme, Cranberry Sauce and Spiced Walnuts

Growing up in the tropics, cheese really didn't feature much in our everyday diet. We had durians and fermented shrimp paste (belacan), and that was enough odorous foods for one culture to have to endure. It's all very different the kids growing up in this more global world now, of course. 
Coconut milk, on the other hand, does feature a lot in our tropical cuisine, from breakfast snacks, main meals and desserts. Saying that, however, our use of it nowadays is in more measured amounts due to the high oil and sugar content (coconut cream especially).
Like chalk and cheese
I've been toying with the idea of mixing one of the most Eastern ingredient with one of the most Western and finally came up with this Coconut-Cheese ice cream recipe. My tastebuds know for a fact that thyme goes extremely well with cheese so that was thrown in for good measure. On its own, this creamy, distinctively Cheddary ice cream is already worthy of a gasp. But try eating a spoonful of it drizzled with warm, cinnamon-scented cranberry-orange sauce and topped with spicy, gingery walnuts, and you're bound to hear absolute silence as the world around you stops moving! Trust me when I say this, it is that good.


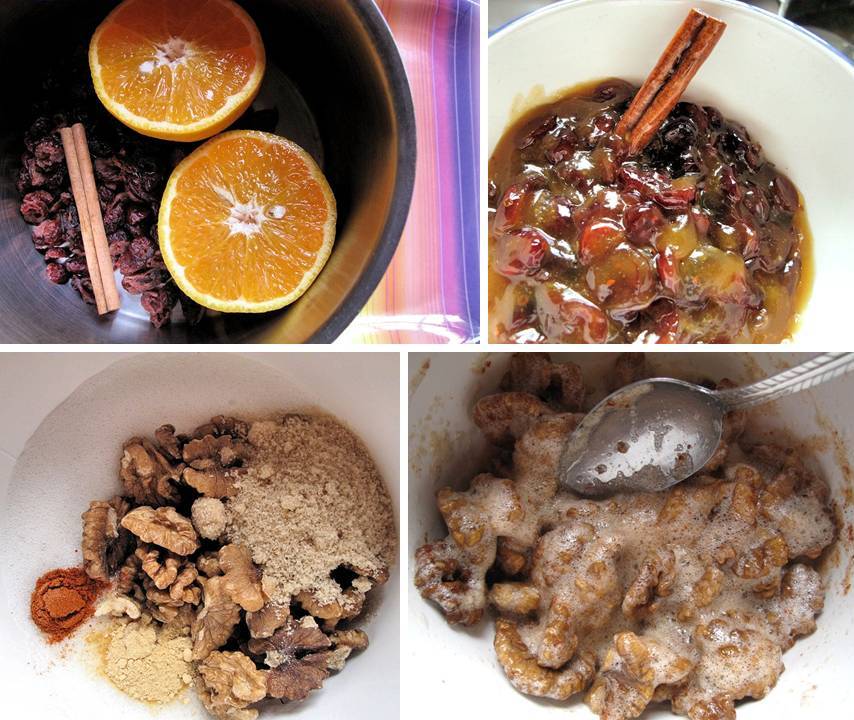
 Top: Cranberry-Orange sauce,  Bottom: Spicy walnuts
 
Out of the oven - spicy, sweet, crisp walnuts with ginger and cayenne pepper
Next time you have guests over for a party, be daring enough to serve this understatedly sexy, elegant and complex dessert all rolled into one. Oh, and remember to print out copies of the recipe as your guests will be asking for it!
If you're making this dessert for any adorable tiny tots, just substitute the coconut milk with regular milk and leave out the salt and spices.


Coconut-Cheese Ice Cream with Thyme, Cranberry Sauce and Spiced Walnuts
Ingredients:
Coconut-Cheese Ice Cream with Thyme
• 1 cup coconut milk
• 1/2 cup heavy cream
• 125g (4oz) cheddar cheese, grated
• 125g (4oz) cream cheese, diced
• 1/2 teaspoon ground thyme
• 3/4 cup honey
• 1/8 teaspoon salt

Cranberry-Orange Sauce
• 1 cup dried cranberries (or 2 cups fresh berries)
• 1/2 cup orange juice
• 1/4 cup brown sugar or honey
• 1 cinnamon stick
• 2 teaspoons vanilla extract
• 1 tablespoon cornstarch
• 1 tablespoon water

Spiced Walnuts
• 1 egg white
• 1 teaspoon water
• 2 cups walnuts
• 1/4 cup brown sugar
• 1/4 teaspoon ground ginger
• 1/4 teaspoon cayenne pepper or chilli powder

Method:
Coconut-Cheese Ice Cream with Thyme
1. In a small heavy bottom sauce pot, bring the coconut milk and heavy cream to a boil.
2. Remove from heat and whisk in the cheddar cheese, cream cheese, honey, thyme and salt.
3. Blend this mixture in a blender until smooth. Transfer to a bowl, then cool completely before freezing mixture in ice-cream maker.
4. Transfer to an airtight container and put in freezer to harden, at least 2 hours. Let ice-cream soften 5 minutes before serving.

Cranberry-Orange Sauce
1. Combine cranberries, orange juice, sugar/honey, vanilla and cinnamon stick in medium saucepan. Bring to boil over high heat, stirring until sugar dissolves; boil for 1 minute.
2. Strain into bowl. Reserve cranberries. Return juices and cinnamon stick to the same pan. Mix 1 tablespoon water and cornstarch in small bowl; stir into juices in pan. Stir over medium heat until juices boil and thicken, about 1 minute. Mix in reserved cranberries. Chill compote 2 hours.

Spiced Walnuts
1. Preheat oven to 120°C/250°F.
2. Whisk together egg white and water in a large bowl until frothy and stir in nuts. Stir together sugar, ground ginger and cayenne pepper/chilli powder and stir into nuts, coating well. Spread nuts on a lightly buttered pan and bake in middle of oven until dry, about 50 minutes. Cool and chop into bite-size chunks.

Assembly
To serve, scoop ice cream into sundae glasses, top with cranberry-orange sauce and chopped spiced walnuts.

Wednesday, October 20, 2010

Russian Chip Cake and Blog Despair Therapy


I think I need to undergo some Blog Despair Therapy. Every day last week, I had looked at this blog, started to type up something, looked at it again and felt.... utter despair. Couldn't write another word, didn't want to, more like it. Oh, there were no lack of recipes because there's something cooking in this house everyday (well, the kids had to eat, even though I could quite happily go on a diet when I'm in that 'urrrgh' state of mind). I just didn't feel like posting anything. Seeing the prolificness and discipline of other bloggers didn't help any. In my heavy heart I thought, am I the only one suffering from this?

Until one day I came across this post by Sara of Caffe Ina, who was also having a bad day (but still managed to write something!). She was suffering from her so-called blog depression and the symptoms she described were exactly what I was feeling! All of a sudden, I didn't feel so bad knowing that someone else (many other bloggers, in fact) would come to this stage at some point. Call it Blogger's Block, that was precisely what I had.

Oh yes, amongst the comments to Sara's post was one by the very talented Cristina of From Buenos Aires To Paris. I feel this deserved mentioning because as amazing a food blogger as Cristina is, she too apparently has her down days when it comes to blogging. Welllllll.... at least I was in good company! Funnily, she also coined the term "Group Blog Despair Therapy" (GBDT) and reckoned somebody should go ahead and start this group. Forget about Food Bloggers Anonymous, the GBDT sounds much better and so support-groupish - and we all need each other to continually feed this fire inside, don't we?


So here I am. Totally undespairing and wanting to share with you one of my all-time favorite recipes - Russian Chip Cake. Ironically, I learnt this recipe not in Russia (where I'd frequently travelled to for work) but in Germany. It's a favorite because it was the first cake I had baked that drew compliments, I mean, genuine ones. It's ridiculously easy, too, adding more points to its already high score on my nepotism scale. And Germany was also the place where I'd learnt to really bake so naturally, many of the desserts I'd put my hand to while there became my favorites. You could say my Baking A-ha Moment! was peppered in Deutsch, as were most of my recipe books from those days. Being back home for good now, my spoken German is not so much rusty as it is extinct - but I swear, I can still decipher those Deutsch culinary instructions to a T.


Presumably, the origin of this dessert is from Russia although Google couldn't come up with anything conclusive on this point (so let's just keep assuming until someone reading this can point out otherwise). Why Chip Cake, though? Well, the same dough for the base is torn by hand or chopped roughly to make flat 'chips' which are then arranged on top of the cream cheese-custard filling. Not only is the overall look of the cake pretty striking, the rich flavors and textural combinations of cocoa, butter and creamy custard make this a sensational winner each time. Give it a try it if you don't believe me.

Russian Chip Cake
Ingredients:
Dough
1 1/2 cups plain flour
1/3 cup cocoa powder
2t baking powder
1/2 cup sugar
1t vanilla extract
125g (1 stick) butter. softened
1 egg

Filling
250g (1 packet) Philadelphia cream cheese
3/4 cup sugar
1t vanilla extract
2 eggs
4T custard powder
125g (1 stick) butter, melted and cooled

Method:
1. Preheat the oven to 170C. Line the base of an 8-inch round baking tin with non-stick baking paper and grease the sides with butter.
2. Make the dough for base and chips first: Sift the flour, cocoa and baking powder into a mixing bowl. Add sugar, vanilla, egg and butter. Use the kneading hook on the food mixer at low speed, and then increase to high speed as the dough firms up.
3. Dust the work surface with flour and knead the dough to a smooth texture.
4. Divide the dough into two portions. Take one and roll the dough to cover the base of the baking tin. Press up the sides and cut off the excess with a knife.
5. For the filling: Blend the softened cheese, sugar, vanilla, eggs, custard powder and melted cooled butter until a smooth mixture is formed. Spoon filling into the tin and level off the surface with a spatula.
6. Tear out 1-inch pieces of the remaining dough, or chop into think chunks with a knife. These are the 'chips' to be arranged carefully on top of the filling until it is almost completely covered.
7. Bake for 60 minutes until a skewer inserted into the centre of the cake comes out clean. Leave to cool completely in the tin before turning out and serving.

Related Posts with Thumbnails