Foodiva's Kitchen: green tea
Showing posts with label green tea. Show all posts

Monday, April 11, 2011

Matcha Cendol and Faux Red Ruby Dessert - A twist on two Asian classics


The great thing about living in Asia, particularly Southeast Asia, is that you can get several versions of the same dish. Usually by the way it's served, you can tell which country it is from. Same, same….but different, as the popular phrase goes.

L-R: Rice flour, mung bean flour and matcha powder

Take cendol, for example. This is a Malay dessert - short, green noodles made from mung (or green) bean flour, served with palm sugar syrup and coconut milk. Pandan (screwpine leaves) are used to flavor the noodles and impart the green color. The Singapore version uses only green bean flour, but the Malaysian version uses rice flour and sometimes tapioca starch as well. Tapioca starch makes the noodles more stretchable, whereas green bean flour gives the cendol a slightly springy texture. The Indonesian version often uses a mix of rice flour and sago flour. The Singaporeans and Malaysians serve their cendol with red beans over crushed ice while in Indonesia, cendol is served with sliced jackfruit. As for us in Brunei, we tend to eat our cendol plain because that’s how we like it. The simpler things we know are often the best, although a heavy dose of coconut milk helps too (bad, bad, bad for the heart…I know!)


For this post, I wanted to do a fun take on two classic Asian desserts: Malay Cendol and Thai Red Ruby or Tub Tim Grob. Tub Tim literally means 'ruby', and Tub Tim Grob means 'crunchy ruby'. Red Ruby is essentially chopped water chestnuts encased in tapioca flour and served with coconut milk. The chestnuts are colored red and when they are cooked, the tapioca coating turns translucent, making them look like shining rubies. The first time I had this dessert, I was only a tiny tot and forgivably mistook the rubies for pomegranate seeds!


I’m always up to playing around with ingredients in my kitchen so for the cendol, I did away with the pandan flavoring and substituted matcha (green tea) powder instead. That gave the resulting cendol an ever so slighty bitter matcha taste but hey, still maintaining the traditional green color. For the Red Ruby, I couldn’t be bothered to mess around with water chestnuts (the dastard peeling….gah! Luckily, I didn’t have any in the house), so I replaced that with a crisp, green pear instead. I liked that the pear retained some crunchiness after being boiled for only a few minutes, and it also gave a soft fragrant to the rubies upon chewing.


Now you and I know that everything tastes a gazillion times better when it’s frozen. With this valuable insight in hand, I decided to freeze the accompanying condiments of coconut milk and palm sugar in pretty ice cube moulds to make them more interesting – plus you can actually see that they are part of the dessert. It’s just a whole lot more fun to eat this slowly in pace with the melting of the ice cubes!

Okay, let me focus on some technicalities here, in order to make those cendol noodles you would need special equipment. The pros use a cendol press, but not everybody has one at home. I will therefore make life easier for you (and me) by recommending that you use one of these makeshift equipment* that works wonders as well:
  • A large holed potato ricer
  • A colander with round holes
  • A metal ladle with holes (I used this)
  • A cookie press using the attachment with many small holes
  • A clean, durable, food grade ziplock plastic bag (To make a hole, snip off a small corner about 2-3mm) 
Did you get the key word? HOLES…the more the better! The last suggestion is probably the best because ziplock bags are available everywhere so now there's no reason for you not to try out this recipe!


Matcha Cendol and Faux Red Ruby Dessert
Serves : 4
Matcha Cendol “Noodles”
½ cup rice flour
½ cup mung/green bean flour
2 tablespoons matcha powder
3 cups water*
3-4 cups soybean milk

1. Before you start, prepare a basin of ice water. You will need to press the cooked flour mixture straight into this mixture to solidify it into cendol.
2. Mix all the above ingredients together and cook on low heat until mixture thickens, stirring constantly to prevent burning.
3. Fill mixture into the equipment* you're using (see post above). Press dough down with a spoon or squeeze, dropping the mixture into the ice water. Work fast as the mixture solidifies quite quickly!
4. When the cendol mixture has all been squeezed into the ice water, keep cendol in the fridge together with the ice water until ready to use. Use a slotted spoon or sieve to scoop cendol out.
5. Reserve soybean milk for the dessert assembly.
* You can substitute the water with pandan juice: Just blend 1 cup loosely packed pandan leaves - washed, snipped with scissors - with 3 cups water and strain to get the pandan juice. If fresh pandan juice is not available, just use 2 teaspoons green pandan paste/essence with 3 cups of water.

Palm sugar ice cubes
150g palm sugar
2 tablespoons caster sugar
500ml water

Place palm sugar, caster sugar and water in a saucepan and boil until sugar has melted. Continue to simmer for 2-3 minutes until syrupy. Let the mixture cool in pan to room temperature, then pour into ice cube trays and place in the freezer until frozen solid.

Coconut Milk Ice Cubes
500ml coconut milk
Pinch of salt

Simply add the salt to the coconut milk and stir until dissolved. Warm mixture in a pan on low heat, if necessary, them cool. Pour mixture into ice cube trays and place in the freezer until frozen solid.

Faux Red Ruby
1 cup chopped pear (pea-sized)
1 cup tapioca flour
5 drops red food coloring (or 1/2 cup beetroot juice)

1. Place pear pieces into a bowl and add red food coloring, mix well and leave to soak for 5 minutes.
2. Next, turn the pear pieces into 'rubies' - Spoon tapioca flour into a ziplock bag and add the pears. Shake well to coat the fruit pieces, leaving them in the bag until required. Remember to shake off excess flour using a sieve before cooking.
3. Bring a large pan of water to a rolling boil and add half the pears at a time. Stir to separate while cooking, it should be ready when the flour coating becomes translucent and the pear pieces float to the surface (2 minutes).
4. Scoop out rubies with a strainer and place into a basin of ice cold water. Drain and add to the final dessert.

Planning and assembling dessert
1. Make the Palm Sugar and Coconut Milk Ice Cubes a day ahead. On the day of serving, make the Matcha Cendol first, then the Red Ruby.
2. To assemble, you would need soy bean milk as a liquid base. Pour about 1/3 to 1/2 cup soy milk into each bowl, add the strained Matcha Chendol and Ruby Reds and dump in the ice cubes (a piece each of coconut milk and palm sugar, or to individual taste). Serve immediately.


Sunday, November 21, 2010

International Incident Party: Chocolate-Matcha Grissini With Anglesey Sea Salt


For a period when I was a teenager, we lived in a house right in front of the beach, with a view looking out towards the South China Sea. Even on the days when we didn't step onto the sandy shore, the saltiness of the sea permeated everywhere. We felt it and tasted it in the air we breathed, in the stickiness of our skin/hair/clothes, whenever we licked our lips. We also saw the destruction it caused, the most memorable of which was the premature aging of my bicycle, my then precious form of transport for explorations around the neighborhood. The salty air had quietly chewed away at the metal, leaving behind a rather sad, rusty frame.

Since then, I've had a 'frenemy' (love-hate) type of relationship with salt. My salt tolerance level is pretty low and I'm often wary of using too much salt in my cooking. On the other hand, very little of it will leave my tastebuds puzzled and yearning. For this month's International Incident Party (theme: Salt), I decided it's time I pay my respects to this most basic of flavorings. 


Lately, out of curiosity more than anything else, I seemed to have acquired several different salts to add to my pantry: pink, coarse Himalayan salt (origin: Pakistan), translucent white Anglesey Sea Salt (origin: Wales, UK) and flaky, pink Murray River Salt (origin: Australia). Now, which one to use for this party?

I'm more than a little obsessed by these pretty diamond shapes! Pity they're only salt crystals...

I decided to go with the Anglesey Sea Salt because my recipe is Matcha Grissini coated in dark chocolate, and the white, coarse sea salt would show up well sprinkled against the chocolatey backdrop. Anyone who has ever baked these crisp, Italian breadsticks will tell you they're a breeze to make, but the oriental matcha and decadent chocolate coat probably lends the illusion that it takes many moons to produce (instead of the 2 hours it actually took me). I've also added extra salt and black pepper to the grissini because these are the grown-up version, to tease our palates with their sweetness, saltiness, spiciness and slight bitterness due to the green tea. Kids will equally love to munch on these chocolate breadsticks, just leave out the matcha, black pepper and sea salt.


Eat them as a snack, dip them in hot chocolate or coffee, then sit back and watch the world go by. 


Usual thanks to Penny of Jeroxie - Addictive and Consuming Blog for hosting this great party!

Chocolate-Matcha Grissini With Anglesey Sea Salt
Makes about 25 pieces
Ingredients:
2 tsp active dry yeast
1 tsp sugar
1 tblsp salt
1 ½ cup bread flour
¾ cup whole wheat flour
2 tblsp matcha powder
2 tbsp olive oil
¾ to 1 cup warm milk
1 tsp crushed black pepper
300g dark chocolate, melted
Anglesey Sea Salt, for sprinkling

Method:
1. Put the flours, matcha, yeast, sugar, black pepper, salt, olive oil and salt in a large mixing bowl. Add the warm milk slowly, you may need only slightly less than a cup. With a dough attachment, mix until the mixture becomes a soft and elastic dough. The dough can then be kneaded by hand, it should be smooth and slightly moist, but not sticky.
2. Place dough in a well-oiled bowl. Cover bowl with a damp cloth and allow the dough to rise in a warm place for about an hour.
3. Divide the dough into two. Take one piece and roll out into a thin rectangle (about 1/4 of an inch high). Using a pizza cutter cut the dough lengthwise into strips which are approximately 1/3-inch and 10-inch long. Do the same with the remaining piece of dough.
4. Twist each strip from both ends and place the strips on a greased or lined baking tray. Allow them to slightly puff up (about 10 to 15 minutes). Bake the grissini at 210C for about 15 minutes. Cool on a rack before coating with chocolate.
5. For the chocolate glaze: Chop the chocolate into 1/2 inch chunks and melt in a double boiler or in the microwave. Pour the melted chocolate onto a flat platter and proceed to dip and roll the grissini in it. Work quickly as the chocolate will harden halfway through this coating process. If it does, just warm it on medium heat in the microwave.
6. Sprinkle the sea salt on the chocolate-covered part of the grissini while it is still moist. Place grissini to dry on waxed baking paper. Serve immediately or else, store in an airtight container in a cool place for up to 3 days.


Thursday, November 4, 2010

Spiral Ravioli - Matcha and Black Sesame

"Life is a journey up a spiral staircase; as we grow older we cover the ground we have covered before, only higher up; as we look down the winding stair below us we measure our progress by the number of places we were but no longer are.”
The Winding Stair, W.B. Yeats

Eric Ripert brought me here. Well, not in person (although that would've been nice :-) ), but the other day I was watching him make ravioli on Avec Eric with this motherly and rather delicious Italian mamma. One chef was French and the other Italian, but for the sake of the programme and its global viewers, they communicated the virtues of homemade ravioli in their heavily accented English. The whole episode made me smile, not so much for the language irony but for the ease and elegance of the ravioli-making process. Something about the way Monsieur Ripert's hands was massaging the dough was hmmm... sexy. And it made me want some. Ravioli, that is.


I looked back at my pasta-making experience to date and can only really recall two times. Yes, you read that right - two. Once was when I made lasagna noodles out of red cabbage(!) and the second time was an attempt at making fetuccine out of tamarind pulp. Why hadn't I started with just plain dough? I don't really know the answer to that. I have a disturbing history of jumping in at the deep end and praying for things to work out alright ;-). Most of the time, I have been lucky. The rest of the time, I've conveniently forgotten about. Optimism pulses through my veins like a welcomed curse.


So I started to do some research on how to make ravioli and then dammit, I came upon artisan ravioli. Gourmet ravioli. Dammit, because they looked absolutely gorgeous! Even while I was learning and figuring out how to make the beautiful, striped ravioli, my brain hijacked itself and urged me to go spiral instead. From the recesses of my memory, I pulled out a technique for getting the spiral effect on pastry and theorized it would work for pasta dough as well. Basically, you need to use different colored dough that are layered one on top of the other, then rolled up like a cinnamon bun, sliced and finally flattened on the cut edge. Did you catch all that? Hmm, there's a reason why they say a picture paints a thousand words!
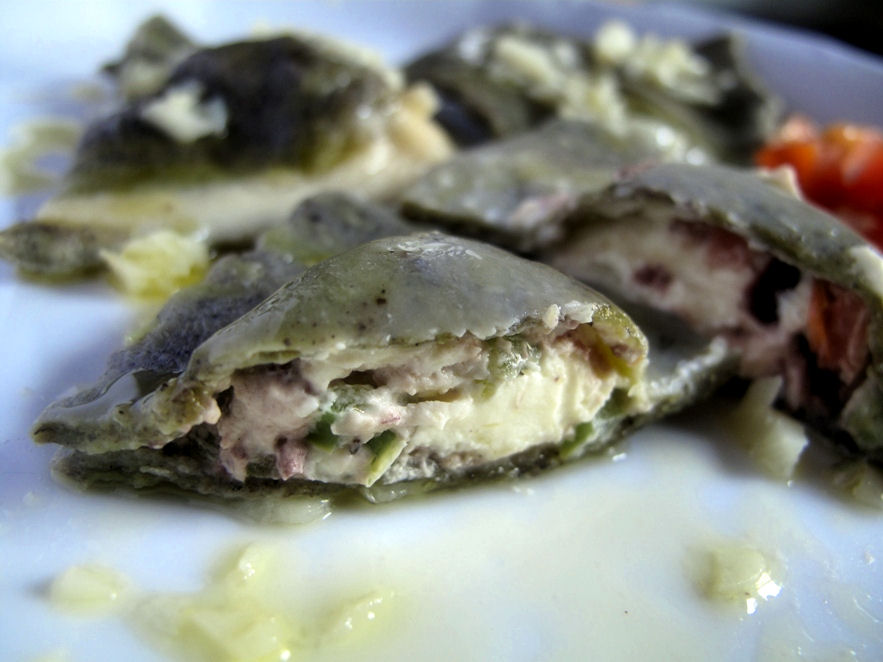
My colorings: Green - Matcha powder, Black - Black Sesame powder, White - Plain dough


The matcha and black sesame flavors were subtly released upon cooking, however it was the fresh filling of green pepper, cherry tomatoes, black olives, celery leaves and cream cheese that gave the ravioli the punch. I ate this with a simple garlic and butter sauce which complements all the wonderful flavors already contained in my spiral version of artisan ravioli. Eric, you should come over and learn to make these from this mamma!


Spiral Matcha and Black Sesame Ravioli
Servings: 1-2
Ingredients:
Pasta Dough:
2/3 cup plain flour
1 tablespoon plain flour, to adjust dough consistency
1 egg
1 tablespoon matcha powder
1 tablespoon black sesame powder

Filling:
1/2 green bell pepper, diced finely
4 cherry tomatoes, chopped
6 black olives, pitted and diced
1 stalk celery leaves, chopped finely
100g cream cheese, softened
salt and pepper, to taste

Method:
1. Place the flour in a food processor. Add egg and process for 10 seconds until the flour is moist and crumbly. Adjust by adding some more flour to the dough if it is extra sticky and process further. Each time you stop the machine, pinch the dough between your fingers, it should feel firmer each time. After about 30 seconds of processing, the dough should come together and form a loose ball on top of the blade, and feel moist but not sticky when pinched.
2. Take the dough out, and cut into 3 equal portions. Leave one plain, to each of the other knead in the matcha and sesame powder. Sprinkle some flour on a hard wood surface and start to knead the dough pieces separately. With the heel of one hand, push the ball of dough away from you. Fold it back toward you and rotate the dough a quarter turn. Repeat this process until the dough feels damp without being sticky, then stop kneading (about 1-2 minutes). Shape dough into a ball and cover with a large overturned bowl, let it rest for 30 minutes.
3. Take the green dough and roll to flatten. Divide the plain dough and black dough into two pieces each. Place one piece of black dough on top of the green dough, then wrap the green dough around it. Pinch to seal edges, and roll again to flatten. Repeat process of wrapping and rolling with the rest of the dough pieces. (The layers and sequence - green, black, white, black, white).
4. Roll the layered dough to form a ‘cylinder’, then slice across the cylinder to get round discs about 1/2 inch in thickness.
5. Run each disc through pasta machine as per the instructions, until it is thin enough for your ravioli sheet (I went up to No. 4). You will see the spiral effect on the flattened dough, almost like a Mexican sombrero.
6. Mix together the ingredients for the filling in a bowl. Place about a teaspoon of filling (for each ravioli) on top of one spiral sheet and place another ravioli sheet  to cover it. Pat down around the filling to seal dough, then cut into shapes with a ravioli cutter. Gently pinch edges of ravioli to seal it further.
7. Boil water with some olive oil and cook the ravioli for about 10 minutes until the edges are soft but still chewy. Serve immediately with (chopped) garlic sauteed in butter sauce. 


Thursday, October 28, 2010

Poetry Thursday #8: Green Tea Rolls With Purple Sweet Potato Filling

Poetry Thursday #8:
My life, so wonderful,
So toilsome; stressful.

Nothing to look forward to,
At least for the moment.
Reoccuring irritants,
Constant lies; deception.

Pleasure, not as pleasing,
Tastes are going bland,
The spice of life fading,
Regressing; retreating.

I ponder these things,
While sitting at the edge,
The edge of my sanity,
This foothold; ledge.

I entered this world,
To someone screaming,
Now I say the same word,
I'm begging; pleading.

Any last words?
Just fucking push already.

Push... by David Robichaux Jr. 


I might as well declare this week Purple Sweet Potato Celebration Week. For the past several days, I had carefreely indulged my obsession for purple-colored food, namely (you guessed it), purple sweet potatoes (PSPs). It all began when I'd spotted some freshly dug (still coated in soil) PSPs at the market over the weekend. Against my better judgement, I grabbed a few of the tubers, all the while scheming up something beautiful and delicious with them in my head.

Today is only Thursday, but I've already rustled up five - yes, FIVE - new recipes using my favorite purple vegetables! I suppose I'll stop only when they run out (just hoping there are no Withdrawal Symptoms!). I'm not going to extol the nutritional virtues and versatility of PSPs again, but if you're new to these lovelies and are pretty curious, click on the links below for my previous posts on these purplies:

Purple Sweet Potato Pie with Easy Oats Crust
Rockin' Pink and Purple Scones
Mont Blanc-Inspired Purple Sweet Potato Cakelets


For today's recipe, I attempted a pairing of matcha (green tea) and PSP flavors in a bunch of sweet rolls, and the outcome was unexpectedly delicious. The potatoes went very well with the green tea, the two very distinct earthy notes blended brilliantly to striptease the palate. Yes, very naughty! The success of this recipe surpassed even my expectations. And the colors, OH... So drop-dead gorgeous. Like a well-matched outfit, on a good hair day.


The three layers: green tea (roll), brown sugar and purple sweet potatoes (filling)


Experience the luscious feeli...err, filling.

Maybe these vibrant rolls will stir up some excitement on Yeastspotting @Wild Yeast and Recipe Swap Thursday @Prairie Story, where I'm sending it to!
 
Green Tea Rolls With Purple Sweet Potato Filling
Makes: 12 rolls
Ingredients:
Dough:
1 teaspoon dry, instant yeast
1 cup warm milk
1/2 cup white sugar
1/3 cup margarine (or butter), melted and cooled
1 teaspoon salt
2 large eggs, room temperature
4 1/2 cups bread flour
3-4 tablespoons matcha powder

Purple Sweet Potato Filling
400g sweet potatoes, boiled and mashed
1/3 cup butter, softened
1 cup brown sugar

Method:
1. Dissolve the yeast in the warm milk in a large bowl. Mix in the sugar, margarine, salt, and eggs. Add flour and matcha powder, mix well. Knead the dough into a large ball for about 5 minutes. Put in a bowl, cover and let rise in a warm place about 1 hour, or until doubled in size.
2. After the dough has doubled in size, turn it out onto a lightly floured surface, cover and let rest for 10 minutes.
3. Roll dough into a 16x21 inch rectangle and after that prepare the filling.
4. Assembly: Spread dough with 1/3 cup butter and sprinkle evenly with brown sugar. Add the mashed, cooled purple sweet potatoes one spoonful at a time on top of the sugar. Flatten layer evenly with a spatula.
5. Roll up dough and cut into 12 rolls. Place rolls (cut side up) on a lightly greased rectangular baking pan. Cover and let rise until nearly doubled, about 30 minutes. Meanwhile, preheat oven to 200C/400F.
6. Bake rolls until matcha layer turns slightly brown, about 15 minutes. Leave to cool on a rack for 15 minutes before serving (careful, the filling will be very hot when it comes out of the oven!).

Thursday, September 2, 2010

Poetry Thursday #1 & Crazy-Colored Bread (Fruity Il Gianfornaio)

Poetry Thursday #1:
I don't know exactly what a prayer is.
I do know how to pay attention, how to fall down
into the grass, how to kneel down in the grass,
how to be idle and blessed, how to stroll through the fields,
which is what I have been doing all day.
Tell me, what else should I have done?
Doesn't everything die at last, and too soon?
Tell me, what is it you plan to do
with your one wild and precious life?

Extract from The Summer Day by Mary Oliver

Okay. I've decided that every Thursday would be dedicated to sharing my favourite poems with you. It gives more structure and meaning to my blog posts, something to look forward to each week. I like poetry, although if you just looked at me (or read me), you'd think I only ever read geeky, racy, corporate, foodie stuff. No, I like the lyrical, whimsical, silly, philosophical stuff too. Anyway, I thought you might like some of these poems too. You just never know.

So what has poetry got to do with food, really? That's a question I'm hard-pressed and not qualified to answer but nevertheless will try. They both have got plenty to do with emotions, filling a void, making the connection, feeling less lonely and more centred. Well, there are always social media, speed dating and religion too, but I'm not going to go into any of that. For me, reading beautiful, funny, cryptic, even violent poetry (and books) helps to fill some of my voids. Oh, eating does that too, but I'm acutely aware of how much nourishment and destruction my body can take, so I can't hope to eat all the time (don't we wish we could though?). But reading, I can, all the time. My brain will never explode from gaining too much knowledge. At least I hope not.


Saying that, reading through Diva D's Breadmaking book the other day left me a bit frustrated. There was a picture of a beautiful Australian vegetable bread called Il Gianfornaio, which wasn't accompanied by a recipe. Aaaargghhhh....! There wasn't much information on the net either, but I did stumble across this self-concocted recipe by Arundathi of My Food Blog. After 3 nights of tossing and turning in my bed obsessing about this multicolored bread, I woke up (though I never slept much all that time, anyway) and decided, it's time.


Fruit juices, matcha powder and chocolate filling

The only thing was, I really didn't fancy blanching, squeezing, mashing and blending all those vegetables to get those lovely colors. That was how I settled on making a fruit bread instead. I had some colorful fruits patiently awaiting their destinies in the pantry, so hey, let's go bend the rules a little! Besides, I'd already decided in my mind that the combination of brightly colored fruits would smell and taste great in the bread.


The bread would be made into smaller rolls as I want each person who gets handed this baby to enjoy its beauty individually. And because I'm such a slave for chocolate, there would be a piece of cocoa heaven embedded within the roll. Hmm, I really don't need to explain myself when it comes to my favourite ingredient!

So here are the fruity fellows and the corresponding colors they naturally imparted to the bread dough - raspberries (red), oranges (orange), coconut milk (white), mangoes (yellow) and matcha (green). Ah, so you spotted that I snuck green tea in there. Well, I didn't have avocadoes or kiwi or any green fruits in the house, and matcha just seemed the easiest choice to work with. Plus it generally goes well with fruity stuff, so I had my ass pretty much covered. ;-).


Let's see, how did the rolls taste? They were light, airy, wonderfully fruity! I ate them in two ways - by peeling the fruity sections apart to taste them individually (like a curious monkey) and then biting into them altogether to savour the homogeneity of flavors!

Oh yeah, this is going to Yeastspotting, my first submission ever. Won't be my last, for sure.

Fruity Il Gianfornaio
Makes: 8 rolls
Ingredients:
Basic Dough
1 cup all-purpose flour for each bowl
1/4 tsp active dry yeast for each bowl
3/4 tsp salt for each bowl
1 tbsp sugar for each bowl
1/2 tbsp melted butter for each bowl
110 ml juice for each bowl

Juices & powder
110 ml each of raspberry puree (red), orange juice (orange), coconut milk (white), mango puree (yellow).
1 tablespoon of matcha powder (green) and 110ml plain warm water.

Filling
100g chocolate, chopped into 8 equal, chunky pieces

Method:
1. Make the basic dough 5 times over. Mix the dough until it comes together using the dough hook. Add individual juices/powder to each separate bowl of dough.
2. Empty the dough out onto a floured surface and knead for about 10 minutes until the dough becomes smooth and elastic. Place in an oiled bowl and cover with cling wrap. Repeat for the other bowls. Set in a warm area and allow to rise until doubled in size (approximately 1 hour).
3. Take the dough out of each bowl and form about 8 small balls using your palms. Roll each ball to form a rope and for each roll, line all the 5-flavored ropes end-to-end next to each other. Pinch the ends together to seal and then form concentric circles upwards with the ropes (like a beehive hairdo!) and end up on top. As you are rolling up the ropes, tuck in a piece of chocolate in the middle of the roll. Tuck top end into the centre.
4. Place in a well-oiled round baking tray and cover with a damp, clean tea cloth. Allow to rest for about 1 hour.
5. Preheat the oven to 230C. Brush the tops of rolls with egg whites to glaze and bake for 15 minutes or until the bread is done (hollow sound when you knock on base of the bread with your knuckles). Remove from oven and cool on a rack. Serve on its own or with butter and jam.

Sunday, August 29, 2010

Cashew Crusted Dragonfruit Hearts and Matcha Cheesecake


You gotta hand it to boredom, it makes you do something you normally won't. Just like doodling on a piece of paper led to oh, say, the creation of the Teenage Mutant Ninja Turtles (the concept arose from a humorous drawing sketched out by Kevin Eastman during a casual evening of brainstorming with his friend Peter Laird), doodling recipes in my mind led to this slightly outrageous creation - Cashew Crusted Dragonfruit Hearts and Matcha Cheesecake.

Cashew nuts and biscuit base


Well, this dessert was not totally unfounded. I had leftovers that needed to be used up, and I didn't want to use them for anything that I normally do. There was half a dragonfruit from my scones session, some matcha powder from my churros post, half a packet of Digestives and a large jar of roasted cashew nuts left over from that day I cooked biryani rice and made my creamy pear-cashew sorbet. Oh, also a packet of cream cheese that I wanted to bake with but hadn't up to this point.


The mental doodle started with the cashews, condensed milk and matcha, three of my most favourite flavors in the world. The cheese was the anchor ingredient and made me think, okay, a cheesecake would be good. Then the visual part of my brain reasoned that I needed to brighten this dish up a little and what goes well with green? Yep, you guessed it, the ever dazzling fushia pink that dragonfruit provides! The hearts were originally supposed to be swirls on the green filling, but somehow I stopped swirling when I saw the much cuter hearts. Especially since they were fuschia pink hearts. Yeah.

Little fuschia hearts, for your sweetheart. Ask them to marry you, quick!
(Or if they already have, ask them to go with you on a romantic cruise, or out dancing ;-))


This cheesecake was surprisingly easy to make, and even easier to photograph! (No melting ice cream or precariously leaning food stacks, thank goodness). If you don't believe me, here's the recipe:

Cashew Crusted Dragonfruit Hearts and Matcha Cheesecake
Ingredients:
Pastry base:
2 cups Graham crackers or Digestives, crumbed
2 cups cashew nuts, roasted and finely chopped
¾ cup butter, melted and cooled

Cheesecake filling:
1 packet (250g) Philadelphia cream cheese
1 ½ cups sweetened condensed milk
2 eggs
½ small dragonfruit
1 tablespoon matcha powder

Method:
1. Preheat the oven to 180°C/325F. Grease an 11-inch pie pan and set aside.
2. Prepare the pie base: Place cashew nuts in a food processor until finely chopped and pour into a bowl. Crumb the biscuits the same way, then add this to the bowl of cashew nuts. Add the cooled, melted butter and mix well. Press crumb mixture onto the bottom and sides of the pie pan. Chill for 15 minutes in the fridge.
3. For the filling: In another mixing bowl, whisk the cheese until smooth, then add the condensed milk. Mix until combined before adding the eggs one at a time.
4. In the meantime, peel, slice and puree the dragonfruit in a blender. Divide the cheese batter into two portions. In one bowl add the dragonfruit puree, and into the other add the matcha powder.
5. Reserve about 3 tablespoons of the dragonfruit cheese batter for the hearts decoration. Pour the rest of this red batter onto the base of the pie dough and bake for 20-25 minutes until the top is slightly firm to the touch.
6. Take the pie tin out of the oven and carefully pour the matcha cheese batter on top of the dragonfruit layer.
7. Drop little dots of the extra dragonfruit mix on the matcha layer and run a knife through each of them to form little hearts and swirls.
8. Place it back in the oven and bake further for 25 minutes until a rod inserted into the centre of the pie comes out clean.
9. Let it cool for at least 20 minutes before serving.
PS. The bottom dragonfruit layer turned an orangey-pink color upon cooking, probably because it was in the heat for too long. The dragonfruit hearts on the top, meanwhile, retained their fuschia color. So strange, this cooking business!

Related Posts with Thumbnails