Foodiva's Kitchen: chocolate
Showing posts with label chocolate. Show all posts

Monday, February 13, 2012

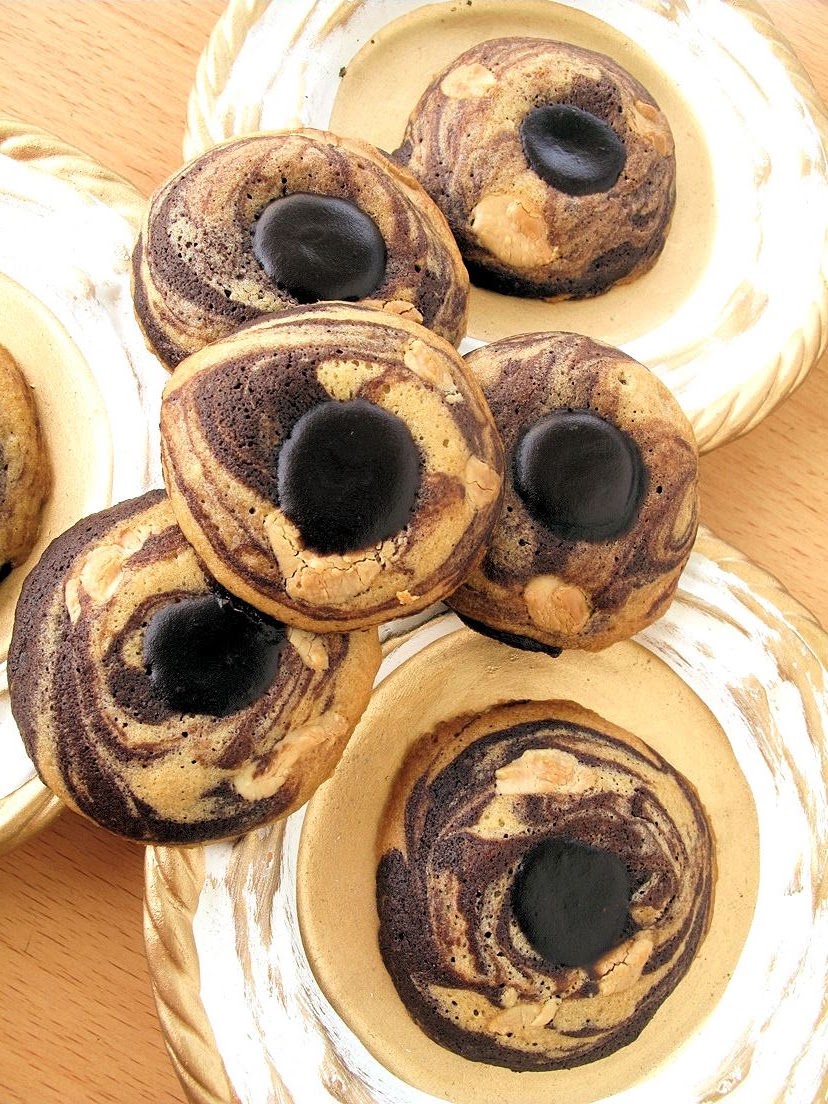
Muffin Monday - Triple Chocolate Muffins

In my dreams I gorge on chocolates, I roll in chocolates, and their texture is not brittle but soft as flesh, like a thousand mouths on my body, devouring me in fluttering small bites. To die beneath their tender gluttony seems the culmination of every temptation I have ever known.
~ Joanne Harris, Chocolat

So are you ready to face your week head-on with these devilishly decadent Triple Chocolate Muffins? I'm very late for this week's Muffin Monday, so late in fact that there's only a few hours left to my Monday over where I'm at. Let me explain the reason for this unusual (but fast becoming the usual!) tardiness - it's partly because I'm sick as a dog today, but mainly, it's because I've been very disorganized. The complete opposite of our event host, Anuradha of Baker Street, who actually sent this recipe early on last week. My apologies again, An and many thanks for letting me still participate. 

Get ready for some love....and lovin'.

Chocolate is hands down my most irresistable indulgence, as in, I am not able to resist having it in any of its forms. Sounds a bit like an illness when I put it that way, but maybe it is a kind of addiction. Well let's be grateful that at least it's legal :).


I looked through the recipe and the 'triple-ness' came from the cocoa, bittersweet and semisweet chocolate chips, with a dash of espresso powder to give the muffins a kick. My sister had brought back a stash of some rather lovely Swiss chocolates the last time she came home to get married (actually, she only got married once), so I decided to use some of those in place of the chocolate chips. I'm surprised we still had some left over, or perhaps our chocolate stash was really the size of a sweet-toothed pirate's treasure loot... ;).


I chopped up a handful of bite-sized, white-tipped Toblerones which went into the batter as chips and to top each muffin, I placed a slice of milk chocolate filled with salted caramel in the middle. I don't have to tell you how good this combination of chocolate-everything tastes like as you bite into the muffin's warm belly, do I?


The recipe is so easy that I did everything by hand as soon as I rolled out of bed and had these ready in time for breakfast! We don't normally start off each day with Triple Chocolate Muffins (unfortunately, sanity and willpower prevail) but this one time we did, you can bet we walked out the front door with an extra bounce in our step!

Muffin Monday is an initiative by Baker Street. A culinary journey of sharing a wickedly delicious muffin recipe every week. Drop in a quick line to join her on her journey to make the world smile and beat glum Monday mornings week after week.

Muffin Monday: Triple Chocolate Muffins
Makes 12
Ingredients:
1/2 cup (1 stick) salted butter
1 3/4 cup unbleached, all-purpose flour
2/3 cup dutch-process cocoa
11/4 cup sugar
1 tsp instant espresso powder
1 tsp baking powder
1 tsp baking soda
3/4 tsp Kosher salt
1/2 c. bittersweet chocolate chips (I used mini-white topped Toblerones, cut into small chunks)
1/2 c. semisweet chocolate chips (I used salted caramel-filled milk chocolate, as a topping)
2 eggs
1 cup milk
2 tsp pure vanilla extract
2 tsp white vinegar

Method:
1. Line a muffin tin with 12 paper cups. Spray lightly with cooking spray. Preheat oven to 425.
Melt the butter; set aside to cool.
2. In a large bowl, whisk together the flour, cocoa, sugar, espresso powder, baking powder, baking soda, salt and chopped chocolate.
3. In a separate bowl, whisk the eggs, milk, vanilla and vinegar until blended. Stir in the cooled, melted butter.
4. Add the wet ingredients to the dry ingredients. Stir with a rubber spatula, just until blended.
5. Spoon into the prepared muffin liners…the cups will be very full. Bake for 15-20 minutes until the muffins bounce back when pressed with a finger. Cool on a wire cooling rack for 5 minutes.
6. Remove from the pan and let them cool just a bit longer. Serve warm.


Monday, November 14, 2011

Nutella Ding Dong Cake


A Ding Dong Cake - now doesn't that name just fire up the imagination? When I was assigned the blog Sweet Flours for this month's Secret Recipe Club, I found out that the blog author Allison and I have one thing in common - a big sweet tooth. Her blog features plenty of baked goodies which makes it a dream site for me. She actually baked this cake for her great grandmother's 91st birthday, and another time once before for her 89th birthday. I took my cue from great grandma, that lady sounds like she has quite a discerning taste in her choice of birthday cakes :).


At first I hadn't a clue why the cake was named so, but after a bit of googling discovered that Ding Dong cakes are those little chocolate-covered cakes with with a white creamy filling sold by Hostess Brand. The ones I so obviously had never eaten while growing up. While Allison had made a regular cake-sized version of Ding Dongs, I decided to make the original puck-sized ones because sometimes eating minicakes makes things a bit easier on the conscience. And a lot easier for me to fit into my skinny Levi's too, not that they're not already made of stretch denim, but still...


The recipe for this cake originally came from Smitten Kitchen, but the adapted recipe can be found here on Sweet Flours. The process of making the minicakes was slightly fiddly, but nothing that I hadn't already done in my kitchen many times. The coffee-chocolate cake batter was straightforward enough, however the marshmallow filling needed a fair amount of whisking in a bowl placed over a pan of simmering water, a bit like making swiss meringue buttercream frosting but without the butter. 

In an original Ding Dong (I just love saying that!), the entire chocolate cake is coated with a thin layer of chocolate glaze but Allison had coated her birthday cake with chocolate ganache, all glistening on the top and sides. I was a bit short for time on this occasion so my topping was simply warmed up Nutella (30 seconds in the microwave) that I spread with a knife and let drizzle a bit down the sides. Did I just say simply Nutella? Of course, that wasn't the case at all because you and I know that Nutella is King and in actual fact stole the show!
    
This will be my last participation in the Secret Recipe Club. It has been really fun discovering many new blogs and cooking from my assigned ones, however I feel it's time to get back to doing my "own thing". Creating recipes that come from my own heart and imagination and make me truly fulfilled, you know. I'm on a quest to get my old ding dong back! :-)


Monday, October 17, 2011

Secret Recipe Club - Snickers Coffee Cheesecake Brownies

Childhood smells of perfume and brownies.
~ David Leavitt

After a two-month break from the Secret Recipe Club, I'm back with a delicious bake attributed to Frugal Antics of the Harried Homemaker, the blog of which I was assigned. Kristen, the blog owner is a fantastic mother of 5 and an even more amazing cook, as evidenced by the wide-ranging recipes on her blog. She comes from a long line of women who ran restaurants, catered, taught other people how to cook, and Kristen is no different. What I find as equally fascinating as her recipes are her Saturday Stories series, depicting multigenerational tales of her family, her childhood as well as her own Rainbow Family, as she calls it. I really can't imagine there'd be many people who haven't already come across Kristen and her blog, but in case you've been living under a rock lately, I highly recommend that you leg it over there for some fabulous food gems!

Monday, October 3, 2011

A Beautiful Mess - Chocolate-filled Brioche Rolls, YBR and Awards

On, there are so many lives. How we wish we could live them concurrently instead of one by one by one. We could select the best pieces of each, stringing them together like a strand of pearls. But that's not how it works. A human life is a beautiful mess.
~ Gabrielle Zevin, Elsewhere

I was supposed to do a pasta post today, but I've done a bread one instead. It's the first day of the week and truthfully speaking, I think I'm experiencing the Monday blues. Just home alone by myself. Yep, the boredom can get pretty stressful. 

So a bit of kneading therapy was required today. I tossed away the pasta idea and replaced it with this slice-pinch-squeeze brioche one. Oh, and I made a video for it, my very first one. Okay, a pretty crappy one too since I'm the most technologically-challenged person living in this house. But it was a giggle to do, and relieved the boredom of the day somewhat.

Monday, September 12, 2011

Muffin Monday - Lavender Granola Muffins with Apricots, Cranberries and Chocolate


After a whole week of decadent feasting, baking these granola muffins made me feel immensely better about my eating binges of late. Admittedly, I did try to work off the calories by running and hiking up hills under the blazing heat over the past several days, but all that simply made me tired and not really that much happier. It'd been a while since my muffin pan had seen the inside of my oven walls anyway, so I decided it was time to put it to good use again.

Thursday, September 8, 2011

#BakeTogether - Spiced Up and Stormy #Irene Double Chocolate Nutella Mousse Cookies

Stop with the labels, we are not jam jars.
~ Caroline Casey

For those who were affected by Hurricane Irene a mere fortnight or so ago, it will be a while before they shall be able to forget the image below and the limitless power of Mother Nature. Despite humankind's incredible intelligence and technological prowess, something like this reminds us all of how helpless we are when pitted against such powerful forces of nature.

Wednesday, August 24, 2011

Gateau Choco-Citron


I mentioned this Gateau Choco-Citron about two posts ago and told you I made up the recipe on the fly, so here I am sharing that recipe with you. It's a three-layered cake made of a rich chocolate brownie layer, a sweet, tart lemon curd layer, topped with a soft chocolate mousseline layer. Thanks once again to Aube of Kitchen Vignettes for describing the components of this gateau so well that I was able to make it in my very own kitchen one afternoon.

Saturday, August 13, 2011

Peanut Butter PieCupcake for Mikey Perillo

When you are sorrowful look again in your heart, and you shall see that in truth you are weeping for that which has been your delight. 
 ~Kahlil Gibran

I've been a Twitter absentee and I just found out about this so hopefully, I'm not too late. It's already Saturday here, but about half a world away, it's still Friday and I'm determined to get this Peanut Butter Pie post out anyway. It's for Mikey, Jennifer Perillo's husband who passed away so suddenly last weekend. I'm not the only one putting up a peanut butter pie post in honor of Mikey (who, by the way, loved to eat them), hundreds of people are. You can see how some of the pies look like over at TasteSpotting and watch this beautiful video tribute by White On Rice Couple, Diane and Todd.

To honor Mikey, Jennie requested that we make one and share it with our loved ones. 

Wednesday, June 15, 2011

Chocolate Banana Peanut Butter PieCupcake

The difference between success and failure can often be humility. There is a fine line between unique and weird, there is also a fine line between confidence and ego. Careful that you don’t cross it, because as soon as you do the path could easily lead to failure.

~ Brad Moore

Back in January, I came across this jawdropping dessert on Making Life Delicious blog and what it was essentially was a pie  baked inside a decadent chocolate cake. The Chocolate Pecan PieCake was made to celebrate in the new year and the recipe was posted on January 1st, 2011 (1/1/11). It was over-the-top special, yet in my mind the dessert oscillated back and forth in between OMG! and WTF??

Monday, June 6, 2011

First Anniversary! - Lavender-Honey-Cardamom-Lemon Dark Chocolate Tart and Paper Blogoversary!


Today, Foodiva's Kitchen is 365 days, 178 posts, 92 followers, 31,481 visitors and 2255 comments old. Wow! 1 year old, my Paper Blogoversary. Who would’ve thought a year ago that I would come to know of this new word that’s not yet officially in any dictionary – Blogoversary? And who knew when I began Foodiva’s Kitchen that writing this blog would impact my daily life and the way my family eats in ways I hadn’t even envisaged?

Monday, May 9, 2011

For The Love of Polvoron & YBR


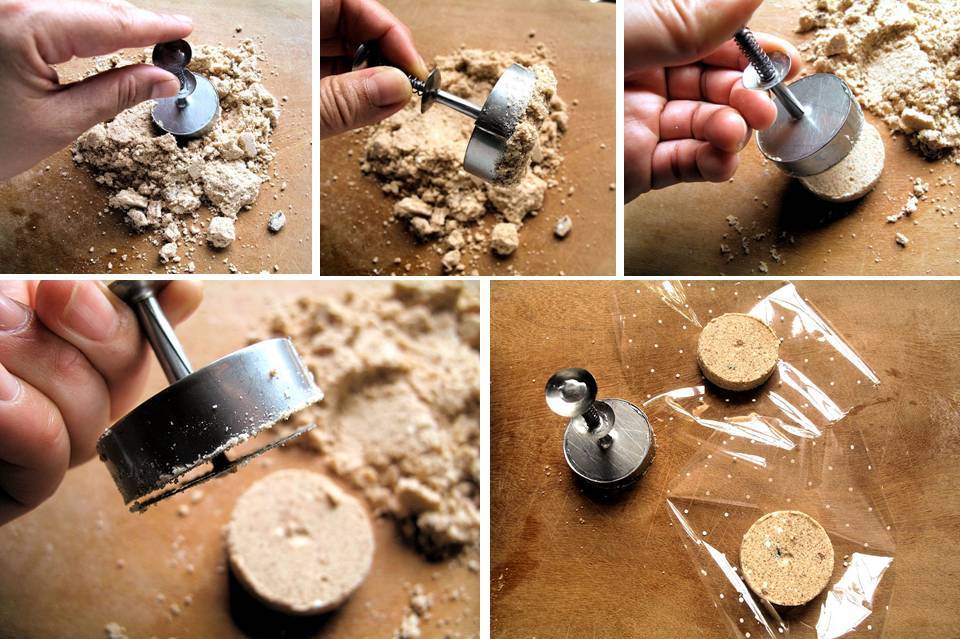
Since I first tasted polvoron a long time ago, I've been wanting to make it. If you've ever eaten these before, you'll know that polvoron is a soft, dusty, dense and magnificently crumbly shortbread of Spanish origin made from powdered milk, flour, sugar and sometimes nuts. When I finally remembered, I scoured the net for a really good, simple polvoron recipe. At around the same time, I miraculously discovered a tiny polvoron maker/press at my local baking supplies store (bearing in mind that I don't reside in a Spanish-speaking country here, nor do we have much Spanish influences. Well, apart from having an army of Argentinian polo horses, if you want to be pedantic about it). Talk about the planets aligning at the same time, hey!

 L-R: Dragonfruit, Matcha and Plain Polvorons


 The process: Gather, press, release and presto! Then wrap in cellophane to store.


I'm thinking that this would probably be my best recipe this month...but I haven't totally decided. You'll just have to wait and see if I have more tricks up my pantry! ;-) For those in the know, every month, I try to submit to the Your Best Recipe event hosted by that crazy-talented Mexican chick in Prague, Nancy of Spicie Foodie. If you haven't checked out my YBR contribution for April yet, please click Nancy's post here and look up the others too while you're at it!

Polvoron
Plain Basic Recipe (approx. 1kg)
Ingredients:
2 cups all purpose flour
1 cup powdered milk (I used Anlene low fat, ultra-high calcium for geriatrics like me)
1 cup caster sugar
1 cup melted butter, cooled thoroughly

Method:
1. Sieve the flour into a thick-bottomed, non stick pan and toast on medium heat, stirring constantly, until flour turns light brown. Transfer the roasted flour in a bowl right away to prevent further cooking.
2. Add powdered milk and sugar into the mixing bowl, stir to mix. Then add the melted butter, mix with a spoon and press the flour to ensure there are no lumps.
3. Take the polvoron mold, fill it with the polvoron mixture by pressing down on the flour until it is fully filled. Press down hard to compact the mixture before releasing it from the mold. Add more butter if the mixture in not cohesive enough.
4. Carefully wrap a polvoron in cellophane or colored Japanese paper. Store in an airtight container.
5. If you want to try the different Flavorings, divide the polvoron mixture above into 4 portions (approximately 150g dry mixture each, before the addition of butter). Leave one portion plain.
To each of the other portions:
Matcha polvoron - Add 1 teaspoon matcha powder to dry ingredients, before adding 1/4 cup cooled, melted butter.
Chocolate polvoron - Melt 25g dark or milk chocolate in 1/4 cup melted butter, cool, then add to dry ingredients. You can also add 2 tablespoons of cocoa powder to the dry ingredients before adding the butter.
Red dragonfruit polvoron - Scoop a tablespoonful of dragonfruit flesh, press through a small sieve into 1/4 cup melted butter. Stir until pink color is incorporated in the butter. You can also tip the seeds and remaining flesh in the sieve into the butter. Add this cooled butter mixture to the dry ingredients.

Sunday, April 24, 2011

We Should Cocoa: Apricot-Mocha Brownie Marzipan Bars


Chocolate flows in deep dark, sweet waves, a river to ignite my mind and alert my senses.
~Anonymous~

Isn't it funny how there are days when you surf the net to check out your blogger friends' offerings and you click on links upon links and finally end up on a page you that makes you pause and think, hmm...I'd really like to be a part of that? For a number of uber-surfers, that's a frequent occurrence but not so for me. Maybe I don't click on that many links, I tend to always gravitate and return to sites that drew me to them in the first place, either for their prose or their photos but most of all, for their owner's personality and friendship. On this one particular day, I stumbled upon the "We Should Cocoa" event hosted by the lovely Choclette of Chocolate Log Blog and Chele of Chocolate Teapot. It's a monthly cooking event involving that most scared of ingredient, chocolate, and one other compulsory ingredient chosen by the hosts, and guess what? Here I am, contributing a chocolicious recipe to the said event.


This  month's extra ingredient is marzipan. I was rubbing my hands in sinisterful glee because I happen to love marzipan! I had never made it myself, of course, nor ever baked with it. But I recall its dense, rich, creamy taste inside Christmas stollens I had eaten in Germany, and in tiny fruit forms (made completely out of marzipan) whenever I've travelled to Thailand. That's really about it, my marzipan experience is sadly very limited.

So why the glee? It's my chance to try and make my very own marzipan(!) and pair it with an original recipe out of my chocolate-drenched mind. After a bit of research, I found out that marzipan was such a breeze to make. I made just a small block for starters and when it didn't crack after overnight chilling and rolling out....I was more than thrilled! (I'm so easy to please, can you tell?)

                Top: Dried apricots and apricot paste                      
Bottom L: My homemade marzipan                                                              R: Mocha brownie on almond crust

For several years now, I've had this rather sinful recipe for chocolate brownie that's laced with strong coffee. It's soft and oh-so-squealy-gooey inside but crisp on top... as I said, it's a brownie headed for Hell. I wanted to wrap that brownie in my homemade marzipan and fashion it into bars but after a bit of thought, that just seemed too dense overall. My pantry held some beautifully soft, dried apricots so after blitzing them in the food processor with some honey, milk and more marzipan, I got this lovely apricot paste. Spread that on top of the brownie, cover it with a sheet of marzipan and we have the rather mouthful Apricot-Mocha Brownie Marzipan Bar. Oh yes, I also baked the brownies on top of an almond crust to give the sweet a bit of crunch and make it look, you know, a bit more bar-like. You can never have too much almonds anyway, can you? 

 Bottom: Faux coffee beans made out of marzipan and rolled in cocoa powder

For decoration, I rolled some marzipan into coffee-bean shapes, dusted them in cocoa powder and placed one on top of each marzipan bar.  


Let me tell you, there are recipes I like and there are recipes I really like. This is one of them. Every layer turned out perfectly and the flavors (refreshing apricots on top of gooey chocolate and underneath marzipan) melded really well together. That's not normal, especially when it's the first time I make something. So you see, if I had never landed on the 'We Should Cocoa' page, I never would have come up with this bliss!

Apricot-Mocha Brownie Marzipan Bars
1st/bottom layer: Almond crust
60g butter
100g all-purpose flour
60g ground almonds
60g sugar

1. Preheat oven to 180C. Line a 8x8-inch deep baking tin with parchment paper, or use a loose-bottomed tin for easy release of cake.
2. Rub butter into flour until the mixture resembles breadcrumbs. Add almonds and sugar and rub further with your fingertips until well incorporated and forms a loose dough. You can also place the ingredients in a food processor in the above order to expedite the process.
3. Tip the mixture into the baking pan and press down with your fingers to flatten it. This is the almond crust. Bake for 10 minutes and set aside.

2nd layer: Gooey Chocolate Brownie
150g chocolate, chopped
60g butter
1 teaspoon instant coffee powder
2 eggs
50g sugar
50g all-purpose flour
1 teaspoon vanilla extract

1. Melt the chocolate and butter in a heatproof bowl set over a pan of simmering water. Once melted, remove from heat and stir in the instant coffee powder until dissolved. Leave to cool.
2. In another bowl, whisk the eggs and sugar until pale and creamy. Stir in the cooled chocolate mixture. Add the flour and fold gently to incorporate. Stir in the vanilla extract.
3. Pour mixture over the top of the semi-baked almond crust and bake at 180C for 15-20 minutes. Leave to cool completely. Preferably, leave the cooled cake in the refrigerator overnight.

3rd layer: Apricot and Honey Filling
1 cup dried apricots, chopped
1 tablespoon honey
4 tablespoons milk
2 tablespoons marzipan (see recipe below)

1. In a food processor, blitz the apricots with the honey, milk and marzipan until you get a homogeneous creamy yellow mixture.
2. Spread the apricot mixture on top of the cooled brownie, flattening with the back of a spoon to create an even layer.
3. Top with a thin sheet of rolled out marzipan. Press down gently until the marzipan sticks to the apricot layer.

4th layer (top): Marzipan
250 grams of peeled almonds
1 cup icing/confectioners sugar
1 small egg white

1. In a food processor, pulse the almonds until you obtain a very fine almond flour.
2. Add the sugar a quarter cup at a time and pulse until very well combined.
3. Finally add the egg white and pulse until the mixture starts to resemble marzipan. Pinch a bit of the dough and press in between your fingers, it should feel soft and pliable.
4. Roll the dough in a plastic film and refrigerate it for at least one hour. After that take it out and place on a clean surface dusted lightly with confectioners sugar. Roll out the dough and fold it two or three times. Flatten it again and return it to refrigerator. The dough is ready to be used when it is no longer sticky. (I left mine overnight)
5. Roll the marzipan flat in between two sheets of plastic film to about ½ cm thick. Cut into an approximate 8x8 inch square and carefully transfer this layer on top of the apricot layer. Press down gently until the marzipan sticks to the apricot layer.
6. Using a sharp knife, cut the marzipan bar into little squares about 2x2 inches each. Wipe the knife every time you cut so the layers of the bar will not run into each other. Serve immediately or store bars in an airtight container in the refrigerator for up to 3 days.

Friday, April 15, 2011

Vanilla (Chocolate & Matcha) Éclairs - French Fridays with Dorie


Its only my second week of French Fridays with Dorie, and the complexity of the recipes has already risen up a notch. From leisurely steaming broccoli last week to this, making éclairs. I was slightly intimidated to start off with but then realized that I had no real reason to be. Despite common perception, éclairs are actually not that complicated to make especially when you've got Dorie's soothing words guiding you.

My arsenal of choice for this challenge consisted of a wooden spoon, different-sized ziplock bags, gigantic piping tips, an ice water bath and really strong arms. Okay, I cheated on the arms part and gave in to the convenience of an electric whisk. If you even have the slightest intention of conjuring up choux pastry and its accompanying custard cream filling one day, then this you should know, there's going to be some seriously heavy duty stirring/whisking involved! So be prepared and muscle up your strong arm.

My ridge fetish

I don't want to mislead you into thinking that this was the first time I've ever attempted éclairs, oh no....I have made these puff, puff babies before. Once. My last flavor combination was lavender and black sesame éclairs with dulce de leche pastry cream filling. Quite the adventurous little missy I was, and I won't even waste your time explaining the rationale behind that feat. In short, those flavors worked amazingly well. You'll probably be relieved to know that this time round, the recipe in Dorie's book, 'Around My French Table' stated simply Vanilla Éclairs. Sadly, I had no excuse to go too far off the plot.


Saying that, however, I couldn't claim the right to call mine an adventurer's kitchen if I didn't at least try to explore other possibilities. So here are some things I did a bit differently to my heart's calling:
1. I used a star tip to pipe out my choux pastry because I actually like the beauty of ridges on my éclairs.
2. I opted for a bitter-ish, dark chocolate ganache glaze instead of the tart, sugary version suggested in the recipe. The ganache made for easy glazing, especially on the ridges. I just dipped the tops of the éclairs in the soft ganache and it spread very readily over and in between the ridges.
3. Apart from the vanilla flavored pastry cream, I also made additional chocolate and matcha cream fillings. It was easy, I just divided the vanilla cream into 3 equal portions, added melted chocolate to one and a teaspoon of matcha powder to the other. The third portion was left plain.
4. As I was preparing to fill the choux fingers, I had a lightning (haha) moment. Wouldn't it be a great idea to pipe two flavors into each éclair? Chocolate-vanilla. Vanilla-Matcha. Matcha-Chocolate. You get the idea. The execution wasn't as simple - I had to engineer a large enough piping bag out of heavy duty plastic ziplock, and fitted two little baby ziplocks in there filled with the different flavored pastry creams. Not a pretty sight as you can see below, but it worked. You can't tell from these photos but I actually had bi-flavored éclairs. It's nice to have a little bit of something for everyone, you know.

My makeshift ziplock piping bag for dispensing the double-flavored pastry cream!

5. It was raining a typical rainforest thunderstorm the day I made these so I knew there would be trouble as far as maintaining the puffiness of the pastry was concerned. Luckily, I'd burnt my fingers from hot ovens too many times just so I could gain this knowledge... which is, the best strategy for combating humidity is to let the cooked choux pastry dry and cool in the oven well after the stated cooking time. I simply turned off the heat, lodged a wooden spoon in the oven door (to keep it ajar) and left it for an hour. Guess what, the choux fingers stayed proudly puffy....not a single one had deflated.

Chocolate, vanilla, matcha or me?

So there you have it, a recount of my fairly uneventful (but plenty messy!) éclair attempt. The verdict from The Clan was super-thumbs up! Oh, the kids didn't really notice the double flavors so I managed to get them to down some matcha which is a sizeable achievement. If you wish to learn the recipe, you'll likely have to buy the book. After which, you might as well join along and cook with us. Take your pick of éclairs from the other FFWD bloggers here.

Monday, March 28, 2011

Blood Orange Onde-Onde with Dark Chocolate Filling

won't you celebrate with me
what i have shaped into
a kind of life? i had no model.
born in babylon
both nonwhite and woman
what did i see to be except myself?
i made it up
here on this bridge between
starshine and clay,
my one hand holding tight
my other hand; come celebrate
with me that everyday
something has tried to kill me
and has failed.

won't you celebrate with me by Lucille Clifton


When I think of sunny skies and a lightness in the air, I think of onde-onde, a favorite childhood dessert. Made of glutinous rice flour and filled with anything from nuts, sweet bean paste to palm sugar, with a decadent coating of grated coconut, these fresh, round dumplings are for me the epitome of simpler days, of happiness. My mother used to make onde-onde in the traditional pandan (green) flavor, filled with brown palm sugar that just melts in your mouth.  I opted to fill mine with chocolate because it won't be a Foodiva recipe if I didn't sex things up a bit!

I also added blood orange juice into the mix because I figured it would give a pretty, baby pink coloring and a subtle citrus fragrance to the overall dessert. In case you didn't already know it (although I can’t imagine why?), pink, citrus and chocolate go very well together… yes, they do.

The best thing about this dessert is that it can be made within minutes, with no baking involved. You only need to boil the onde-onde balls for about a minute before they are cooked and ready to eat!


The second best thing is what happens as you take a bite out of the soft, chewy onde-onde. Its contents spew out, then you start to feel and taste the sweet, dark chocolate oozing slowly onto your tongue. Sensory-wise, it's right up there fully approved by Dionysus (Greek God of Earthly Delights). Taste-wise, it's pretty good, too. Come on... you get chocolate, peanut, coconut and yes, blood orange flavors in one go! And that's before you even swallow.


Blood Orange Onde-Onde with Dark Chocolate Filling
Ingredients:
1 cup glutinous flour
2/3 cups blood orange juice
200g dark chocolate, chopped into 1/2cm chunks
1 cup dessicated coconut flakes

Method:
1. In a large bowl, combine the glutinous rice flour with blood orange juice and knead lightly to form a dough.
2. Pinch a small piece of the dough (about 1/4 of it) and drop it into a pot of boiling water. When the dough rises up the surface, remove it with a slotted spoon and shake off the excess water. Mix it back into the main dough and knead well to form smooth dough.(Adding cooked to uncooked dough stabilizes the whole dough). Cover the dough and set aside for about 15 minutes.
3. Bring the pot of water to boil again. Pinch a small piece of dough (about a tablespoon) and flatten lightly. Fill the center of the dough with about 1/2 teaspoon of chocolate. Pull the dough up to cover the chocolate, and pinch to seal the dough. Roll in your palm to form a smooth ball and drop about 5-6 glutinous rice balls at a time into the boiling water. When the rice balls float to the surface, remove them with a slotted spoon and shake off the excess water. I usually tap the spoon on an absorbent paper towel.
4. Coat the rice balls with coconut by rolling them in the flakes. Serve immediately. Also keeps for 2 days, covered, at room temperature.
 

Friday, December 3, 2010

Festive No-Bake Peanut Butter Tart


Peanut butter, the most basic comfort ingredient of many a childhood lunchbox or adult late-night sandwich. We always have a jar in the pantry, even though I seldom send my children to school with a peanut butter-laden treat and we seldom really delve into the buttery jar when there's no 'reasonable' occasion to. So why do we keep our stock of peanut butter? Just in case we have an uncontrollable urge to make something like this no-bake Peanut Butter Tart, I suppose. 


I say uncontrollable, but in actual fact, the urge to make this has been under sufficient control for the better part of a decade. Yes, I've snipped this recipe off a magazine that I had subsequently thrown away many years ago - the date on the page says October 2001, and now 2011 is just around the corner! It had niggled away at me for 10 years, this tart with the humble peanut butter and not-so-humble chocolate components. 


Before I lose the yellowing page completely (as we'll be moving house in a few months), I thought it's better to immortalise the recipe here and in the process, share it with others. Now seems like a good time to make it too because the festive season is looming and with the baking frenzy that precedes it, what could be better than a tart that doesn't need to shuffle for oven space (only fridge space)? This tart will surely help boost your superhost(ess) cred, and what's best, it requires only the minimal amount of  fuss. The rest of life should really be like this...


In my book, the best desserts are often the simplest. Graham crackers or Digestives biscuits and butter are blended to form the easy-to-make crust. It is filled with layers of chocolate ganache and a creamy peanut butter mixture, and finished with whipped cream and shaved chocolate (because chocolate is something you can never have enough of!). And in case you're wondering about that last photo, yes, the photographer-cum-blogger-cum-aspiring dieter does always get the first bite!

Happy no-baking, my lovelies!

No-Bake Peanut Butter Tart
Makes one 13 ¾ by 4 ¼ -inch tart
Ingredients:
10 graham crackers or Digestives
6 tablespoons unsalted butter, melted
3 oz good quality dark chocolate, plus more for shaving
1 ¾ cups heavy cream 

3/4 cup creamy peanut butter
1/2 cup (4 oz) cream cheese
1/3 sweetened condensed milk

Method:
1. Place biscuits in a food processor and pulse until they turn into fine crumbs. Transfer to a bowl, add butter and stir until combined.
2. Place crumbs in a rectangular tart pan (ideally) with a removable bottom. Press crumbs up the sides of the pan with your fingers to form the edge of the tart, then press evenly with the back of a spoon over the bottom of the pan. Chill in the refrigerator while making the filling.
3. Chop the chocolate into small chunks and place in a medium bowl. Place 1/2 cup of the cream in a small pan over medium heat and bring to a boil. Pour over the chocolate, set aside for 5 minutes to yield chocolate ganache. Whisk to combine. Set bowl in an ice bath (a bowl filled with ice and water) until ganache is cool, whisking constantly.
4. Once cool, remove from ice bath and whisk until ganache is just thick enough to hold its shape; do not overbeat. Spread in the bottom of the prepared crust, and return to the refrigerator until set.
5. Combine peanut butter, cream cheese and condensed milk in a food processor and process until smooth. Transfer to a mixing bowl.
6. Whip 3/4 cup heavy cream to soft peaks. Add whipped cream to peanut butter mixture, whisk to combine.
7. Spoon the mixture into the prepared crust, return to the refrigerator for 2 hours or overnight. Remove tart and transfer to a serving platter 10 minutes before serving. Whip remaining 1/2 cup cream and spoon dollops of this on top of tart. Use a vegetable peeler to shave chocolate curls for garnish.

Related Posts with Thumbnails