Foodiva's Kitchen

Monday, December 12, 2011

The Super-Sized Moon and Muffin Monday: Baklava Muffins with Figs and Rose Syrup Glaze

Tell me what you feel in your room when the full moon is shining in upon you and your lamp is dying out, and I will tell you how old you are, and I shall know if you are happy.
~ Henri Frederic Amiel

I'm thrilled to be joining in Muffin Monday again after a long hiatus. Thank you, Anuradha of Baker Street blog for including me after my rather last minute plea :). Actually, I was quite excited at the thought of baking some special, festive-flavored muffins this holiday season and this week's recipe was no disappointment. Baklava Muffins! Have you ever tasted such a thing? Well, it certainly was my first time having a baklava that's not traditionally diamond shaped, with no sticky, crispy bits of dough flying all over the place upon that first bite.


Wanting to play up the baklava-ness of the muffins, I mulled over ways to incorporate rose flavor into the batter. Using rosewater would've been the obvious way to go, and while I did have it, I also remembered something else I had lying around...just begging to be noticed, eaten or used. They're these flower-shaped, pink rock candy from LadurĂ©e that are infused with natural rose flavor. Everyone else at home stayed away from these because to them the floral scent was 'kinda weird' in a candy, and there was only so much I could eat all by myself. 


I ground the candy up in my grinder and realized I'd just created a two-fer. There was no longer any need for the sugar because the rock candy essentially did the same job, and it contained flavoring too! Pistachios would have made the muffins more authentic to the Middle-Eastern style of baklavas, but alas I had none (no walnuts either) and used almonds instead. Dried figs were thrown in the batter because they reminded me of the bounties of the Mediterranean and Middle East where baklavas are often listed as part of the national cuisine. 

Cooked and glazed

For the topping, I replaced the honey with a pink glaze concocted out of confectioner's/icing sugar, rose syrup and milk. Okay, the pink won't have you instantly exclaiming "Aha, baklava!", but didn't anyone ever tell you not to judge a muffin by its color? If you're one of those who are skilled at word association, you'd probably spot the pink and think, 'Turkish delight', which in turn makes you think of 'Turkey', which then gives you flashes of (no, no, not Christmas!) 'Baklava'. A-n-y-w-a-y..., these muffins tasted pretty darn good, with a pleasantly floral note and soft, pillowy texture. Thanks An for the fab recipe!

Super-Sized Moon

How about that total lunar eclipse ending up with a sombre, reddish-colored moon last Saturday (Nov 10), did you all get to witness it where you're at? This was my second time seeing it this year (last one was in June), but I would have to wait another 2 years to see it again. I decided to stalk the moon and take pictures of the eclipse in progress.

Ever since I can remember, I've always been immensely fascinated by astronomy. If I hadn't been reincarnated as the successfully frivolous blogger that I am now, I believe I would've made an annoyingly awesome astronomer or astrophysicist. I memorize the nomenclature of the stars and constellation shapes in the same way other people memorize their home address or their first love's eye pupil color. 

Anyway, nobody else in the house was excited to join me in observing the moon being gradually covered by the earth's shadow (their reasoning - when you can see it on YouTube, why would you want to watch the real thing as it's happening? They are right of course, but still I find it so sad). So armed with my camera with a lens that only zooms up to 20 times, a large cup of hot chocolate and my faithful neck travel pillow (let's face it, there was going to be a lot of looking up involved), I set about to capture the total eclipse, seen below.


Congratulations on making it to the end of this post. You have no idea how grateful I am that you're interested in anything else here apart from these muffins. I'm off to munch on a baklava muffin now, did I already tell you they are really, good? 

Note: Muffin Monday is an initiative by Baker Street. A culinary journey of sharing a wickedly delicious muffin recipe every week. Drop in a quick line to join her on her journey to make the world smile and beat glum Monday mornings week after week.

Baklava Muffins with Figs and Rose Syrup Glaze
Filling:
1/2 cup chopped walnuts (almonds*)
1/2 cup dried figs, sliced thinly*
1/3 cup sugar (Rose-flavored candy, ground finely*)
1 1/2 teaspoon cinnamon
3 tablespoons butter, melted

Muffins:
1 cup + 7 tablespoons all-purpose flour
2 teaspoons baking powder
1/2 teaspoon baking soda
1/4 cup sugar (Rose-flavored candy, ground finely*)
1 large egg
3 tablespoons unsalted butter, melted
1 cup + 2 tablespoons buttermilk (substitute: 3/4 cup plain yogurt + 1/2 cup low fat milk)

Topping:
about 1/2 cup honey (I used the glaze below instead)

Rose Syrup Glaze*
1 cup confectioner's sugar, sifted
1 tablespoon butter, melted
1 tablespoon rose syrup (Monin brand)
2 tablespoons milk

* These are my variations.

Method:
1. Preheat the oven to 200C/400F and prepare a 12 hole muffin baking pan with liners
2. For the Filling: Mix all the ingredients in a small bowl, set aside
3. For the Muffins: In a large bowl, combine flour, baking powder, baking soda and sugar.
4. For the Topping: Mix the confectioner's sugar with butter and mix. Add rose syrup and milk to make a drizzling consistency and pass through a sieve to eliminate lumps. Set aside.
5. In a small measuring jar, lightly whisk together the egg, buttermilk and butter.
Make a well in the dry ingredients and pour the egg mixture. Stir gently. Its okay if its bumpy.
6. Fill the muffin cups one third, add the filling and then top with the muffin mixture again till the cup is two thirds full.
7. Use any remaining filling as a topping. Bake for 15 minutes until golden brown.
Take out from the oven and transfer to a wire rack, still in the muffin liners. Let cool and drizzle with rose syrup glaze.


Tuesday, December 6, 2011

Crispy Spiral Garlicky Mustard and Rosemary Murukku

It's unrealistic to live your life within such strict parameters.
~ David Sedaris

It's safe to say that this blog leans towards the sweet more than savory side of things. However, despite still baking desserts and sweet breads regularly in my kitchen, I have produced nothing that I truly wanted to post up here. Uninspired baking, I call these wasted sessions. So imagine my surprise when an exciting recipe idea suddenly popped up in my head that was not sweet (and therefore not my forte) but the exact opposite - savory.


I had been wanting to try my hand at making the spicy Indian snack, Murukku, for a while but the thought had been withheld by my lack of a press or a sev maker used to churn out perfect murukku spirals. That is, until I stumbled across a YouTube video showing that it can all in fact be done...solely by hand! Of course, my first attempts at twisting the pliable rice flour dough are not very pretty but at least there is some semblance to the murukkus made by the pros in Indian kitchens across the globe! 


Now, flavor-wise was where I had purposely decided to make it un-Indian. My tastebuds had experienced a sensorial shift recently when a friend gifted me with a substantial packet of crispy, floury tidbits from her travels abroad. The snack was so addictive that I really wanted to recreate it once I ran out of the stuff (which didn't take very long - less than two days). I  tried to dissect the flavor profile and deduced that the snack must've contained a healthy dose of mustard and garlic because no one in the house wanted me to smother them with my enthusiastic kisses even long after the packet had run empty...


So, when the murukku-without-a-press video came along, I immediately knew I wanted to incorporate mustard and garlic in the soft dough and dispense with the traditional Indian spices. I also wanted to utilize my latest fresh herb, rosemary - sown by my mama, of course, and passed over to me so it doesn't wilt and die off at the seedling stage. (To all of you with green fingers, I envy your gift!)

My thriving rosemary plant, photo taken from Instagram (@divababu)

Along this process, there were several other things I discovered:
  • my handling and twisting of the dough was genuinely as pathetic as it looked in the video. That's okay though, I'm not into beating myself up over nothing and will probably get better with practice.
  • when I got tired of the twisting and turning, I made simple snake-like spirals but these unfortunately didn't remain crisp for very long after cooling. Perhaps the dough was still too moist inside, I must investigate this further.
  • this spiral snack does double-duty as the perfect fashion accessory. The fact that you can munch on them in between photoshoots make them extra-covetable. Yep, there will never be any skinny girls on my set!

These are best consumed right after they've cooled down and are still crisp. The flavors meld really well together that the exact combo could be adapted to other cracker recipes as well. The murukku tasted incredibly cheesy, a pleasant surprise, while texture-wise they are very similar to thin breadsticks. Once I figure out how to make them stay crisp when stored in an airtight package or container, I'll be packing them to be presented as gifts over the festive season!

Crispy Spiral Garlicky Mustard and Rosemary Murukku
Makes: 16 spirals (2-inch)

Ingredients:
3/4 cup sour cream
1 tsp finely chopped Rosemary leaves
2 garlic cloves, minced
1 teaspoon mustard powder
1 teaspoon brown sugar
1 tsp salt
3/4 cup rice flour
2 tablespoons all-purpose flour
ground pepper, to taste
2-3 tablespoons extra rice flour, to add if dough is too sticky
oil, for deep frying

Method:

1. In a medium mixing bowl, add all ingredients except the extra rice flour and oil and mix well with a spatula.
2. Knead to form a soft dough using your hands. If dough is still too moist and sticky, add rice flour a tablespoon at a time and knead in.
3. Place a plastic bottle cap on a napkin or serviette. The napkin prevents the dough from sticking to the working surface. Form small balls with the dough and twist out each one into a spiral rope around the bottle cap (please refer to the video above).
Note: The thinner the ropes, the crispier will be the murukku.
4. Heat oil on medium high heat in a pan. Carefully lift the napkin to turn the spirals onto your palm and gently lower into the hot oil. Do this slowly or you will be sad if any of the hot oil lands on your skin :).
5. Fry as many spirals as will fit into the pan without overlapping each other. Once they turn light golden, flip them over and fry other side until light golden. (about 3 minutes each side)
6. Remove spirals from oil onto a paper-towel lined plate. Cool completely before eating. Store in an airtight container or ziploc bag at room temperature. Good for consumption up to a week.

Friday, December 2, 2011

French Fridays with Dorie - Matafan

So we contemplate each other, and we want each other, and I give it life and warmth, and it gives me my reason for living.
Paulo Coelho, The Alchemist
I returned home from my foot massage session to this. Fluffy. Mashed potatoes. Pancakes. Don't these four words sound really good to you? Put them consecutively together in one sentence and you've got the perfect thing to start off or complement your meal, or simply to patch up those pesky hunger pangs. Matafan, that's what they're called in France and this is our French Fridays with Dorie recipe this week. 


You would make these savory pancakes not by way of a regular pancake batter. The potatoes need to be roasted with salt for just over an hour and passed through a sieve or potato ricer. I admit I did neither, instead I boiled little slices of potatoes and mashed them with my old-fashioned potato masher. In fact, preparing the matafan batter only took me a mere 20 minutes or so to do. The photoshoot session might have taken longer to orchestrate.... :).


As I bit into the first matafan, I was expecting a pancake-y texture but it wasn't like that at all. In fact, it tasted a lot like mashed potatoes contained within a pancake! Or perhaps more accurately, a mashed potato fritter. I made mine as blini-sized appetizers, topped with creme fraiche and basil-roasted chicken strips. According to my food-obsessed brain, they were totally delicious and matafan definitely needs to be on our regular rotation from now on.

I bet the other Doristas had their own revelations about matafan, and if you'd like to be in on what they are, have a look here.

Foot massage was great... but these fluffy potato pancakes were even better!

Have a fab weekend, everyone!

Wednesday, November 30, 2011

Matcha Stollen with Rose Marzipan Filling

If I can't be beautiful, I want to be invisible.
~ Chuck Palahniuk

I had spent 3 Christmases in Germany while I worked there years ago, and every time the festive season rolled around, the shops, markets and bakeries were filled to the brim with beautiful baked goodies bearing the scents of cinnamon, almond, apples and all the heartwarming things of the earth. Stollens would be amongst the good things in abundance and I never missed the opportunity to purchase and savor them - lots of them! The ones I especially enjoy are the marzipan-filled stollens, so moist and heart-stoppingly rich...it's no wonder I was then double the size I am today!

You may have noticed that I have done zilch-all on this blog lately. It's not that I've stopped cooking or baking completely, for if you're on Instagram, you may have spotted some of my baked goods being captured and uploaded for posterity there. It just seems to me like everything I do right now is bordering on the (how shall I phrase this?)...UGLY. Yes, that's right. Not nearly postable, in fact downright yuckky. Or maybe that's just how I'm feeling inside.

Anyway, a quick peek at the blogosphere shows me that many people around the world are in a celebratory mood, and therefore coming up with joyous kinds of food. The festive season has dawned, Ms. Foodiva, so why don't you get with the program already? 


So yes, today I decide to crawl out of my own blue funk and attempt a blasphemous take on the Christmas Stollen. One with a green dough laden with premium matcha and filled with a homemade marzipan roll that's just on the shady side of pink due to the rose syrup I used to flavor it. Apart from the usual dried raisins and cherries, I also kneaded in some homemade candied ginger and candied lemon and orange peels, but didn't bother with the nuts and spices. As someone who's eaten plenty of stollens in her life, take it from me, you won't find this exotic one anywhere on the planet (yet) outside of my very own kitchen!


I won't tire you needlessly with the history of stollens and what the swaddled loaf signifies, but if you're interested you can have a quick read here. What I am going to regale you with, however, is the tale of what actually happened to me while I was baking this. After I was done making the marzipan and candied ginger/peels (which I dried under the hot sun and not overnight as should have been done), I set about to make the dough and film the process while I was at it.


You can imagine that the set up took a fair amount of time and by the second hour into the first rising, it was very nearly 5pm and the precious sun was sinking fast in tandem with my heart. Then I suddenly remembered  I had to be at another place at 5pm, an important appointment that had totally slipped my mind, so I had to abandon the dough and tend to real life first.


2 hours later (4 hours total first rising), I returned to find my dough hadn't exploded and as a favor to me, had risen very, very slowly. Phew... all was well.

Normally after the process of baking, the fresh loaves are buttered two times before they get a coat of sugar. I buttered mine before and after baking, just to be on the safe side of decadence. What usually happens to the stollen after the sugar coating is that it is sealed to allow the fruits and spices (if you're using any) to develop their flavors. The sealing is also the reason a stollen can be stored and stay fresh for a long time.

The texture of this stollen is somewhere in between a bread and a cake and is an excellent alternative to a traditional Christmas cake. Although my rolling wasn't quite up to my usual standards, causing the marzipan cylinder to happily sit on one side, it didn't affect the taste of the loaf one bit. Yes, it's not my most beautiful stollen, but then so what...it's festive and rocks to the high heavens with original flavors. It certainly does not want to be invisible!


Matcha Stollen with Rose Marzipan Filling
(adapted from One Perfect Bite)
Makes: 1 loaf

Ingredients:
2¾ cups all-purpose flour
2 tablespoons matcha powder
1/4 teaspoon salt
1 scant tablespoon dry instant yeast
1/2 cup milk
6 tablespoons butter
1/4 cup sugar
1 large egg, lightly beaten
1 cup raisins
2 tablespoons candied orange peel, finely chopped (see recipe below)
1 tablespoon candied lemon peel, finely chopped
1 teaspoon candied ginger strips, finely chopped
1/2 cup quartered, glaced cherries (mixed red and green)
250g rose-flavored marzipan/almond paste (see recipe below)
2 tablespoons butter, melted for brushing
icing or confectioners' sugar, for dusting

Method:
1. Mix salt with flour in a microwavable bowl. Place in microwave oven and heat on HIGH power for 1 minute. Whisk. Add matcha powder and yeast and whisk again to mix. Set aside.
2. Combine milk, butter and sugar in a microwavable bowl. Cook on HIGH power for 1 minute, or until butter is melted and sugar is dissolved. When mixture is tepid add egg and whisk to combine.
3. Pour milk mixture into flour and mix well until the dough leaves the sides of bowl and forms a ball. Add candied fruits and nuts working into dough with hands.
4. Turn dough onto a lightly floured surface and knead for about 5 minutes, or until fruits and nuts are evenly distributed.
5. Place dough into an oiled bowl, cover with plastic wrap and let sit in a warm place until doubled in size, about 2 to 3 hours.
6. Turn onto a lighly floured board. Flatten and roll into a 14 x 8-inch rectangle, about 1cm thick.
7. Form almond paste into a log about 13-inches long. Place in the middle of dough, then roll dough around it. Pinch the and two ends of the cylinder and turn edges under. Cover a baking sheet with parchment paper. Place dough on parchment paper, cover with damp towel and let rise until double, about 1 hour. Brush loaf with melted butter, and set aside the remainder of the butter.
8. Preheat oven to 180C/375F. Bake in the center of oven for about 35 minutes, or until an even golden brown. Move loaf to cooling rack. Brush top with melted butter. Let cool for 30 minutes. Dust liberally with confectioners' sugar. Can be frozen up to a month and also keeps at room temperature for a few days if wrapped with plastic wrap.


Candied Ginger, Orange and Lemon Peels
(Adapted from Wild Yeast)


Ingredients:
1 medium lemon
1 medium orange
2-inches fresh ginger
water for blanching
2 cups caster sugar
1 cup water

Method:
1. Score the orange and lemon peel in quarters. Peel off, leaving the orange and lemon whole.
2. Peel and slice the ginger into thin strips, set aside.
3. In a saucepan, cover the peels with cold water. Bring to a boil, drain, and rinse the peels in cold water.
4. Slice each peel into 4 strips. Blanch the peel strips twice more, changing the water each time.
5. In a saucepan, combine the sugar and water and bring to a boil over medium-high heat.
6. Add the ginger and peels, then reduce the heat and simmer until the peels are starting to become translucent, about 45 minutes.
7. Drain the ginger and peels, reserving the syrup in a jar for future use.
8. Place the peels in a single layer on a wire rack and allow to dry overnight.
9. Store in an airtight container, or in the freezer. Store the syrup in the refrigerator.

Rose-Flavored Marzipan


Ingredients:
250g of peeled almonds
1/2 cup icing/confectioners sugar
1-2 tablespoons rose syrup (Monin)
1 small egg white

Method:
1. In a food processor, pulse the almonds until you obtain a very fine almond flour.
2. Add the sugar a quarter cup at a time and pulse until very well combined.
3. Finally add the egg white and one tablespoon rose syrup. Pulse until the mixture starts to resemble marzipan. Pinch a bit of the dough and press in between your fingers, it should feel soft and pliable. Add more almond flour and rose syrup if necessary.
4. Roll the dough in a plastic film and refrigerate it for at least one hour. After that take it out and place on a clean surface dusted lightly with confectioners sugar. Roll out the dough and fold it two or three times.Roll into a 13-inch long cylinder and return it to refrigerator. The dough is ready to be used when it is no longer sticky.

Monday, November 14, 2011

Nutella Ding Dong Cake


A Ding Dong Cake - now doesn't that name just fire up the imagination? When I was assigned the blog Sweet Flours for this month's Secret Recipe Club, I found out that the blog author Allison and I have one thing in common - a big sweet tooth. Her blog features plenty of baked goodies which makes it a dream site for me. She actually baked this cake for her great grandmother's 91st birthday, and another time once before for her 89th birthday. I took my cue from great grandma, that lady sounds like she has quite a discerning taste in her choice of birthday cakes :).


At first I hadn't a clue why the cake was named so, but after a bit of googling discovered that Ding Dong cakes are those little chocolate-covered cakes with with a white creamy filling sold by Hostess Brand. The ones I so obviously had never eaten while growing up. While Allison had made a regular cake-sized version of Ding Dongs, I decided to make the original puck-sized ones because sometimes eating minicakes makes things a bit easier on the conscience. And a lot easier for me to fit into my skinny Levi's too, not that they're not already made of stretch denim, but still...


The recipe for this cake originally came from Smitten Kitchen, but the adapted recipe can be found here on Sweet Flours. The process of making the minicakes was slightly fiddly, but nothing that I hadn't already done in my kitchen many times. The coffee-chocolate cake batter was straightforward enough, however the marshmallow filling needed a fair amount of whisking in a bowl placed over a pan of simmering water, a bit like making swiss meringue buttercream frosting but without the butter. 

In an original Ding Dong (I just love saying that!), the entire chocolate cake is coated with a thin layer of chocolate glaze but Allison had coated her birthday cake with chocolate ganache, all glistening on the top and sides. I was a bit short for time on this occasion so my topping was simply warmed up Nutella (30 seconds in the microwave) that I spread with a knife and let drizzle a bit down the sides. Did I just say simply Nutella? Of course, that wasn't the case at all because you and I know that Nutella is King and in actual fact stole the show!
    
This will be my last participation in the Secret Recipe Club. It has been really fun discovering many new blogs and cooking from my assigned ones, however I feel it's time to get back to doing my "own thing". Creating recipes that come from my own heart and imagination and make me truly fulfilled, you know. I'm on a quest to get my old ding dong back! :-)


Friday, November 11, 2011

French Fridays With Dorie - Spiced Squash, Fennel and Apple-Pear Soup

Soup is cuisine's kindest course. It breathes reassurance; it steams consolation; after a weary day it promotes sociability, as the five o'clock cup of tea or the cocktail hour.
~ Louis P. De Gouy, ‘The Soup Book’

I've been really atrocious at catching up on everyone else's blogs this past fortnight or so and therefore am surprised (and majorly touched) that people still do come over and leave comments on mine. To all those kind souls who have visited this site and taken the time to let me know you were here, a very big thank you. And apologies that I have been a rude hostess and not acknowledged your visits until now. When I'm mentally "back in the zone", I'll make an effort to come around to yours and give you a big, massive hug :-). 


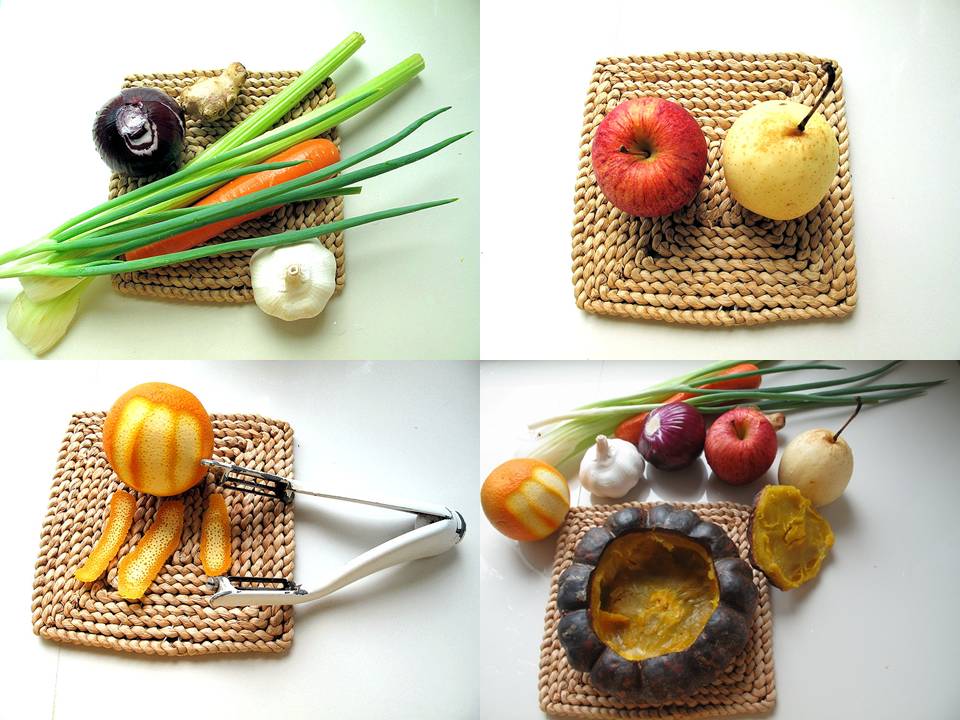
Until then, you can take some comfort in this soup I made specially for French Fridays with Dorie - Spiced Squash, Fennel and Apple-Pear Soup. It contained everything listed in the title, plus more...and it this case, 'plus more' meant slight improvisations on the original ingredients. For the squash, Dorie recommended we use the Long Island Cheese Squash but I wasn't quite sure whether we could get that variety over here. So I went down to my mom's farm to pick a Kabocha squash to use in this recipe instead.    


Another ingredient I didn't have was fresh fennel, but I had tons of fennel seeds in my spice cupboard so I simply assumed they were interchangeable? Anyway, for the spices part of the recipe, I ground the fennel and cumin seeds together in a grinder and sieved the resulting powder to eliminate any chunky bits. The ginger, nutmeg and black pepper were freshly grated/ground in order to extract their strongest aroma. 


At the time of making this, I didn't have any regular green pears but what I did have was a sole Asian (or Chinese) pear in the fridge that knew it was somehow destined to be part of this soup. A red apple was also tossed in there to keep the pear company, as was a carrot because I had this theory that: 1. it (ie. the carrot) would add a lovely orange hue to the yellowish squash soup and 2. it would make up for the lack of mass due to using fennel seeds instead of the bulb. Of course, the whole theory bombed, as you may already have gathered.

Hearty goodness in 6 easy steps

By the way, ever notice how  I like to list my points down in numerical form just to make things clear (in my head more than anything else)? It's an annoying, slap-worthy habit but I can't always stop myself from running off all these lists in my head...and yes, they invariably come out while I'm typing up my posts ;).

Garnish - the spring onion strips curled up when immersed in iced water


After blending, I found the soup to be the exact texture and consistency I wanted it to be. Not too thick nor too thin, which was absolutely lucky on my part, I suppose. The murky beige color was slightly off-putting though, probably the result of mixing the greens with orange-yellow squash, and not forgetting purple from the big onion!. Nevertheless, when the first spoonful entered my mouth... I found the euphony of flavors to be very pleasant and so comforting that my lips involuntarily turned upright into a big grin :-).

Singapore Airlines must be missing a soup spoon right now.

My online cooking group or Doristas will be rustling up their own variations of this squash soup, so if you would like to hop over here, you can have a look at theirs.

Have a gorgeous weekend!


pumpkin

Monday, November 7, 2011

Crazy Cooking Challenge - Mashed Potato Spring Rolls

Sometimes we will hit the target but miss the self. At other times we will miss the target but hit the self. Our purpose, though, is to hit the target as the self and hope that the sharp sound of arrow penetrating paper will awaken us from the so-called 'dream of life' and give us real insight into the ultimate state of being.
~ Hideharu Onuma sensei, Japanese Kyudo archery

It seemed like I had simply disappeared over the past week or so, but in reality, I am still here. Just holding off on blogging while tending to my (rather neglected) life. That's the trouble with passion sometimes, you can get so thoroughly consumed by it at the expense of everything else in your life. Okay, when I write "you", who I'm really talking about is myself. I went off to tend to my garden because the weeds had started to overrun my beautiful patches and it was time to pull them out and discard them. Yes, metaphorically speaking :-).

Photobucket

So to start off this week, I'm back for another Crazy Cooking Challenge, this time sharing a recipe from Momofuku for 2 blog. Tina of Mom's Crazy Cooking, as host of the challenge declared this month's theme to be "Mashed Potatoes" and I thought....wow, what a breeze! Well, I couldn't be more wrong because there are thousands (if not more) mashed potato recipes out there and it proved really hard to decide which one to showcase for this post. 


In the end, I settled for this Mashed Potato Spring Rolls recipe posted by Steph of Momofuku for 2. In case you haven't come across her blog, this is a woman who has cooked and eaten her way through all of David Chang's Momofuku Cookbook and this recipe was adapted out of that book. Steph has no official association with the Momofuku brand, chain or David Chang, but she'a a huge Momofuku fan and enjoys cooking their recipes at home for her and her husband (who's the 'for 2' person).

I, on the other hand, chose this recipe not because it was created by food Sifu, Chang but due to a variety of other reasons which I shall list here:
1. It contains mashed potato (right on theme).
2. It includes bread (we all know carb on carb = sinful, but oh-so-irresistible!).
3. There is frying involved (I know, it's starting to sound bad but bear with me).
4. There is 'spring roll' in the recipe title (although I just realized that mine looked more pop-tartlike than cylindrical).
5. It contains some heat and a green vegetable (which to me negate 1-3 above).


In case you're wondering, yes, it does taste as lovely as it looks....great as a snack or appetizers. Although after you've finished two, you probably won't want to eat anything else because of the thought that it'll take roughly 200 hours on the treadmill to work all this off! 

For a mashed potato overload, head over to the blogs listed in the linky below. Go on, show them some love and oh, don't forget to vote for your favorites.


Mashed Potato Spring Rolls
(recipe from Momofuku For 2)
Serves: 2

4 slices white bread
1/4 cup mashed potato
2 green beans, cooked and sliced in two
pinch shichimi togarashi
salt and pepper to taste
1 egg yolk

oil for frying
sriracha for dipping

1. Trim the crusts from the bread and using a rolling pin, roll out each bread slice to a thin 3-by-5-inch rectangle.
2. In a bowl, combine the mashed potatoes and togarashi; season with salt and pepper. 
3. Brush the edges of 4 bread rectangles with the egg yolk mixture. Shape 1 tablespoon of the potato mixture into a log along a long edge of a rectangle, leaving 1/2 inch on each end. Top with half a green bean. Tightly roll up the bread to form a cylinder; press the ends together to seal. Repeat with the remaining bread and potato mixture.
4. In a skillet, heat the oil on medium high. Add half of the rolls and fry, turning occasionally, until well-browned, about 1 1/2 minutes. Transfer to paper towels. Repeat with the remaining rolls. Serve with sriracha.


Related Posts with Thumbnails