Foodiva's Kitchen: lime
Showing posts with label lime. Show all posts

Monday, March 19, 2012

Muffin Monday - Honey Pineapple Olive Oil Muffins with Lime Glaze


These week's muffin recipe for Muffin Monday is another easy one, if you have a bowl, a spatula and a muffin tray, you're all set to make these. The original recipe provided by Anuradha of Baker Street (our host) was for Honey Lemon Olive Oil Muffins with Lemon Glaze but I decided to switch it up a little and substitute the lemon flavor in the batter with pineapple, and in the glaze with lime.

I baked these in the evening and only 5 muffins survived for the photoshoot the following day! 

I have baked cakes and muffins with olive oil before and loved it. Having it in baked goods reminds me a lot of the breads and cakes of the Mediterranean region, ones I could eat truckloads of :). Thank goodness then that I reside far away in the tropics (where there are other, different food-related sins!).  From what I know, the combination of olive oil and tangy citrus are complementary flavors in cakes, so I reasoned that switching one citrus for another would have the same effect.


I opted for the more tropical citrus accents of pineapple and lime, both of which I have in abundance either growing in my garden or from the vegetable stall down the road from my home. The chopped pineapple bits were divided into two portions, one was mixed into the batter and the remainder was sprinkled on top of the muffins for effect. You won't get perfectly smooth muffin tops as a result, but there's no chance of mistaking these pineapple muffins for anything else! 

Pineapples from my local vegetable and fruit guy (L) and limes from my garden (R). 
Limes photo taken from my Instagram account :)

A quick half an hour is all you need to produce these beautifully light and refreshingly tangy muffins. If you have an extra 10 minutes, you might probably want to make the cute toppers shown here using toothpicks and bits of lime and pineapple. Squeeze the lime on top of the glaze for that extra zing and while you're at it, why not pretend you're on on a tropical holiday! ;)


Note: Muffin Monday is an initiative by Baker Street. A culinary journey of sharing a wickedly delicious muffin recipe every week. Drop her a quick line to join her on her journey to make the world smile and beat glum Monday mornings week after week.  


Honey Pineapple Olive Oil Muffins with Lime Glaze
(Adapted from Pinch My Salt)
Makes 12 muffins
Ingredients:
2 1/2 cups all-purpose flour
2 teaspoons baking powder
1/2 teaspoon baking soda
1/2 teaspoon salt
1/3 cup honey (preferably local)
1/2 cup sugar
1/2 cup extra virgin olive oil
1/2 cup buttermilk, at room temperature
2 large eggs, at room temperature
2 tablespoons grated lemon zest (I used 3/4 cup pineapple chunks, cut into small cubes)
2 tablespoons freshly-squeezed lemon juice (Omitted this)

Glaze:
1/2 cup powdered sugar
2 tablespoons freshly-squeezed lime juice

Method:
1. Preheat oven to 180C/350F. Spray a 12-cup muffin tin with non-stick baking spray or line with paper cups (spray the inside of the cups with baking spray to prevent muffins from sticking to the paper).
2. In a large bowl, whisk together flour, baking powder, baking soda, and salt until well combined. Set aside.
3. In a separate medium bowl, combine honey, sugar, olive oil, buttermilk, and eggs. Whisk together until well combined. Divide the pineapple chunks into 2 portions and stir 1 portion into the mixture. Reserve the rest of the pineapple for the topping.
4. Pour liquid ingredients into the flour mixture and stir with a wooden spoon just until all of the flour is incorporated. Don’t overmix.
5. Divide batter between muffin cups using a large spoon or mechanical ice cream scoop – the cups should be mostly full. Sprinkle remaining pineapple on top of the muffins.
6. Bake for 17 – 21 minutes or until the center of a muffin springs back lightly to the touch or a toothpick inserted into the middle of a muffin comes out clean. Check early and watch carefully, they will brown fast.
7. While muffins are baking, make glaze. Sift powdered sugar in a small bowl and stir in the lime juice, mix until well incorporated.
8. Let muffins cool in pan for 5 minutes then remove to a wire rack. Brush the tops of the muffins with glaze while they are still warm. Let cool completely.

Monday, October 24, 2011

Ginseng Leaf Salad with Pomegranate, Orange and Green Thai Mango

There can be no other occupation like gardening in which, if you were to creep up behind someone at their work, you would find them smiling. 
 ~ Mirabel Osler

My mother is the most gifted gardener I know. For as long as I can remember, she never possessed the best-looking nails because of all the muck she plays around with everyday, but as a positive spin-off of that, we always had really nice gardens wherever we lived. Even when there was no garden, like the house we had in Central London where there was only a rooftop area for some pots of greenery...well, she managed to landscape that area to make it pretty somehow. 

Monday, October 10, 2011

Muffin Monday - Basil Lime Olive Oil Muffins


I'm back on the Muffin Monday wagon this week, and what a delicious and healthy recipe we were given to try out. Our host,  An of Baker Street provided one of Giada De Laurentiis's recipes to make Olive Oil Muffins. As much as I think butter rules when it comes to baking in general, olive and coconut oils do come in as equal seconds.

Tuesday, August 16, 2011

#BakeTogether: Summer All-Year Round Papaya and Longan Cake with Lime Syrup


Have you noticed that I seem to be a part of some online cooking group or another lately? I honestly can't help it... I enjoy being in the company of people who love food, who cook/bake together either weekly or monthly (or both) from the same recipe or out of the same theme. The variations to one recipe are often mind-boggling, and the warm camaraderie within each group is something I wouldn't trade for the world. 

There is also the matter of discipline. Being in a group forces me to work within timelines and strange as it seems for someone who lives a leisurely-paced life on a tropical island, I sure do like a follow a pretty tight schedule when it comes to this blog. Maybe I'm borderline OCD, who knows :-).

Sunday, July 24, 2011

Lemongrass Chilli Lime Ice Cream with Black Sesame Langues de Chat

I break tradition
Sometimes my tries
Are outside the lines

We've been conditioned
To not make mistakes
But I can't live that way, no
~ Lyrics from Unwritten, Natasha Bedingfield

My friend Nancy of Spicie Foodie blog is currently running a fun recipe contest with a giveaway which runs until July 27, 2011. The winner she eventually chooses will win a copy of her brimming-with-spices cookbook, An Epiphany of the Senses and the great news is, it's open to everyone. Yep, all of us on this planet are eligible to enter. Well, the catch is that you'd have to write up a post featuring a recipe that makes Nancy hungry and also uses several of your favorite spices. If it's your original creation, all the better!

Friday, May 27, 2011

French Fridays with Dorie - Cardamom Rice Pilaf


A memory is what is left when something happens and does not completely unhappen.
~Edward de Bono

The best rice pilaf (or pilau rice) I had ever eaten was at an Indian restaurant in Malvern. It was located down the road from my boarding school, tucked away at the base of the Malvern Hills in Worcestershire, UK. Or maybe it seemed like the best because of the memory tied to it and sometimes that's what the brain chooses to remember over everything else.

Friday, May 20, 2011

French Fridays with Dorie - Beef Bacon, Eggs and Asparagus Salad

“We are beginning to wonder whether a servant girl hasn't the best of it after all. She knows how the salad tastes without the dressing, and she knows how life's lived before it gets to the parlor door.”

Djuna Barnes

Two bacon-containing dishes two weeks in a row....sigh. What's a (non-bacon-eating) girl to do? Improvise, that's what. Although you'll be relieved to know that for this week's FFWD, I actually went with the meat part and used beef bacon. It's as fat-laden as actual bacon and was just perfect. End of fret session.

Tuesday, April 19, 2011

Dragonfruit and Coconut-Lime Bread Pudding


“Enchant, stay beautiful and graceful, but do this, eat well. Bring the same consideration to the preparation of your food as you devote to your appearance. Let your dinner be a poem, like your dress.”


- Charles Pierre Monselet, French journalist


It's that time of the year and red-fleshed dragonfruit has made its appearance in the markets once again here. How long I have waited for you to return.... you fushia-pink, non-fire-snorting ball of juiciness! The dragonfruit is in time to be part of this recipe I've created especially for The Bread Pudding of the Month Club. My friend, Victoria over at Mission: Food hosts this monthly event and if any of you have made/are going to make a bread pudding dish this month, please do hop over there and join us!


In my previous recipes using dragonfruit, I mentioned that on its own, the fruit has very little flavor. Almost like a watered-down kiwi, with a similar texture when it's ripe. Because of this, I flavored the custard out of coconut milk and lime to give the bread pudding some tangible character. The dragonfruit was not completely hopeless because its flesh, when blended with the custard, gave the pudding its striking fushia-pink hue that turned to a baby pink color once cooked.


For as long as I can remember, I've held the perception that bread pudding of any kind and flavoring can only be enjoyed fully after a light meal of salad and... well, just salad. Many times when I've had a hearty main course plus appetizer, I've had to turn up my willpower and turn away this filling dessert. Even as my heart screams, "I WAAAANT!". Okay, I tell a white lie. Sometimes I do have a bite, but I can't really get into it, you know, because I'm so full by that time. If only the serving portions were smaller in the restaurants...

Wait, if I was the one making them, I could make them in a size my stomach can handle. So how does mini-bread pudding sound to you? Because that's exactly what I made. My individual portions were so 'mini' they were the size of a small teacup (150ml capacity). No danger of over-indulging here! And once the puddings were turned out for serving, they even fitted nicely on the saucer, just like a cup.


You can, of course, fashion the bread slices into any shape or cube it and dump it all in the ramekins without any grand order. I decided to cut my bread into rounds and arranged them stacked on top of each other in the ramekin. The smaller circles formed a flower-like pattern on top. Tastes the same, just looks prettier. Oh, such visual animals we all are....

Barbie would love these figure-friendly portions

Instead of serving the bread pudding with cream or any type of sauce, I decided to top it off with fresh fruit. Yes, more dragonfruit! You can save all the trouble by simply chopping and sprinkling the fruits on top of the pudding, but.... I served them as dragonfruit balls skewered with toothpicks and stacked upright on top of the pudding. The fruit balls were chilled in the fridge beforehand, so when you eat this, you can feel their juicy coolness against the warmth of the bread pudding on your palate. Three dessert fork-scoops later, my portion of mini-bread pudding was all gone. To quote Goldilocks, "It was just right".

                                                                            Baby pink love
Dragonfruit Bread Pudding on a saucer. Enjoy!

Dragonfruit and Coconut-Lime Bread Pudding
Makes: 4 small ramekins (150ml capacity)

Ingredients:
6-8 slices stale bread, cubed or cut into circles with cookie cutter
1/2 cup dragonfruit, chopped roughly
1/2 cup coconut milk
1 large egg
4 tablespoons caster sugar
1 lime, juice only
Vegetable oil, for greasing
1/2 of a dragonfruit, scooped into balls for topping

Method:
1. Preheat oven to 325F/165C. Fill a 9x9-inch baking tin with water halfway up and place on the middle rack in the oven. This will be the water bath.
2. Line the base of ramekins with cooking foil and brush their insides with vegetable oil to grease. Arrange the bread circles or cubes in each ramekin until it reaches the top. Set aside while you prepare the custard.
3. In a blender, add the chopped dragonfruit, coconut milk, egg and sugar and process until smooth. Pour this mixture over the bread in the ramekins and press the bread pieces down with the back of a spoon. Squeeze or drizzle a splash of lime juice over the top layer.
4. Carefully arrange the filled ramekins inside the preheated water bath and bake for 35-40 minutes until the tops are just browned. Leave to cool for about 5 minutes before serving. To turn out, run a thin knife around the edge of the ramekin and invert onto a small plate. Invert again onto a dessert plate so that the browned layer is on top.
5. For the fresh fruit topping, use a melon scooper to form about 8 balls from the dragonfruit flesh. Take 2 balls and skewer them with a toothpick. Press this fruit skewer on top of a bread pudding and serve immediately.


Sunday, April 17, 2011

Lemongrass and Lime Birthday Cake Pop for the International Incident Party


This month's International Incident Party is special on two counts. First, we are celebrating our energetic host, Penny-of-Jeroxie.com's birthday. Secondly, the theme is Cake Pop, that cutesy ball-of-cake-on-a-lolly-stick made famous by the enormously talented Angie of Bakerella. My inner child just couldn't wait to get both its (my?...its?) hands dirty!

Though I've admired and frequently ogled at Bakerella's cake pop creations for a while, this was only the second time that I've attempted making them myself. Hmm...maybe the first in the strictest sense of the word as I had only made cake balls before this. Once you start inserting sticks into cake balls, it's a different game altogether and I later found out that it takes considerable skill to keep the compacted cake mix stuck onto the sticks!

My chocolate-coating technique had plenty of room for improvement, for as you'll soon witness, the surface of my cake pops had more lumps and bumps than a teenager's troubled complexion. After this experience, I bow down to Bakerella and talented others for their skills in making smooth, perfect-looking cake pops.

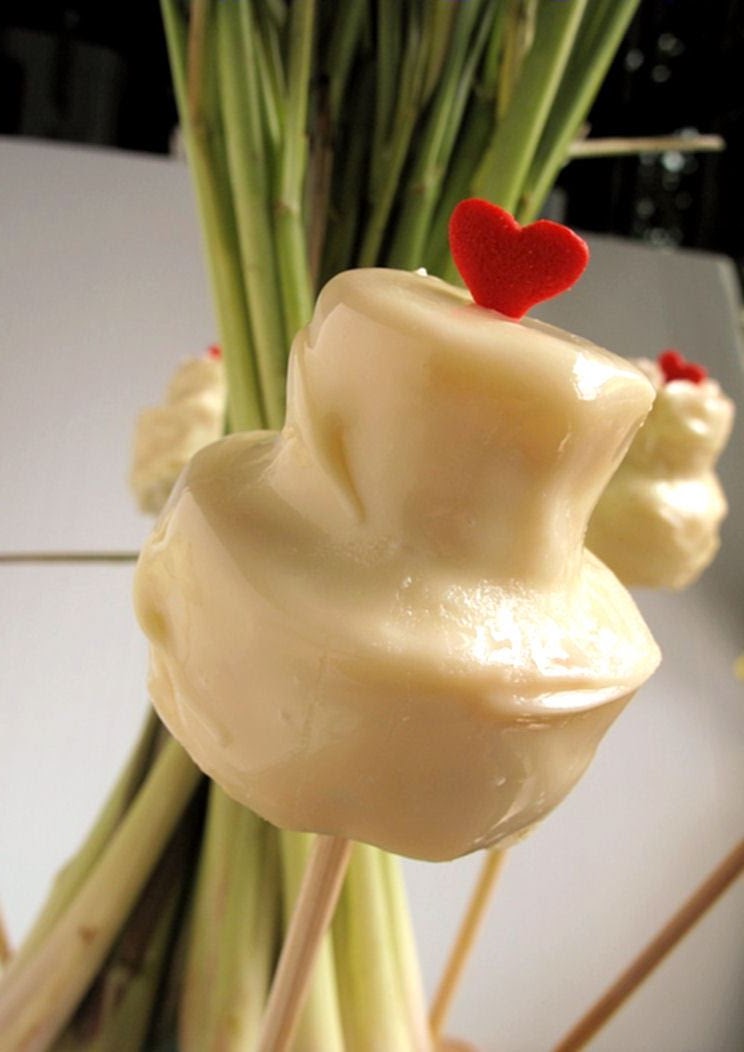
I thought at length about how I wanted to shape my cake pops, and I was rather torn between the traditional (spherical) or funky (other shapes). Eventually, I went with the funky, but something that's not too out-there so as to become unrecognizably cake pop-like. To celebrate your special day, Penny, here are my two-tiered Birthday Cake Pops!


For the cake itself, I opted for an unusual combination of flavors (in desserts, at least) which also proved surprisingly delicious - the kids at home devoured these, that's how I know. Lemongrass and lime cake, crumbled, compacted and later covered in pristine white chocolate and decorated with red sugar hearts and tiny birthday candles. I used both fresh and dried lemongrass as I wasn't too sure if using all fresh would make the cake flavor too intense and overpowering. Both lemongrass and lime have strong, distinct fragrances and flavors - lemongrass having a slightly citrusy-sweet and pungent, earthy aroma, while lime has a sharp and refreshing scent. Taking a bite out of these cake pops will stimulate and keep you wide-eyed with alertness. Never again will you leave your fate in the hands of that doctor fellow who quoted us over the years that eating too much carbs makes you feel sluggish!


Lemongrass and lime cake


The cake itself was light and airy in texture. I omitted the butter and reduced the sugar to compensate for the fact that I would be mixing in dense, sweet cream cheese frosting to bind the cake mixture together. I also squeezed extra lime juice into the frosting to give it more zing! As these Birthday Cake Pops were a bit larger in size than cake balls, I knew that regular pop sticks weren't sturdy enough to hold them up. So what's a girl to do? I used short, disposable wooden chopsticks instead. They worked out quite well, just look at the size of these momma cake pops!

Some industrial strength pop sticks!
A large-holed colander worked well as a stand for these cake pops


I can't wait to see what my fellow bloggers have brought along by way of Cake Pops, and I'd be honored if you will join me by clicking here or the thumbnails below to check them out. Without further ado, let me light the birthday candles and share the recipe with you...

Happy Birthday, Penny!
"Whadd'ya lookin' at?"
As I had some leftover cake mix, I couldn't help but make my very own Gangsta Chix ball!

Lemongrass and Lime Birthday Cake Pops
Lemongrass and Lime Cake
Ingredients:
3 eggs, separated
1/2 cup caster sugar
1 teaspoon grated lime zest
1 cup self-rising flour
2 teaspoons ground lemongrass*
3 tablespoons hot lemongrass juice**

*For the ground lemongrass, I used dried lemongrass enclosed in teabags (herbal infusion) and ground it finely in a grinder.
**If you can't find ground or dried lemongrass, you can chop 1 tablespoon fresh lemongrass finely and boil for 10 minutes in 1/2 cup water. Allow to steep for 10 minutes, strain, and use the reserved liquid as the hot lemongrass juice for the sponge mix. I used both the dried and fresh lemongrass in the ingredients list above.

Method:
1. Preheat oven to 175ºC/350 F. Grease and flour a 9-inch cake pan.
2. Beat the egg whites until stiff peaks form. Gradually add the sugar and continue beating until dissolved. Add the yolks and lime zest and beat just to combine.
3. Sift together flour and lemongrass and gently fold through the egg mixture followed by the lemongrass juice.
4. Spoon mixture into prepared pan and bake for 20-25 minutes or until golden and cake springs back when pressed gently. Leave in pan for 5-10 minutes before turning onto a wire rack to cool.

Lime Cheese Frosting
Ingredients:
250g/8oz cream cheese, softened
2 cups confectioner's sugar
4 tablespoons butter
1 tablespoon lime juice

Method:
In a bowl, whip the cream cheese, butter, powdered sugar and lime juice together until smooth. Use immediately to bind the cake mix.

Making the Birthday Cake Pops
You will need:
250g/8oz white chocolate candy melts
2 tablespoons Crisco or shortening (optional)
Round cookie cutters, 2 sizes (5cm/2in and 2.5cm/1in)
Lollipop or ice cream pop sticks (I used small, disposable wooden chopsticks)
decorative hearts or sprinkles

1. Make the cake mixture first. When the above cake is completely cool, crumble it with forks or your fingers in a bowl until it becomes fine crumbs.
2. Pour the lime cheese frosting into the cake crumbs and mix with a spoon. Then continue mixing with your fingers, kneading and mixing until fully incorporated into the cake. Check to see if it will roll into a ball. It should be a malleable, easy-to-handle cake mixture. Cover with plastic wrap and refrigerate until firm. You can leave the mix refrigerated for several days at this point.
3. Prepare a large baking sheet by covering with wax paper or parchment. On a clean surface, roll or pat the compact cake mixture flat to a thickness of 1 inch. Use a large cookie cutter and a smaller cookie cutter alternately to cut round shapes in the cake mix. This ensures that you have equal numbers of large and small discs. Place discs on the lined baking tray and place in the refrigerator while you melt your white chocolate coating.
4. Melt white chocolate in a double boiler. If you want to make the coating a little more runny for even, smoother coating, add a tablespoon of Crisco to the pot and let it melt. Stir well.
5. Take a small disc and dab one side with melted white chocolate. Immediately press gently on top of a larger disc - you've now got your two-tier 'birthday cake'! Leave to set for a few minutes.
6. Take a pop stick and dip one end in the white chocolate about 1-inch deep. Poke this end into the base of the larger disc. Refrigerate for 15 minutes. Once the chocolate 'glue' has set, you can dip the cake pop into the chocolate until fully covered. Anchor the cake pops by poking the sticks upright into thick styrofoam blocks or sturdy boxes with makeshift holes.
7. Decorate each cake pop by placing a red candy heart on top. Don't refrigerate these as it will cause the coating to weep or melt. They can however be frozen, undecorated.


Monday, February 14, 2011

Tropical Valentine: Tuna Cakes with Banana Chutney and Green Curry Dip


Blue waters. Sunny, clear skies. Warm, breezy weather. Check.
Cold, tall thirst-quencher in hand. Check.
Valentine's Day. Check.
Spicy nibbles, condiments and dip. Double-check
Hot, sizzling date. Uncheck.

Okay, so today is Valentine's Day. Not a day that's normally commemorated in our household, but on this blog, nothing's truly normal. You know that saying, "Two's company, three's a crowd"? You'd think that would be an apt phrase for Valentine's when lovebirds (traditionally two people) have a good excuse to cozy up to each other. But not in this realm.

Today, three of us are paying tribute to a day reserved for love (not that everyday isn't) by each trying out a recipe from the Tropical Asian Cookbook compiled by Wendy Hutton. Our tasteful threesome is made up of Trix (Tasty Trix), Penny (Jeroxie.com) and myself, blogging out of three of the most happening spots on this planet (see below). Well, okay.... maybe two.


How did this come about? On the very last day of 2010, I held my first giveaway which was this beautiful cookbook, and the happy winner was Trix. Since we both have a copy of the same book, we thought why not cook something tropical-themed together out of it? And as we are of the "three's company, two's a bore" school-of-thought, we roped Penny in to join us! 


The book is a compilation of recipes from the prestigious Four Seasons Hotels all over Southeast Asia and South Asia. It features dishes from Singapore, Thailand, Malaysia, Indonesia, Vietnam, Maldives and India. My tuna cake with its simple homemade paratha-like pastry and chutney is reminiscent of a South Asian/Indian dish, while its green curry dip is distinctly Thai. I chose this tropical noon nibbles because I admit, it was the visual that first drew me in. The way the chef (and I presume, the food stylist) presented the dish in the book was stunning... my pictures here don't even come close.

Then I got to studying the recipe and went "Oh my gawd!". No, it wasn't too complex to make, it just seemed that the list of ingredients went on and on and on... On the bright side, everything listed there was easily accessible to me (and you too, I imagine). And so quickly running out of excuses, I decided to forge ahead and make this. Let me tell you, regret it I did not, for the flavors of the tuna cakes when combined with the kick-ass spiciness of the green curry and the sweet heat of the banana chutney were out of this world! Imagine a fireworks display taking place in your mouth, it's not the heat you're concentrating on but the beauty of the explosions.

Tuna cake ingredients

I shall not say too much more but leave you to lovingly stare at all the ingredients. My kitchen was turned upside down for an afternoon making these, but the thought of lovingly handfeeding these tuna cakes to some  (mythical, hot) loved one overrode all painful thoughts of cleaning up. In the end, it was my nephew who scoffed about six of these tuna cakes in one sitting. He declared them "really yummy",  so I guess I can officially elect him my Valentine this year.

Banana chutney ingredients, using curry leaves and bananas from my garden.

Green curry dip ingredients.
I somehow forgot to take a shot of the cilantro and mint - the two major green contributors!
Chilies galore!

Trix has made the spinach kofta with eggplant puree, a delight for vegetarians, while Penny made a lovely thirst-quencher, rose flavored lassi with pistachios to wash all the tropical flavors down. For a complete picture of our Valentine's Day meal inspired by the tropics, remember to head over to their blogs and check out their posts too!

Tuna Cakes with Banana Chutney and Green Curry Dip
Makes 8
Ingredients:
Pastry
1 cup flour
Pinch of salt
1/3 cup water
1 tablespoon vegetable oil

Tuna Filling
2/3 cup (100g) firmly packed drained canned tuna
2 tablespoons very finely chopped onion
2 tablespoons very finely chopped cilantro (coriander) leaves
2 tablespoons freshly grated or moistened desiccated coconut
2 teaspoons lime juice
Salt to taste

Banana Chutney
2 teaspoons vegetable oil
1 teaspoons mustard seeds (I used Nigella seeds)
10 curry leaves
2 dried red chilies, soaked in water 5 minutes, roughly chopped
2 medium ripe but firm bananas, roughly mashed
6 tablespoons fresh orange juice
1 teaspoon turmeric powder (optional)
Salt and black pepper to taste

Green Curry Dip
4 teaspoons finely chopped ginger
4 teaspoons finely chopped garlic
1 large green chili, chopped
1 cup coarsely chopped fresh cilantro (coriander) leaves and fine stems
1 cup coarsely chopped fresh mint leaves
2 tablespoons coconut or vegetable oil
1 teaspoon brown mustard seeds
1 teaspoon cumin seeds
1 large onion, chopped
10 curry leaves
1 large tomato, peeled and chopped
2 teaspoons curry powder
3/4 cup coconut milk
1/2 teaspoon salt

Method:
1. Prepare the tuna filling by combining all ingredients in a bowl, mixing well. Set aside.
2. Combine flour, salt and water in a bowl. Knead for 5 minutes to make a pliable dough. Divide into 8 balls, then flatten each with the palm of your hand. Press with the thumbs and fingers to make each ball into a circle about 3 1/4 in (8cm) in diameter. Fill each circle with one-eighth of the tuna, then lift up the sides, pleating and squeezing them to the centre to enclose the filling. Flatten gently into a cake about 2-in (5cm) in diameter , then heat 1 tablespoon oil on a large skillet and sear the tuna cakes until golden brown, about 1 ½ minutes on each side. Transfer tuna cakes to a baking tray and bake in an oven at 350F (180C) for 8 minutes.
3. To prepare the banana chutney, heat oil in a small pan and add mustard seeds, curry leaves, and dried chilies. Stir-fry until the seeds crackle, then add the banana and mix well with a wooden spoon, cooking for 1 minute. Stir in the orange juice and turmeric, and season with salt and pepper, then transfer to a bowl. Cool, then chill in the refrigerator.
4. For the green curry dip, process Ginger, garlic, chili, cilantro and mint leaves together to make a smooth paste. Heat the oil in a pan and add mustard and cumin seeds. Stir-fry over medium heat until they crackle, then add onion and curry leaves. Stir-fry until the onion softens, 3-4 minutes, then add tomato and cook 5 minutes.
5. Add the blended paste and cook, stirring frequently, 4-5 minutes. Pour in coconut milk, add salt and bring slowly to a boil, stirring. Simmer uncovered until the sauce thickens, about 8 minutes. Taste and add more salt if desired.
6. Serve the tuna cakes with banana chutney and green curry dip.

Saturday, August 28, 2010

My Way With Pear Pt. 2 - Pear and Cashew Cream Sorbet


Remember this beautiful pear? Well, the fantasy continues. For my second pear recipe installment, I decided to make a lovely, tangy pear-lime sorbet. But wait, I say "sorbet" quite liberally here because after I threw in the roasted cashew nuts into the mix, the texture of this frozen dish turned cream-like. So I'm not quite sure if there's ever such a thing as a creamy sorbet, but  here it is. It's naturally sweetened, and melts lingeringly on the tongue (or, in my case, on the dish, in the bright sunlight).


On their own, the pear and cashew flavors are fairly subtle. This is where the lime came into play, because the tanginess of the citrus somehow enhances the sweet-tartness of the pear and the sweet-creaminess of the cashew nuts. Don't ask me how, it just does.

Pear and Cashew Cream Sorbet
Ingredients:
2 Forelle pears
1-2 large limes, squeezed
2 tablespoons honey
1/2 cup water
1 cup cashew nuts, unsalted and roasted

Method:
1. Peel, core and slice pears, place in the water and honey in a pan and poach for 10-15 minutes until the pears are soft. Leave to cool completely.
2. When cool, pour pears and poaching liquid into a food processor, add the lime juice and cashew nuts and blend until the nuts are finely ground.
3. Freeze in an ice cream maker, or if you don't have one, just freeze the mixture for an hour in a suitable, covered container. When the ice crystals start to form, scrape down the sides and blend again until smooth. Repeat this process two more times over the next 2-3 hours, then leave to freeze for 4 hours or overnight.
4. Serve on its own or with some thinly sliced pears soaked briefly in salted water.

I used small jelly molds to shape the sorbet. It was less messier to serve up and didn't melt as quickly!

Monday, August 9, 2010

Red Dragonfruit Granita

Post Update: This made the Top 9 on Foodbuzz today.
It's my first time, so is it too silly to be excited about this? (ahh, who cares... I'll just be excited anyway!)

After my earlier post on the dragonfruit quenchers, I still had several dragonfruits left over so I thought, "Wouldn't it be pretty if I turn this gorgeous pink-red fruit into a sorbet?" I'd seen many posts on white fleshed dragonfruit sorbets (always inevitably served in it's skin shell - helloooo.... what happened to originality?), but hardly ever red dragonfruit sorbets. That was what I'd started to do when I suddenly, deflatedly remembered that I didn't have an ice-cream maker and no way was I ever going to process this mixture fine enough by hand, even if I had set up camp by the freezer for half a day!

So the next best thing? Granita. It's great to have on a hot, hot day and for this particular recipe, I decided to accentuate the not-so-flavorful dragonfruit with lime zest, grapefruit zest and fresh ginger slices steeped in sugar syrup! The smell of the hot syrup was heavenly, and I was truly tempted to just add it to some cold water, slip in some lime slices and glug it down like a thirsty desert dweller. Thank goodness my willpower won and I managed to save the syrup for the granita. ;-)

My styling for the photography kind of sucks because I was trying to shoot this extra fast before it all turned into slush. At least, the color of the fuschia bourgainvillea from my garden complemented the granita very well and hmmm... not a dragonfruit skin receptacle in sight!

These babies bleed and stain! But they wash off quite easily, don't worry

  My flavored syrup, with lime, grapefruit zest & fresh ginger

Good enough to drink!

 So refreshingly pretty!

Red Dragonfruit Granita

Ingredients:
1 Dragonfruit
1/2 cup sugar
1/2 cup water
1/2 inch fresh ginger, sliced
1/2 lime zest
1/4 grapefruit zest

Method:
1. Boil the water with the sliced ginger, lime and grapefruit zests, then sir in sugar until dissolved. Remove from heat and let the syrup cool. Once cooled, strained the bits and use the sugar syrup to make the granita.
2. Cut the dragonfruit in half and scoop out the flesh. Place in a blender and add the sugar syrup, puree until smooth.
3. Pour into a deep dish or container and place in a freezer. After an hour, mash with a fork and repeat the process for the next 3-4 hours until it becomes ice "crystals", which is the granita.

Related Posts with Thumbnails