Foodiva's Kitchen: mascarpone
Showing posts with label mascarpone. Show all posts

Monday, July 4, 2011

Dragonfruit-Basil Mascarpone Ice Cream and Mochi Ice Cream


Have you noticed how there've been way too many recipes using dragonfruit on this blog lately? It's not that I can't help myself, but I really can't! Red-fleshed dragonfruit is seasonal, just like strawberries, and rhubarb and God knows what else. It lasts a mere few months and then I have to wait nearly a whole year to do this again. A whole year of resisting using artificial pink food coloring. Yes, my name is Maya and I'm a PINK addict. Do you think I need to join a support group as a form of therapy? :-)

Sunday, June 26, 2011

Dragonfruit and Black Sesame Mochi Ice Cream

Happiness, hit her like a train on a track
Coming towards her, stuck still no turning back
She hid around corners and she hid under beds
She killed it with kisses and from it she fled
With every bubble she sank with a drink
And washed it away down the kitchen sink
~ Florence And The Machine, Dog Days Are Over


My childhood friend and I had gotten together for lunch recently and for dessert, we treated ourselves to mochi ice cream at a Japanese restaurant. It was black sesame ice cream wrapped in a plain mochi shell and to say it was hea.ven.ly is an understatement. The creamy, nutty flavor was not unlike frozen peanut butter, with the black sesame ice cream melting effortlessly on the tongue. As for the mochi, oh the mochi...have you ever had it like this before? Despite being frozen, it retained its chewiness, softness and silkiness that it didn't require much of an effort to cut through it. That leisurely afternoon treat lodged an intention in my mind... I needed to learn how to make mochi ice cream at home!

Wednesday, April 6, 2011

Guava and Prune Mascarpone Ice Cream with Honeycomb Topping


Back in the days before pop corn became a staple fare of cinema or movie-theatre goers, we enjoyed feasting on simpler snacks sold by street hawkers just outside, yes.. not inside, the cinemas. Snacks such as steaming hot chick peas (garbanzo) and sweet corn kernels, skewered Chinese/Asian pears pickled in brine, and sliced guavas sprinkled generously with dried prune powder. These street snacks still exist today, of course, but they are no longer consumed within the walls of a cinema. More likely, we'll buy them at the night market and snack all the way home, or else have the crisp fruits while strolling back to the office after lunch on a hot day.

Before I go on further, I just wanted to mention that I finally got myself an ice cream machine while on a short trip abroad. I lugged the heavy thing in my suitcase and prayed that it would not break and oh yes, for sunny skies too (it's been raining buckets here lately). Even though sniffles, coughs and sore throats still exist in parts of the house, I foresee many smiley, ice cream days ahead :-).


For my first ice cream adventure with the coveted machine, I wanted to recreate the flavors of one of our street snacks, guava dipped in prune powder. I didn't want to mess around with a custard base, so I settled for mascarpone to hold the flavors together and the mascarpone somehow made the texture of the ice cream that much better. Because fresh guava is so crisp, I had to cook it first to soften the flesh, otherwise it would just turn into rock-hard guava pieces likely to break your tooth once frozen. I blended most of the cooked guava to make the ice cream, but reserved some to add into the semi frozen mixture (right after churning) to retain some of that fruitiness.

The salty-sweet prune powder complemented and enhanced the guava ice cream well. To round off the dessert, I decided to make honeycomb shards for a topping and flavored this with prune powder. It was fun and ultra easy to make... all that whooshing, bubbling up reminded me of my days in the lab when things got really exciting, or out-of-hand, or both. LOL. Naturally, most kids love all this honeycomb stuff (remember Crunchie?) but just don't overdo it or the dentist will come after you with a massive drill!


Honeycomb shards


To my friends KJ and Layloo, both new moms and guava and prune powder addicts, this recipe is totally for you!

Guava and Prune Mascarpone Ice Cream with Honeycomb Topping
Makes: 3/4 litre
Ingredients:
250g fresh guava, peeled, cored and sliced into tiny chunks
50g sweetened prune powder
50g caster sugar
1/4 cup water
200ml milk
200ml mascarpone

Method:
1. Place guava chunks, prune powder, sugar and water in a deep pan and let it boil on medium heat for 5-10 minutes, stirring constantly until the guava turns soft and slightly mushy (similar to the texture of cooked apples). With a slotted spoon, scoop out 1/3 cup of cooked guava and set aside. You can chop these finer if you wish, as they will be incorporated later into the soft ice cream.
2. Add milk to the remaining mixture in the pan, let it cool slightly then blend in a food processor or blender until smooth.
3. Pour blended mixture into a bowl and whisk in the mascarpone until just combined. Pour into an ice cream machine and churn according to manufacturer's instructions.
4. Stir the reserved guava above back into the soft frozen mixture before placing it in an airtight container. Leave in the freezer to freeze for at least 4 hours or overnight. Serve with prune honeycomb topping sprinkled on top.

Prune Honeycomb Topping
Makes: 125g
Ingredients:
100g caster sugar
1 tablespoon prune powder
4 tablespoons golden syrup
1 1/2 teaspoons bicarbonate of soda

Method:
1. Put the sugar, prune powder and golden syrup into a deep cooking pan and stir to mix.
2. Place the pan on the heat and let the mixture melt, then turn into to a bubbling mass the colour of maple syrup - about 3 minutes.
3. Turn off the heat, whisk in the bicarbonate of soda and the syrup will bubble up instantly into a big, fine cloud of aerated pale gold. Turn this immediately onto a piece of reusable baking parchment or greased foil.
4. Leave it to set at room temperature and then bash it with a meat beater or something solid, so that it splinters into many pieces. Sprinkle on top of ice creams or cakes and store the rest in an airtight container for up to 3 days.

Tuesday, November 30, 2010

Date and Orange Mascarpone Fritters & YBR November


If you feel like doing something very easy but still unusual for dessert next time you have some guests over for eats, then I have just the recipe for you. Dates are now in season and if you happen to have them in abundance in your pantry, you can whip these simple fritters up. Fill the pitted dates with the flavors of orange (zest) and creamy mascarpone, toss them in orange (juice) batter and fry. See... easy like Sunday mornings.


These are best made by using the sweet, thick, fleshy medjool dates which grow in Egypt and California. I didn't have any medjool on hand but a friend had just brought back and gifted me some dates from Saudi Arabia, so I used those instead. Not as large nor as fleshy, but they were just as sweet. Once coated in batter and deep-fried, the mascarpone just melts in your mouth as you bite through the batter. I would serve these warm with Cinnamon or Vanilla icecream, or both, why not?


Last time I fried up a batch of these fritters, I ate about 10 of them all by myself, curled up in bed with a cup of hot, creamy chocolate. While watching The Biggest Loser on TV. How ironic.

Date and Orange Mascarpone Fritters
Makes 20 fritters, serves 4
Ingredients:
20 medjool dates
Finely grated zest of 2 oranges
8 tablespoons mascarpone
Plain flour, for dusting
Oil, for frying

Batter
300ml freshly squeezed orange juice
100g (4 oz) self-raising flour

Method:
1. Split the dates along one side and remove the seeds. Set aside.
2. Mix the orange zest with the mascarpone. Stuff the dates with the mascarpone mixture and push back into shape.
3. Make the batter by whisking flour and orange juice together until smooth, getting rid of lumps. Heat the oil for deep-frying.
4. Dust the dates with flour and then drop them carefully one by one into the batter to coat. Lift the dates out of the batter with a spoon and place gently in the hot oil. Cook for 4-5 minutes until completely crisp and golden. Lift from the pan onto a plate lined with kitchen paper to absorb any excess oil.
5. Serve the fritters warm or cool with cinnamon or vanilla ice-cream.


One last thing, as you may know, Nancy of Spicie Foodie is hosting the Your Best Recipe event starting from last month. For November, I've submitted my recipe for Spiral Ravioli, in the mysterious (natural) hues of green, black and white. To check out mine and other bloggers' best recipes via Nancy's round-up, please click here.

Have a great 'date' with these fritters, peeps! (Cheesy, I know).

Sunday, November 28, 2010

My Love in Black and White (or Gunmetal Grey)

I gave you all the love I got
I gave you more than I could give
I gave you love
I gave you all that I have inside
And you took my love
You took my love

No Ordinary Love, song by Sade


During the years when I was still stumbling around in the dark trying to search for my soulmate, my favorite go-to songs for romance have mainly been the ones sung by Sade. Her public persona has always been elegant, mysterious, sexy, seemingly just-out-of-reach... everything I'd aspired to be - well, back in the heydays, anyway. Nowadays of course, I've moved on to become the person I am, my own person, and I'm happy with the way things are. Only once in a (very rare) while, when it's just me and my iPod and no chattering kids, family members or friends in the vicinity, the soothing sound of Sade's melodies still draws me in, lulls me. Her voice, smooth as liquid gunmetal, and her words reside in a small corner of my mind, I know them all by heart.


Below's music video of No Ordinary Love was actually released back in 1992. Nearly two decades later, this gorgeous woman seems not to have aged a single day! The fact that she's portraying a mermaid here resonates with my natural love of the sea and scuba diving shenanigans. More than once, I imagined Sade-the-mermaid as, ummm, me... (okay, permission to laugh all you want).


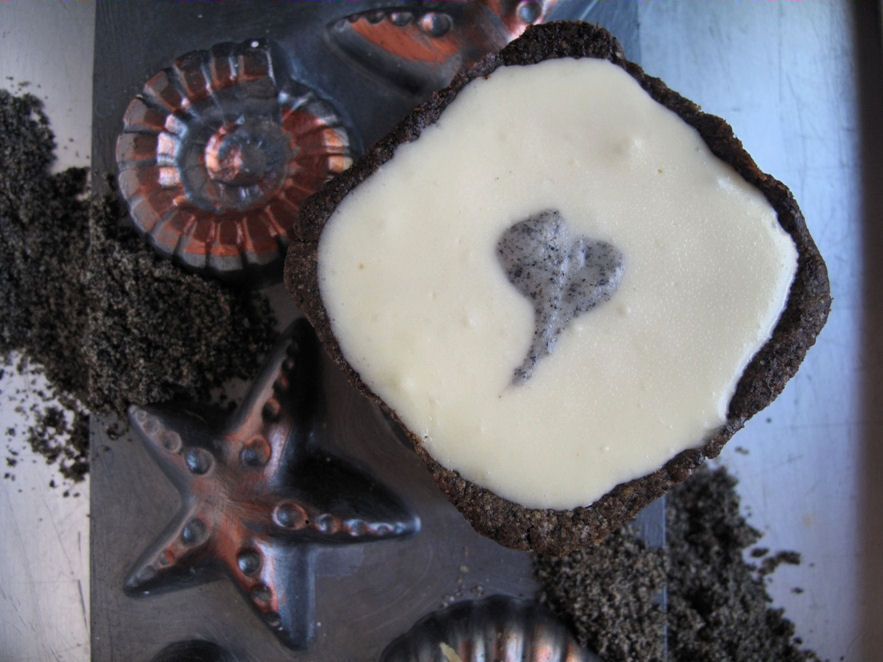
My recipe today was an effort to celebrate my triumphs in love (who really cares about the failures?) by making something as smooth and enchanting as that liquid gunmetal voice. In a shade of gunmetal grey, even.


The challenge was not merely how to get the exact hue, but also how to make such a dark grey-colored dish edible and purposefully alluring if it's ever handed to someone on a plate. I decided to try a simple tart, with very minimal oven time. Sound good so far? I toyed with the idea of creating a very stormy grey crust with a pure white (ie. non-cooked) filling. Black sesame have been a feature in several of my recipes lately, but hey, my stock hasn't yet run out and I had to utilize this ingredient again to get that very, very dark crust. When my crusts came out of the oven, you would've found me doing my jiggy dance of joy because they'd turned out in the exact shade that I wanted - gunmetal grey, baby!


Since this tart is all about the dark and also beautiful aspects of love, I felt the nutty-flavored black sesame crust would contrast nicely with a smooth, rich and creamy Mascarpone filling. A blackened heart positioned smack in the middle signifies my love - stamped in black and white, for always.


Mascarpone Tart With Black Sesame Crust
Makes 12 mini-tarts/one 12-inch tart
Ingredients:
Crust
150g plain flour
100g black sesame powder
125g butter
1 egg
100g caster sugar

Filling
1/2 cup cold milk
3 teaspoons powdered gelatine
250g whipping cream
1/2 cup caster sugar
250g Mascarpone cheese
2 teaspoons black sesame powder

Method:
1. Preheat the oven to 200°C.
2. Make the crust first: Place the butter, flour and black sesame in a bowl. Rub the butter into the flour with your fingertips until it resembles breadcrumbs. Make a well in the centre of the bowl, add sugar and break an egg into it. Knead with your fingers until you get a pliable pastry mixture.
4. Grease the tart tins with butter. Roll dough into little balls and press into the base of the tart tin. Roll reemaining dough in between your palms to form 'ropes', arrange this against the inside edge of the tin and press against the edge to flatten and form the wall of the crust. Prick the base with a fork and bake in the oven for about 15 minutes. If you’re using a standard pie-tin, bake blind for 15 minutes, then reduce heat to 180°C, remove the parchment paper and baking beans and bake crust for another 10 minutes. Take out of the oven and set aside to cool. Once cooled, release crust gently from the pan and place on a plate or tray.
5. For the filling, add the gelatine to the cold milk in a small pan to soften it, then heat the pan gently, stirring to dissolve the gelatine. Do not allow the milk to boil. Remove pan from the heat and set aside to cool.
6. In a bowl, beat the whipped cream and sugar until it forms soft peaks, then fold in the mascarpone and cooling gelatine mixture. Pour 1/4 cup of this mascarpone into a small bowl and add 2 teaspoons black sesame powder.  This dark mixure will be used to form the heart designs against the white filling.
7. Spoon or pour light mascarpone mixture carefully into tart crust up to very near the top. Bear in mind there is no baking involved after this, so the filling won't expand. Smooth the surface with a spatula, then spoon small dollops of dark mascarpone on parts of the white filling. Carefully drag the tip of a small knife across the dark mixture, forming a heart shape.
8. Chill tray in the refrigerator for about 4 hours or overnight until the filling is set. Serve cool or at room temperature.

Related Posts with Thumbnails