Foodiva's Kitchen

Wednesday, December 22, 2010

Sweet Potato and Coconut Milk Agar


My final recipe for the International Incident Party this month was a dessert featuring two of my favorite ingredients, purple sweet potato and coconut milk. I used agar to set the different layers in place, making this a completely vegetarian dessert.

The best part of  this sweet for me is the see-through topmost layer with thin slivers of purple sweet potato suspended in clear agar - it's almost like looking through a crystal ball. Use your prettiest jelly moulds to show off the colorful layers!

 
It's all in the layering, baby!
 

Sweet Potato and Coconut Milk Agar
Ingredients:
13g (1 packet) Agar powder
500ml water
200g sugar
50g purple sweet potato, peeled, sliced and sliced into thin strips (mandoline)
150ml coconut milk
200g purple sweet potato, peeled, sliced and steamed
50 ml extra hot water
100g orange sweet potato, peeled, sliced and steamed


Method:
1. Place sugar and 500ml water in a pot and stir until all the sugar has dissolved. Add agar powder into the pot and put stove on medium heat.
2. Stir frequently to avoid agar thickening at the bottom until everything has dissolved. Once mixture boils, the agar is ready to be added (separately) to the different flavors that will make up each layer.
3. Prepare one layer at a time and leave each layer to set until just firm on the surface before adding on the next layer. This ensures that the layers ‘stick’ together and do not separate when unmolded.
4. 1st layer: Cook the purple sweet potato strips (50g) in boiling water for about 2 minutes. Do not overcook or the strips will start to fall apart. Drain and spread evenly onto the base of a heatproof mould. Add 100ml of the hot agar mixture on top of the potato strips and leave to set for a few minutes.
5. 2nd layer: Heat the coconut milk in the microwave for about 45 seconds and add 150ml of the hot agar mixture. Stir to combine and pour half of this mixture immediately on top of the first layer. Let it set for a few minutes. Leave the other half for the last layer.
6. 3rd layer: Blend the steamed purple sweet potato (200g) with 150ml agar and 50ml extra hot water until smooth. Pour half of this mixture immediately on top of the second layer. Let it set for a few minutes. Leave the other half for the last layer.
7. 4th layer: Blend the steamed orange sweet potato (100g) with 100ml agar until smooth. Pour this mixture immediately on top of the third layer. Let it set for a few minutes.
8. 5th layer: Pour the remaining half of the purple sweet potato mixture over the fourth layer. If agar has started to harden, heat the mixture in the microwave for about 40 seconds. Let it set for a few minutes.
9. 6th layer: Pour the remaining half of the coconut milk mixture over the fifth layer. If agar has started to harden, heat the mixture in the microwave for about 40 seconds.
10. Allow to cool for 10 minutes, then place mould in fridge for 30 minutes to set completely. To serve, turn out of mould and slice into 1cm wide pieces that show off the coloured layers.

Tuesday, December 21, 2010

Mother-in-Law's Tongue Pasta (Lingua di Suocera)


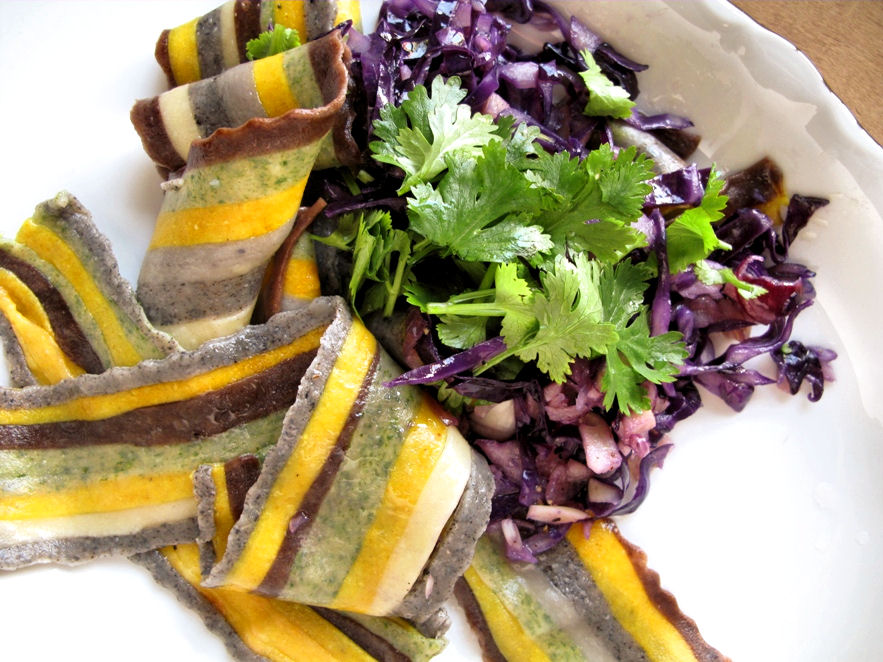
If someone tells you that the best things in life are easy, don't be so quick to believe them. Take this Mother-in-Law's Tongue Pasta, for example. I set out to make them in my home for the International Incident Party last Sunday, thinking that producing something this beautiful couldn't be that hard. I've made flavored pasta and ravioli before, so how much different could this be?

Haha, I've changed my mind since - the process of producing these stripey, colorful ribbons ranks right up there with finding a mathematical equation that could be used to solve for the nth prime.... yep, it was it was that difficult.  I managed to make 5 (yes, five) stripey noodles, and for that, I was grateful and over the moon!


My ingredients to produce the colorful stripes were spinach (green), carrot (orange), black sesame (black/grey), cocoa powder (brown), turmeric powder (yellow) and blueberry jam (blue). The jam was pure desperation, btw, but I had a good preserve, bursting with blueberries!

The hardest part was lining up the linguine strips so that they slightly overlapped alongside each other and then getting them to seal properly. Seal, dammit. I suppose if I were to make these everyday for the next couple of years, I would probably get the technique down to pat. It's a stunning pasta yes, but who has the time?

Sigh.... so perfect.

I didn't want to mask the vibrant stripes with a tomato or cream sauce, so I simply boiled the pasta al dente and then sauteed it in garlic butter alongside shredded red cabbage and coriander leaves. Tastewise, it's much like any other pasta. I couldn't really taste the individual and collective (thank God) flavorings. As I dangled each tantalising noodle with a fork before savoring it, I had to pause and take stock of it one last time because I'm not sure when I'll be making this next! 

Mother-in-Law’s Tongue Pasta (Lingua di Suocera)
Servings: 2-3

Ingredients:
Basic Pasta Dough:
2 cups plain flour
2 eggs

Flavorings:
½ small carrot, diced, boiled and chopped finely
2 tablespoons spinach, blanched, squeeze out water and chopped finely
1 teaspoon turmeric powder
1 teaspoon cocoa powder
1 tablespoon blueberry jam
1 tablespoon black sesame powder

Method:
1. Place the flour in a food processor. Add eggs and process for 10 seconds until the flour is moist and crumbly. Adjust by adding some more flour to the dough if it is extra sticky and process further. Each time you stop the machine, pinch the dough between your fingers, it should feel firmer each time. After about 30 seconds of processing, the dough should come together and form a loose ball on top of the blade, and feel moist but not sticky when pinched.
2. Take the dough out, and divide into 7 equal portions. Leave one plain, to each of the other knead in the individual flavorings. Sprinkle some flour on a hard wood surface and start to knead the dough pieces separately. With the heel of one hand, push the ball of dough away from you. Fold it back toward you and rotate the dough a quarter turn. Repeat this process until the dough feels damp without being sticky, then stop kneading (about 1-2 minutes). Shape each dough into a ball and cover with a large overturned bowl, let rest for 30 minutes.
3. Run each piece of dough through a pasta machine as per the instructions, until it is thin enough to cut into linguine strips (I went up to No. 4).
4. Pass the sheet of dough in the linguine cutter, and place separately on a flat surface. You’d need a fairly large, clean table or countertop for this.
5. Make two noodle strips at a time: Dust the counter with flour, take about 14 individual linguine strips and line them lengthwise alongside each other, making sure they overlap slightly along their lengths. This ensures that the strips will seal together as you roll it flatter.
6. Dust more flour over the strips and carefully use a roller to flatten the pasta, pressing firmly down to seal the strips. Do not roll the noodle too thin or they will come apart.
7. Using a ravioli cutter, cut pasta into two 1½-inch wide x 12-inch long strips of Lingua di Suocera. Dry on a rack in an oven at 25C for at least 4 hours or overnight outside the oven. Leftover linguine can be cooked immediately, another way to make a colorful pasta dish.
8. To cook, boil water with some olive oil and cook the pasta for about 10 minutes until soft but still chewy. Serve immediately with a sauce.

Monday, December 20, 2010

Colorific Salad-in-a-Sushi


This is the first of my three recipes featured in the Color-themed International Incident Party (thanks again, Penny), the very last one for 2010. Slivers of vegetables and fruit are encased in fried egg-sheets and rolled in nori. Simple yes, but watch out for those renegade egg-sheets that refuse to comply to your charms!

If you're not into eggs, then possible substitutes for these sheets are steamed bean curd skin, or rice paper (used in Vietnamese spring rolls). When you get tired of rolling rolls within rolls (or run out of egg-sheets, whichever comes first), then just dump the colorific filling on top of the nori and roll, baby, roll!

These are my salad fillings: beetroot, yellow pepper, carrot, cucumber, red cabbage and mango

Tis the only way to roll...
 With egg-sheet
Without egg-sheet

Colorific Salad-in-a-Sushi
Ingredients:
4-5 large eggs
olive oil, to fry
½ cup red cabbage, shredded into thin strips
½ of yellow pepper, sliced into thin strips
½ of mango, peeled and sliced into thin strips
½ of a beetroot, peeled and sliced into thin strips
½ of a cucumber, deseeded and sliced into thin strips
1 carrot, peeled and grated into long strips
nori sheets

You will need a bamboo rolling mat or cling film to roll the sushi.

Method:
1. Break the eggs into a bowl and whisk with a fork until smooth. Brush a rectangular pan with a drop of olive oil and heat on the stove under medium. You don’t want the pan to be too oily as you want the fried egg sheets to be almost dry and crisp, they will be easier to roll. Spoon about 3 tablespoons into the hot pan and tilt mixture towards the four edges to ensure an even distribution. Cook for about 2 minutes, then flip over. Cook for a further 1 minute, then turn the egg-sheet out onto a plate to cool completely. Repeat process with the rest of the egg mixture.
2. Boil the sliced beetroot in hot water for about 5 minutes until softened but still firm in shape. Drain and cool completely before using.
3. Take a cooled egg-sheet and arrange one of the sliced vegetables/fruit in a straight line along one side of the long edge, facing you. Start rolling away from you until the vegetable/fruit is completely encased. Do this with the rest of the egg-sheets and vegetables.
4. Place a nori sheet on a sushi rolling mat lined with cling film. Then arrange the rolled up egg-sheets in a line and on top of each other along the short side of the nori (1cm from the edge), nearest to you. Start to roll from the end nearest to you, make sure you press firmly along the length of the rolling mat so the filling can spread a little towards the opened ends.
5. Slice the roll across about ½ inch thick with a sharp, wet knife. Dip the blade in water to moisten it in between cuts. Serve with a soya sauce dip.

Have a lovely Monday!

Sunday, December 19, 2010

International Incident Party: Somewhere Over The Rainbow...


It seemed that I blinked and it's already December. Time to celebrate our greatest moments over the year but more importantly, time for another International Incident Party! Penny of Jeroxie.com as our lovely host has wisely pronounced 'Colour' a.k.a. 'Color' as the theme of this month's party. What better way to see the year out than with a big bang, an explosion of culinary colors? 

In the six months since I've embarked on this blogging journey (I'm a mere baby in the blogosphere!), my kitchen has seen its fair share of rainbow-like dishes gracing its countertop and table. I certainly like to play with the most vibrant colors naturally available - reds, greens, yellows - but there is one oddity and that is my predilection for purple and pink. Strange really, because I'm not terribly feminine in outlook or appearance (in fact, I often imagine myself as a tattoed-up Jesse James with boobies and a black leather apron, real baad, oh yeah!). All this time, my poor brain may possibly be rebelling against this constant desire to be a biker-foodie chick, resulting in recipes that manifest themselves as the girliest-looking concoctions, as you can witness below:  


Anyway, back to this party. I was so excited to showcase more colors in my food that I ended up preparing a three-course meal bursting with flavors and vibrancy. I suggest you put your sunglasses on now as it's going to get crazy-bright in here ;-).

Appetizer: Colorific Salad-in-a-Sushi 


A refeshing, colorful salad presented in sushi form! Slivers of red cabbage, cucumber, carrot, beetroot, yellow pepper and mango are encased in fried egg-sheets, which are again rolled within nori sheets. If you can roll sushi, you can definitely roll these. They're slightly larger versions of regular sushi but they look like pyschedelic babes on a plate! My heart hurt to have to eat these, but hey, someone's got to do it...


Main course: Mother-in-Law's Tongue Pasta (Lingua di Suocera)


I've been intrigued with these unbelievably stunning noodles for a while but when I googled it up, there was no information on how to actually make it. For now, it seems that the secret recipe and technique for producing this pasta will remain with the Marella family in Puglia, Italy who makes these by hand! Never one to give up, I bravely attempted my own version of Lingua di Suocera. However let me just put on record that my real-life mother-in-law's tongue was not the inspiration for this creation (in fact, I'd be worried if hers took on these hues!).

I experimented with 6 colors derived from carrot (orange), spinach (green), black sesame (black), blueberry jam! (blue), turmeric powder (yellow) and cocoa powder (brown), and left one plain. It was pretty tedious work lining up the linguine-sized noodles lengthwise against one another before rolling them flat to seal - and of course, they never do in the exact way you want them to - then trimming off the edges to form a wide, flat, stripey, colorful noodle.

It was a warm afternoon when I made this, and after painstakingly crafting a whole set of just 5 noodles, I gave up and  jumped into the pool with the kids. The rest of the linguine was not wasted though, they were heaped together and cooked into a gorgeous multicolored pasta dish that my young housemates devoured after their swim. Luckily, I remembered to take a snapshot before it was all gone!

But here's the real star of the party, my version of Mother-in-Law's Tongue pasta accompanied by red cabbage, garlic and coriander (cilantro) sauteed in butter. Those Italians have totally got it sussed out, they know exactly what it takes to make food that take your breath away. 
  
 
Hmm, I could stare at this the whole day.... if only I wasn't so hungry.

Dessert: Sweet Potato and Coconut Milk Agar


This purplelicious layered agar is flavored with purple and orange sweet potatoes and coconut milk, two ingredients that go extremely well together. The topmost layer contains thin strands of purple sweet potatoes (achieved using a mandoline) encased in sweetened clear agar. For the opaque sweet potato layers, the potatoes are first steamed and then blended with hot agar liquid to form a puree. Despite its carb contents, this pretty layered dessert makes for a delicious and surprisingly light finisher!


I had fun creating these dishes, it felt as if the rainbow had somehow shone its way into my kitchen and inspired me to look closer at its spectrum for ways to brighten up the plain old plate. Now before you come here looking for that pot of gold, check out what colorful goodies the other participants came up with by clicking on the thumbnails below. 

In the interest of maintaining a fun and light International Incident Party atmosphere, all recipes featured here will be posted separately in the coming few days. We wouldn't want to derive yawns resulting from a long-drawn out post now, do we? Haha, no we so wouldn't.

Don't forget to put some (natural) color in your lives and on your plates. Thanks for reading, and yes, you can take those sunglasses off now!


Saturday, December 18, 2010

Muffin Shortbread Cookies With Nutella-Cranberry Filling


Yes, I know. I've disappeared, gone on hiatus for about a fortnight. What can I say? The well sometimes run dry, I wasn't even the inspired to write about stuff not related to food. Such as why I've disappeared, for example.

But today, today I'm back. At first, I thought of writing about my various kitchen disasters to date as I'm sure someone out there would be interested. Who doesn't like to be reminded that we food bloggers are only human, after all? Then quite suddenly, a simple new recipe I came up with turned out to be a success. A cookie recipe at that. So I'm going to write about this instead and save the exploding kitchen story for another day. I'm sure you guys can wait.


I've called these Muffin Shortbread Cookies because I decided to bake the shortbread dough in mini-muffin pans. They held the distinctive muffin shape but melted in the mouth like typical shortbread once you bite into them. As for the Nutella filling, hey, who needs to explain away Nutella? It's just plain good to have it in any recipe, that's my opinion. Since Christmas is just around the corner, chucking in some chopped cranberries along with the Nutella elevates this humble shortbread to the likes of the Festive-Cookie Brigade!


Before I get on to the recipe, I'm doing another post tomorrow. It seems strange to post two days in a row after my recent absence, but it's for the International Incident Party hosted by Penny of Jeroxie.com.  Catch this blog again tomorrow, you won't be disappointed!

Muffin Shortbread Cookies With Nutella-Cranberry Filling
Makes 48-50 cookies
Ingredients:
Shortbread
2 cups flour
1 cup butter
1/2 cup brown sugar, packed
2 teaspoons vanilla extract

Filling
1 cup flour
1/2 cup butter, softened
1/4 cup Nutella
1/4 cup dried cranberries, chopped finely

Method:
1. First, make the shortbread. I do it the stressfree way - just place all the ingredients in a food processor and blend it for a minute or so until the dough forms into a ball. Remove dough, place in a bowl and chill in the refrigerator while you prepare the filling.
2. For the filling, add butter and flour in a bowl. Rub the butter into the flour until it resembles breadcrumbs, then add the Nutella and dried cranberries and knead into a ball with your hand.
3. To assemble the cookie for baking, make small round balls with the shortbread and press into the base of a non-stick mini-muffin cup. Crumble the Nutella-cranberry filling on top, then place another larger ball of shortbread on top and press down so that its surface is even with the top of the muffin cup. Do this with the remaining shortbread and filling.
4. Bake in a preheated oven at 180C for 10-12 minutes (depending on the size of your muffin tin) until the shortbread dough turns a light golden brown. Leave to cool completely in the pan. To remove muffin cookies, turn the tray over and give it a firm tap against a hard surface. The muffins will pop out easily. Store in an airtight container for up to two weeks.

Friday, December 3, 2010

Festive No-Bake Peanut Butter Tart


Peanut butter, the most basic comfort ingredient of many a childhood lunchbox or adult late-night sandwich. We always have a jar in the pantry, even though I seldom send my children to school with a peanut butter-laden treat and we seldom really delve into the buttery jar when there's no 'reasonable' occasion to. So why do we keep our stock of peanut butter? Just in case we have an uncontrollable urge to make something like this no-bake Peanut Butter Tart, I suppose. 


I say uncontrollable, but in actual fact, the urge to make this has been under sufficient control for the better part of a decade. Yes, I've snipped this recipe off a magazine that I had subsequently thrown away many years ago - the date on the page says October 2001, and now 2011 is just around the corner! It had niggled away at me for 10 years, this tart with the humble peanut butter and not-so-humble chocolate components. 


Before I lose the yellowing page completely (as we'll be moving house in a few months), I thought it's better to immortalise the recipe here and in the process, share it with others. Now seems like a good time to make it too because the festive season is looming and with the baking frenzy that precedes it, what could be better than a tart that doesn't need to shuffle for oven space (only fridge space)? This tart will surely help boost your superhost(ess) cred, and what's best, it requires only the minimal amount of  fuss. The rest of life should really be like this...


In my book, the best desserts are often the simplest. Graham crackers or Digestives biscuits and butter are blended to form the easy-to-make crust. It is filled with layers of chocolate ganache and a creamy peanut butter mixture, and finished with whipped cream and shaved chocolate (because chocolate is something you can never have enough of!). And in case you're wondering about that last photo, yes, the photographer-cum-blogger-cum-aspiring dieter does always get the first bite!

Happy no-baking, my lovelies!

No-Bake Peanut Butter Tart
Makes one 13 ¾ by 4 ¼ -inch tart
Ingredients:
10 graham crackers or Digestives
6 tablespoons unsalted butter, melted
3 oz good quality dark chocolate, plus more for shaving
1 ¾ cups heavy cream 

3/4 cup creamy peanut butter
1/2 cup (4 oz) cream cheese
1/3 sweetened condensed milk

Method:
1. Place biscuits in a food processor and pulse until they turn into fine crumbs. Transfer to a bowl, add butter and stir until combined.
2. Place crumbs in a rectangular tart pan (ideally) with a removable bottom. Press crumbs up the sides of the pan with your fingers to form the edge of the tart, then press evenly with the back of a spoon over the bottom of the pan. Chill in the refrigerator while making the filling.
3. Chop the chocolate into small chunks and place in a medium bowl. Place 1/2 cup of the cream in a small pan over medium heat and bring to a boil. Pour over the chocolate, set aside for 5 minutes to yield chocolate ganache. Whisk to combine. Set bowl in an ice bath (a bowl filled with ice and water) until ganache is cool, whisking constantly.
4. Once cool, remove from ice bath and whisk until ganache is just thick enough to hold its shape; do not overbeat. Spread in the bottom of the prepared crust, and return to the refrigerator until set.
5. Combine peanut butter, cream cheese and condensed milk in a food processor and process until smooth. Transfer to a mixing bowl.
6. Whip 3/4 cup heavy cream to soft peaks. Add whipped cream to peanut butter mixture, whisk to combine.
7. Spoon the mixture into the prepared crust, return to the refrigerator for 2 hours or overnight. Remove tart and transfer to a serving platter 10 minutes before serving. Whip remaining 1/2 cup cream and spoon dollops of this on top of tart. Use a vegetable peeler to shave chocolate curls for garnish.

Wednesday, December 1, 2010

Bruce Lee and the Amazing Technicolor Gratin

Update: This gratin made the Top 9 on Foodbuzz. Thank you for all the love-buzzes and more importantly, for stopping by with your kindest words about the loss of our Bruce Lee. I have the best friends, readers and followers!

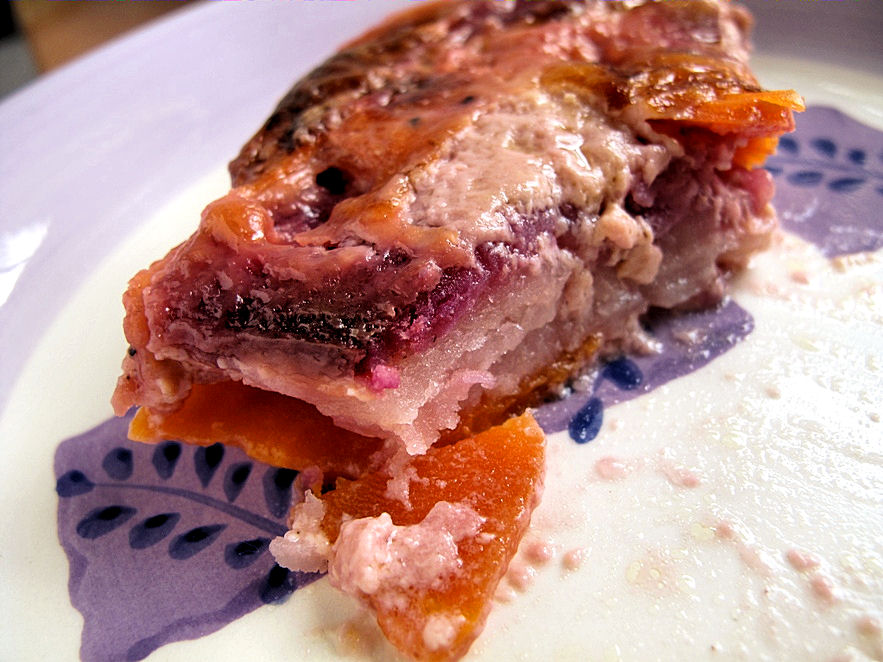
The plan was to make this gratin completely potato-filled, but I couldn't get hold of regular (orange) sweet potatoes so I added carrots instead. Then the dilemma came up as to whether I should call this a potato gratin because of the presence of the carrots. Well, at least I can call it pretty, yes, that's it... a pretty, colorful sidekick to any entrée on a plate.

When I made this, I also ran out of fresh herbs (yes, it was one of those blaaah, bland days in the pantry), but if I'd had some, I would've sprinkled oregano or thyme along with the cheese and imagined this creamy gratin would've tasted even better than it already did.


Anyway, I do have to warn you that the hardest part about making this dish is the slicing involved. If you don't have a mandoline and you plan to make this, perhaps now's the time to invest in one! The vegetables have to be thin enough for the layers to sit together comfortably and elegantly. I alternated rows of carrots, regular potatoes and purple sweet potatoes until I reached the end of the baking pan. The pieces of chopped garlic at the bottom of the dish, hidden underneath all the potatoes, carrots, cream and cheese, provided the lovely savory flavor.


As soon as the dish came out of the oven, it dawned on me that the color of the purple sweet potatoes had surrepticiously seeped out and tainted the whole gratin slightly lilac. Oh well, it was still pretty and more importantly, tasted pretty darn good!


I know that the kids in this house will read this blog someday and because of that, I wanted to give a special mention of our beautiful, white cat. He died last night after a bout of illness, leaving the kids (and adults) distraught. He had only been with us for a little less than six months but even when we'd first brought him into our household, he was already a sickly little fellow. The kids adored him completely and on his good days, he eagerly awaited their return from school so they could play with him. Other than that, he was my constant companion in the kitchen, curling up quietly in the warmest spot on the rug. He was such a well-behaved cat, a complete anomaly in our experience with felines so far.

We named him Bruce Lee, perhaps subconciously wishing that he would be as strong as his superstar namesake. Like his namesake though, his passing was untimely. A million trips (it was a lot) to the vet couldn't fix what was raging inside his tiny broken body and when he finally took his last breath, he was wrapped in warm blankets, ironically, in the kitchen. This morning we buried Bruce Lee in our garden, under the shade of one of our many fruit trees. Before they left for school, the children picked some colorful tropical flowers to place carefully upon his burial site.

The house suddenly seems so quiet today. Yes, we're totally missing him.

Our beautiful Bruce Lee, RIP.

Technicolor Gratin with Potatoes, Carrots and Purple Sweet Potatoes
Serves: 4 to 6 people
Ingredients:
3 garlic cloves, peeled and halved
Unsalted butter, for baking dish
1 cup (240 ml) whole milk
1 cup (240 ml) heavy cream
2 medium potatoes, peeled and sliced finely with a mandoline
1 large purple sweet potato, peeled and sliced finely with a mandoline
1 large carrot, peeled and sliced finely with a mandoline
Sea salt and pepper
Pinch of ground nutmeg
Handful of shredded Parmesan cheese

Method:
1. Preheat the oven to 200°C/400°F/gas 6. Butter the inside of an ovenproof dish, around 12 x 8.5-inch, and at least 6cms deep. Rub dish with 2 halves of one garlic clove. Dice the garlic and place them at the bottom of the dish; set aside.
2. In a pot, heat the milk and heavy cream. Add the pinch of nutmeg and remaining garlic, which has been finely diced. Bring to a simmer and then turn off the heat.
3. Tightly arrange the potato and carrot slices inside the dish, alternating between 1 layer of potatoes, purple sweet potatoes and carrot. Repeat until you run out of ingredients.
4. Pour the milk/cream batter over the vegetables – mixture should cover the vegetables. Season with sea salt and pepper. Top with the grated Parmesan cheese.
5. Bake the gratin for 50 minutes to 1 hour, or until the top is a golden color. When the mixture bubbles while it is being baked, purple color will seep from the purple sweet potatos and the gratin will take on a lilac hue. Serve warm as a side dish.

Related Posts with Thumbnails