Foodiva's Kitchen

Tuesday, August 10, 2010

Puffed Up Lurrvve Pastry


I just looked back at my last three posts and these are what I made and blogged about:
  1. a purple-colored pie,
  2. black-colored sushi, and 
  3. frozen pink-red colored fruit named after a fiery animal!
Pretty random, don't you think? Ahh yes, colorful too. I very much like to play with color, and the natural colors of food allow me to go crazy with my some of my, ahem, creations. Then there's the taste factor. I have to make sure the flavors go together too, and not just have a visually enticing dish. Otherwise, my nibbles will be like those 3rd and 4th runners-up in beauty pageants... unmemorable and never to be heard of again.

Yesterday, I decided to experiment with puff pastry, not for the first time but probably the first time in many moons, or light years. Long time ago, anyway. I made it from scratch (yeah, I wish!) store-bought frozen puff pastry. For the record, I have NEVER attempted to make puff pastry in my entire life. The thought of rolling, folding, rolling, layering the butter in between the dough sheets over and over and over again scares the apron off of me! I mean, I can't even pronounce the darn dough in French - Pâte feuilletée - my eyes read the words, yes, but my brain and mouth wouldn't compute. My tongue just cannot seem to wrap itself around all those dashes, umlauts and silent "e"s and "l"s. The fact that I never progressed beyond the Beginner's Level at the Alliance Francaise has something to do with this, I suppose. I totally reek in French, sad... because I do love their culture, food, chicness and all that. 

Diva D, my fellow home dweller, on the other hand, HAS made puff pastry in our Red Kitchen! This momentous occasion took place a few weeks ago, and although the puff pastry was not perfect, she was very patient and persistent in her efforts. Below was the result - breakfast Croissants. Completely unglazed, because I'd forgotten to remind her about this step... 


The pastry was light and flaky and was simply fab! I was both proud (that Diva D did it on her own with only a cookbook and YouTube as references) and ashamed (that I still can't get over my puffpastryphobia). How did it get to be this way? 

That was a slight detour from my recipe for this post. Yesterday, I had sent some of these baked puff pastry parcels to the office (not mine, since I no longer work there) and my ex-colleagues dug in and well, really dug them. Only one problem, I had no clue what this dish was called when queried by friends! You see, I'd only just invented the munchies in my head, then in my kitchen, but the recipe itself had not yet been committed to paper.

Postman's Surprise? No, Puffed Up Lurrvve sounds much better!

Since there are so much good flavors and even more love in this pastry parcel, how about we just nick it "Puffed Up Lurrvve?". LOL! The names get crazier each time. Admittedly, the puff pastry was ready-made but if you're interested in making it yourself, here's a recipe by Chef Carla Pelligrino of Rao's in Las Vegas. If the culinary terms detrempe and beurrage don't put you off, maybe the level (Difficult) and prep time (almost 2 hours) will. You get a medal for bravery if you complete this task, just please let me know and yeah, you're completely entitled to rub it in.

Well, I did make the filling....does that count? I used bulgur wheat, and mixed it up with beef rashers, Feta cheese, yellow capsicum, black olives and seasoned it with garlic, shallots and coriander leaves. Delish-shuz! Here's the low-down:

Puffed Up Lurrvve Pastry
Makes: 18 pieces

Ingredients:
2 sheets frozen puff pastry (10"x10")
125g bulgur wheat
600ml water
4 strips beef rashers
100g Feta cheese, crumbled
8-10 canned black olives, pitted and sliced
2 yellow capsicums, roasted, deskinned and diced
3 cloves garlic, diced
2 shallots, diced
4-6 stems coriander leaves, chopped
salt and pepper, to season
1 egg, for glazing

Method:
1. Preheat oven to 200C, and thaw frozen puff pastry for 5-10 minutes before using.
2. Boil the bulgur wheat for 15 minutes until most of the water has been absorbed, then drain. While it is still hot, add the beef rashers, garlic, shallots, coriander, capsicum, olives and mix gently until evenly distributed. When the mixture has cooled, add the Feta cheese and mix further. Season with salt and pepper, set aside.
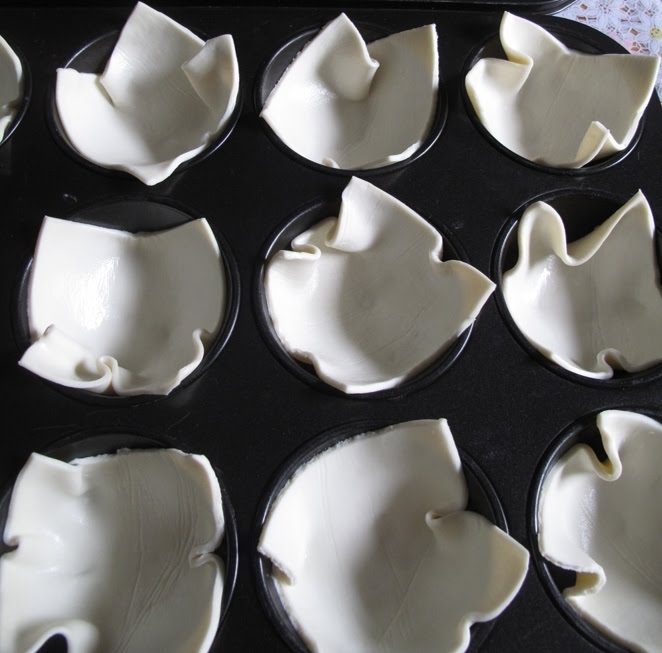
3. Cut each pastry sheet into 9 equally-sized squares while still slightly frozen, then place each small square in a muffin cup (below).


4. Place a heaped tablespoon of filling into each pastry cup, then pull the 4 corners of the pastry towards the middle to "seal" the parcel. Brush top with beaten egg to give it a golden glaze when cooked.


Monday, August 9, 2010

Red Dragonfruit Granita

Post Update: This made the Top 9 on Foodbuzz today.
It's my first time, so is it too silly to be excited about this? (ahh, who cares... I'll just be excited anyway!)

After my earlier post on the dragonfruit quenchers, I still had several dragonfruits left over so I thought, "Wouldn't it be pretty if I turn this gorgeous pink-red fruit into a sorbet?" I'd seen many posts on white fleshed dragonfruit sorbets (always inevitably served in it's skin shell - helloooo.... what happened to originality?), but hardly ever red dragonfruit sorbets. That was what I'd started to do when I suddenly, deflatedly remembered that I didn't have an ice-cream maker and no way was I ever going to process this mixture fine enough by hand, even if I had set up camp by the freezer for half a day!

So the next best thing? Granita. It's great to have on a hot, hot day and for this particular recipe, I decided to accentuate the not-so-flavorful dragonfruit with lime zest, grapefruit zest and fresh ginger slices steeped in sugar syrup! The smell of the hot syrup was heavenly, and I was truly tempted to just add it to some cold water, slip in some lime slices and glug it down like a thirsty desert dweller. Thank goodness my willpower won and I managed to save the syrup for the granita. ;-)

My styling for the photography kind of sucks because I was trying to shoot this extra fast before it all turned into slush. At least, the color of the fuschia bourgainvillea from my garden complemented the granita very well and hmmm... not a dragonfruit skin receptacle in sight!

These babies bleed and stain! But they wash off quite easily, don't worry

  My flavored syrup, with lime, grapefruit zest & fresh ginger

Good enough to drink!

 So refreshingly pretty!

Red Dragonfruit Granita

Ingredients:
1 Dragonfruit
1/2 cup sugar
1/2 cup water
1/2 inch fresh ginger, sliced
1/2 lime zest
1/4 grapefruit zest

Method:
1. Boil the water with the sliced ginger, lime and grapefruit zests, then sir in sugar until dissolved. Remove from heat and let the syrup cool. Once cooled, strained the bits and use the sugar syrup to make the granita.
2. Cut the dragonfruit in half and scoop out the flesh. Place in a blender and add the sugar syrup, puree until smooth.
3. Pour into a deep dish or container and place in a freezer. After an hour, mash with a fork and repeat the process for the next 3-4 hours until it becomes ice "crystals", which is the granita.

Saturday, August 7, 2010

Black Rice Sushi Rolls


After yesterday's success with the purple sweet potato pie, I was at a bit of a loss about what to do with some mashed pumpkin in the fridge. I didn't want to repeat the same pie recipe using the pumpkin instead. Been-there-done-that kind of thing, you know. Besides, I just know in my heart that it won't be as Ah-mazing, because, though similar in texture, they are just different vegetables. Just like you and I are different. But more alike than different, especially when it comes to food.

I'd therefore planned on making glazed pumpkin cookies instead, as I've never baked those before and they would be cool and comforting to have around too. However, life is what happens to you while you're busy with other plans. Sez John Lennon. And so, the pumpkin cookies remained as mere page in my recipe book because in the meantime, something else had cropped up in my life (a.k.a. my kitchen) that I found infinitely more interesting.... Glutinous Black Rice! And the Black Rice Sushi Rolls happened instead. Oh, I did use a few tablespoons of the mashed pumpkins in the sushi so it wasn't a complete loss. I think the rest of it will have to go into a pumpkin soup tonight. Life happens.


Black rice is apparently all the rave in 2009, so this post may be a bit of a yawn. However, if Chef Ian Pengelley of Gilgamesh, London still thinks it's cool, then so do I! The mysterious, black-purple grains are bursting with the antioxydant anthocyanin, it's low carb and lowers cholesterol too. Let's face it, black rice is good-looking (on a plate), good-tasting (like hot popcorn) and it's GOOD for you!

For this recipe, I've used all vegetable ingredients so it's suitable for vegans. If you want to include fish or meat, please go ahead and be my guest (or rather, I'll be yours?).

Black Rice Sushi Rolls
Ingredients:
Makes: 3 rolls

1 cup black glutinous rice
2 cups water
2 tablespoons rice vinegar
½ teaspoon salt
3 pieces baby corn
½ firm tofu
6 tablespoons mashed pumpkin
3 nori sheets
Salt and pepper, to season

You will need a bamboo rolling mat or cling film to help you roll the sushi.

Method:
1. Wash and soak the rice in water for about an hour, then drain and boil with 2 cups of water. You can cook this either on a stove or in a rice cooker, but just bear in mind that black rice takes slightly longer to cook than white rice.
2. Once cooked, stir in 2 tablespoons of rice vinegar and a pinch of salt (optional) and leave to cool.
3. Prepare the vegetable fillings:
    a. Boil the pumpkin pieces until softened, drain water and mash with a fork.
    b. Boil the baby corn for a few minutes until slightly soft, but still a bit crispy. Slice into half lengthwise.
    c. Fry the tofu in a little olive oil, cool and then slice into thin strips.
   You can season each of these with a little bit of salt and pepper, I only seasoned the pumpkin.
4. Once the rice is cooled, spoon it onto the nori sheet as shown (below). Line up your filling in a straight line, then start to roll from the end nearest to you (where the rice is closest to the edge). Make sure you press firmly along the length of the rolling mat so the rice and filling can spread a little to the opened ends.


5. Slice the roll across about ½ inch thick with a sharp, wet knife. Dip the blade in water to moisten it in between cuts. Serve with soy sauce and wasabi dip.

Crazy, sexy, beautiful!

Friday, August 6, 2010

Purple Sweet Potato Pie with Easy Oats Crust


My reaction when I first took a bite out of this pie was that it had turned out better than I thought it would when I was toying with the recipe. Now, every cook or baker knows deep in their hearts that it’s not every day they will stumble upon or create a mindblowing recipe, and for me, today was one in those 1,001 days (or maybe more).

I recently came across this post by Bits of Taste featuring the purple-colored Japanese sweet potatoes, or "Okinawan" potatoes, prevalent in Japan, Hawaii and many parts of Asia. The posted pictures were so enticing that I had to run out to get some! When I was growing up, we grew these and the orange-colored sweet potatoes in our back garden and would pull them fresh out of the ground whenever we'd wanted to eat some. Unfortunately, we don’t cultivate these around my house now because adult commitments dictate that we should just go ahead and purchase these from the farmer’s market or supermarket if we ever need them. Besides, it’s my mother who has the green fingers and unfortunately, the green finger gene has not been passed down to me.


Anyway, the traditional way of eating sweet potatoes in my childhood home was to boil them or fry them in batter. Either way, we used to dip the sweet potato pieces in sweet condensed milk and sometimes the thick milk would dribble down the sides of our mouths and down to our chins (and our laps, or the floor). Such was the uninhibited joy of eating sweet potatoes in those days! Hang on a minute…. We do STILL eat them with condensed milk even now, just a little less messy and hopefully a tad more elegantly.


My eyes glazed over at the thought of these two rich ingredients trapped in a dish – sweet potato and condensed milk - they taste soooo, so good together! Could it be possible to throw them both in a pie and they will still taste heavenly? I didn’t need someone to come over and twist my arm, because that’s what I‘d planned to do when I bought the purplies. Hmm.. but the pie can’t just have any old crust though. I wanted something crunchy, something earthy (whatever that means), then it crossed my mind that maybe oats and wholemeal flour as a base would do the trick. In my excitement about the potatoes, I’d forgotten to buy eggs and found only two left in the fridge. Well, I needed those for the filling so the crust would have to go eggless. Luckily, the oats and wholemeal didn’t need eggs for stickiness, they were perfectly fine by themselves. Gosh, see how amazingly resourceful we human beings can be when pushed into a corner?

The baked sweet potato and condensed milk pie combo really surpassed my expectations (hadn’t I already told you this??). The moist, silky-smooth and tender filling complemented the crusty oats perfectly. Oh, did I say that I also added coconut milk (instead of cream) to the filling? Yes, that sealed the deal for sure! This will be the recipe I will pass down to my children someday. This, and maybe my mother’s green finger gene.


I drizzled extra condensed milk on top of mine because I wanted to feel my mamma's arms around me.. :-)


Purple Sweet Potato Pie with Easy Oats Crust
Ingredients:
I cup instant rolled oats
¼ cup wholemeal flour
3 tablespoon brown sugar
½ teaspoon cinnamon powder
5 tablespoons vegetable oil
2 tablespoons water

Filling:
1/3 cup brown sugar
2 eggs
1 teaspoon vanilla extract
¼ teaspoon salt
dash of ground nutmeg
1/2 cup condensed milk
3/4 cup coconut milk
425g (1 can) purple sweet potato, boiled and mashed

Method:
1. Lightly grease a 9-inch pie tin or spray with non-stick baking spray. Preheat the oven to 200°C.
2. In a bowl, mix the oats, flour, brown sugar and cinnamon. Work oil and water in until well blended.
3. Pat oat crust into the pie tin with your fingers and bake for 8 to 10 minutes until browned around the edges. Remove from the oven while you prepare the filling. Reduce oven temperature to 180°C.
4. For the filling, whisk the brown sugar, eggs, vanilla and salt in a bowl. Blend in the coconut milk and condensed milk, then add the mashed sweet potato. Mix further until it becomes a smooth mixture.
5. Pour the mixture into the prepared crust and bake for 30-40 minutes, until the filling is just set. A skewer inserted into the center of the pie will come out clean.
6. Remove from oven, cool for 10 minutes before turning out and serving.

Super Simple Steamed Crepes


Oh, I saw you re-reading the title. Is that right, what she wrote? You read it correctly the first time and it does say "steamed". And yes, it's crepes that are being steamed, which can only mean two things: no skillet and hence, no skill required to flip it. Hooray! I was totally sold on the idea of making crepes this super-easy way and good thing I have a steamer at in my kitchen, eyy?

A gazillion years ago, while I was still at Uni, one of my dorm mates, Vincent, had declared one morning a Crepe-y Sunday (hello, Hangover!) and that he was going to make those of us who were fortunate enough to wander into the kitchen at that moment the best crepes we were ever going to taste! Of course, he was French and so we had to pronounce his name "Vahn-saunt" or something to that effect. Him being French made us believe that the crepes would live up to his heritage. Well, he certainly didn't disappoint - his crepes were excruciatingly delicious, fillings and all. That very day marked my exposure to the most authentic, thin, crisp, mouthwatering Crêpe Suzette. Thanks to Vincent, he had spoiled me for other future crepes to come into my life!

But steamed crepes, honestly? It's nowhere close to the fantastically precise French crepes - it's thin but not paper thin, it's light and fluffy but no crispy bits and edges, so why the hell would I even want to be putting up this recipe? Three words --> No. Messing. Up. This crepe cousin does not demand that you toss it up, expect it to execute a somersault in mid-air and land perfectly on the skillet while it's being cooked! Is that a good reason enough for you? It is for me. *winks*

Goes well with whipped cream, cherries, maple syrup and yes banana (peeking out). Also chocolate!

The taste of the steamed crepe is delightful, its texture soft and light, a thinner version of the luscious breakfast pancakes and a lot healthier. If you want to, you have my absolute permission to go crazy with the toppings and filling. Hey, life is short after all, and you bend the rules where you can (and where it doesn't hurt).

Here's the recipe:

Steamed Crepes
Ingredients:
2 eggs
1/2 cup sugar
1/4 teaspoon salt
1 teaspoon vanilla extract
3/4 cup flour

Method:
1. Whisk the eggs and sugar until light and fluffy. Add the vanilla extract, then fold in sieved flour until combined.
2. Spoon the batter and form round shapes on non-stick baking paper in a steamer tray. Steam for 5 minutes, remove paper from steamer and leave to cool.
3. Remove the crepes from the paper, add filling and fold it in half before drizzling syrup or chocolate on top.

Happily steaming away


Yeah baby!


Related Posts with Thumbnails