|
| Clockwise from top left: Johor Laksa, Eggless Chocolate Mouse, Tabbouleh, Curried Rice with Cashews and Raisins |
Imagine you were to stumble - God help you - into a
dinner party that lasted for 10 hours, where the 50 guests were free to arrive (not necessarily at the same time), to eat, mingle and leave at any time within those 10 hours. Chances are, that would have been our
Open House party last Friday when we quite literally opened up our house to the people who have filled up our lives throughout the years and made them meaningful. For those unfamiliar with an Open House concept, I had introduced this cultural phenomenon in one of my previous
posts. What I'd failed to mention, however, was that in allowing other people into our personal living spaces and intimately sharing our food with them, we unknowingly open our hearts up to them as well.

Clockwise from top left: Johor Laksa, condiments for laksa, satay pizza slices
When I found myself pleasantly thrust onto the 3rd round of
Project Food Blog where our challenge was to host a Luxury Dinner Party, my first thought was, how on earth was I going to pick my guests for this party? Living in a country with a TOTAL population of only around 300,000 people, word would get around pretty quickly about my scant number of invitations and neighbours/relatives/friends would be out picketing in my front yard in protest! Totally insane, but true (the protesting part, not the parading-with-pickets part).
I consulted with Diva D on how to resolve this and she suggested we hold an "Open House" party where we could invite many guests to our house in celebration of Eid. It's a month-long festivity after all. Only thing was about this dinner party was that it would begin before sunset, at 3pm to be exact. And it would end, as per the usual practice, at whatever time the last guest decided to walk out of the house (ours, it turned out, was at 1am). A 10-hour party? Definitely exciting.
Tabbouleh
Aromatic Curried Rice with Cashews and Raisins
Diva D came up with the magic number of 50 guests, comprising our family and close friends. Apart from having to concoct a luxurious dining experience, here was the real challenge - I would be cooking everything
all by myself. For 50 people. With 50 empty stomachs and a gazillion discerning tastebuds to their name. You see, I had no help, and yet I was foolish and very driven. Somewhere along the line, I forgot this was even a PFB challenge because once we'd pressed the proverbial button to send the invitations out, the only voice echoing in my head was that of
Tim Gunn's to "Make It Happen"!
Local biscuits served on the coffeetable:
L- Pineapple Tarts, R - Kueh Mor
A buffet seemed the most sensible plan because how else would I be able to serve and host 50 guests for an amazing sit-down? For one, I do not have a dinner table the size of England and two, I am not lucky enough to have a best friend named Gayle, who can organise my bash, complete with seating arrangements and then invite 50 of my "closest friends" to it (think Oprah). So buffet it was. Two dining tables that could seat up to 12 people at a time were dressed up with fancy table-garments. No one at my party had to resort to unceremonious behaviour and tackle their food standing up. The buffet stations ensured that the guests could help themselves to the spread, which in turn left me free to mingle with our guests, filling up glasses and generally having a ball.
 |
| Our guests! |
For me to be able to pull all this off successfully, with deceiving effortlessness, I'd had to be very well organised, efficient and strategic. Here, I'd like to share with you some organizational tips for party planning for a big crowd:
1. Get Some Party-Guests!
In order to firm up your guest attendance, invite everyone well ahead of the event. When you have 50 people to invite like we did, you wouldn't want to leave it to the last minute (people have lives too, you know) nor would you want to waste money on buying stamps and end up with sticky tongue syndrome. Would you?Technology is a gift from the heavens because it allows us the luxury of real time notifications and RSVPs, so use it.
2. Plan Up To Your Eyeballs
There's no such thing as too much planning when it comes to executing a successful party. For a luxury do, just triple the effort you would normally put in to planning a standard party! Our planning actually started two weeks ahead of the party. With the invitations out and menu finalised, I drew up a shopping list and buffet-setting plan, cleared the tables where I wanted to place the buffet stations, and washed, dried and plastic-wrapped the cutlery, crockery, glasses and all serving dishes/implements (to keep dust out), then finally ironed the tablecloths and napkins. Oh, not to mention mopped the floor, dusted all surfaces and generally became obsessed with plumping up cushions. In order to make the party look like it was thrown together effortlessly, the gargantuan effort had to take place beforehand.
One thing people often forget to plan ahead for is storage space in your refrigerator or stove for all you will be cooking, and also to keep leftovers. Large crowds mean large dishes, which means they need space! We had to purchase an extra fridge in preparation for this party, and were we glad we did.

All wrapped up and ready
Call me whatever but I'm one of those annoying people who likes to writes a To Do list every night before I go to bed, even while on vacation. Of course, for a party this large and the fact that I was on my own and well on the way to my own kamikaze, creating a checklist was even more critical. There were simply too many things to remember and my poor little brain required some extra support. Here's a sample of my To Dos related to the tasks of food preparation:
2 days before:
Make pizza dough and freeze
Make satay sauce for pizza
Bake lemon ice-box pie and freeze
1 day before:
Prepare fish for laksa sauce
Prepare chicken for chicken curry
Cook lasagna
Make chocolate mousse
Bake mango and fig torte
Bake cempedak and marang torte
Bake apple coffee cake with butterscotch glaze
Day of event:
Prepare condiments for laksa
Cook laksa sauce
Cook spaghetti
Cook chicken curry and potatoes
Assemble and bake satay pizzas
Cook curried rice
Skewer fruits
Make tabbouleh
Make fresh orange and lime juices
What's most important is to be realistic about how much you can do by yourself. I broke the whole prep session down into little tasks to be done over a span of several days so that I could manage on my own. If you don't have the stomach for all of this, then enlist some help and delegate the chores.
Do It Safely
Obviously the most important consideration when feeding a crowd this big is proper food safety measures. I did not want to be eaten up with guilt if I were to make anyone sick, so cleanliness was paramount. As I also had to cook large batches of food, it was important that they were cooked thoroughly all the way through. Once they were cooked, I made sure that hot foods were kept at the proper temperature so that bacteria didn't have a chance in hell to begin to grow. This was especially important for my chicken curry dish and Johor Laksa sauce, both of which contained coconut milk, a potent ferment-inducing ingredient.
Choose A Guest-Appropriate Menu
Despite the higher than average number of guests, ours was not planned as a cocktail party and everyone would get to sit down and eat their meals. In my mind,
no one would be walking out of my house hungry. So when I was brainstorming the menu, I had to think about several things:
1. The level of difficulty and length of time it takes to makes each dish. I wanted to make sure I could handle all the food preparation on my own and not be overwhelmed right in the middle of things. What good would it do the guests if they had to pick me up sobbing off the floor in the middle of a mountain of spices I needed to prep and cook, but just
couldn't?
2. Since we were inviting whole families with children, parents and grandparents, as well as the unattached, engaged or dating, my food selection had to cater for the palates of the young, the hip, the old and the wise, plus everyone in between. I'd wanted to focus on familiar favourites, while adding a few new tastes and flavors - at least, as far as my guests are concerned. On feature were several local fares reflecting my Southeast Asian Malay heritage (Johor Laksa, Satay-flavored Pizzas, Cempedak and Marang Torte), plus I wanted to showcase a melting pot of influences that included Italian (Lasagna and Pizzas - for the kiddies!), Indian (Curried Rice, Chicken Curry), Middle-Eastern (Tabbouleh) and Western (Lemon Ice-Box Pie, Chocolate Mousse - for me!) dishes. This was my final menu - click on it to enlarge:
As you can see, we didn't have appetizers in the buffet line-up because where I come from, the tradition is not to have any. We normally dive straight into the main courses! You may also notice that there were as many desserts as there were mains and I was completely at fault. Firstly, I have a ginormous sweet tooth and assume others do too and secondly, my main passion in the kitchen is baking and sometimes I forget that people need to eat savory meals too. So when I saw that my dessert list was starting to overtake the main dishes, I cut back on a few and balanced out the numbers. My guess is that only another sweet-toothed creature would probably be able to understand this rationale!
Another point I'd like to highlight on this menu concerns beverages, or rather, the lack of it. I'd read somewhere that a luxury dinner party would not be complete without wine. However, our beliefs dictate that we do not take wine or any other alcoholic beverages and honestly, our meals do not seem
less complete because of it. I'm sure any committed vegetarian will tell you the same reasoning about not taking meat. So for this party, we served fresh fruit juices instead courtesy of Diva D's squeezing prowess and really, no one seemed to complain.
L: Lemon Ice-Box Pie R: Skewered Fruits and the dessert table
Seeing Double
Standard recipes are usually meant to feed smaller crowds, so when you have 50 guests, you think it's safe to assume that these recipes can be multiplied accordingly. Right? Well wrong, I found out that not all ingredients needed to be multiplied. For example, oil or fat for sauteing need not be multiplied, as long as you have a proper amount to cover the bottom of the pan. Cooking times may also vary as some dishes may take less than double time and some may take even more, depending on the size of the dish. Something else I'd learnt through this experience was that a recipe to serve 4-5 that I had multiplied by 10 could have actually served more than 50 people. Way more. I also had to bear in mind that since there were 12 dishes altogether in the buffet, people would only tend to eat a little of each so there was no need to cook each dish as if it alone was to feed 50!

Now when I said 50 guests, I hadn't meant that all 50 will have come at the same time. Normally what would happen is that about 5 to 10 guests would be at the house at any one time and stay for at least an hour. Then they leave when another batch of guests arrive at the doorstep. It's almost like an unspoken code of conduct that open house guests adhere to, and strangely enough, I'd never even thought about or articulated this in any form or manner before the writing of this post!
The party was enjoyed by all and even though I was exhausted by the end of it, I knew I had thrown myself wholeheartedly into organizing this party. The genuine experience of "luxury" for me was not in the settings nor the meticulous preparations (these were all good, but easily forgettable). No, the
luxuriousness was in seeing the guests enjoy the food I'd prepared, enjoy themselves in my house, and us having the pleasure of their companies throughout the whole 10 hours. Yes,
10. Those are the kind of things that make me infinitely happy.
This has been a rather long post, and I hope I hadn't lost you way up there at
10 hours and
50 guests. If it makes you feel any better, I'm as exhausted as you are! Before I sign off, though, I just wanted to let you know that voting for this challenge will begin on
Monday, October 4. If you'd like to see what I'll be cooking up in the next challenge, just click on my widget on my right side-bar. My little space in
Project Food Blog is determined by
you, so use your powers well. *winks*
Here I share are a few recipes from my party I think you might like. I'll be posting the others soon!
Johor Laksa
My pièce de résistance was the Johor Laksa, a rich, spicy seafood noodle soup. The number of compliments it received from guests far outnumbered those received by my bright orange outfit. Heck, even my
mother liked it and she's a professional perfectionist who's NOT easily impressed!
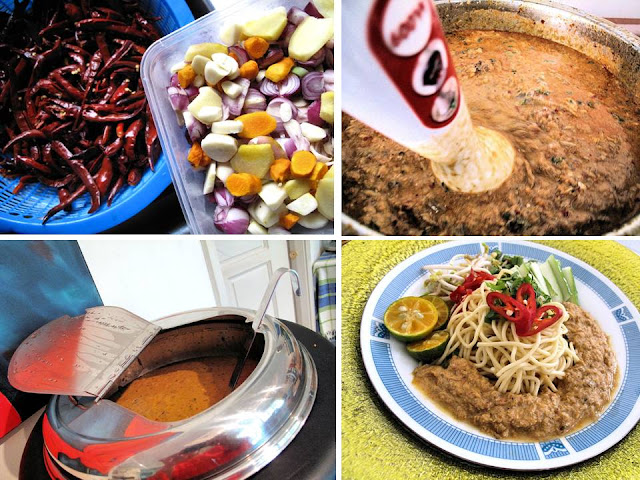 |
Clockwise from top left:
Spices to make Johor Laksa, giving my fish sauce a whirl with my blender, the assembled dish, and the serving hot-pot. |
Laksa is a cuisine derived from the Peranakan culture, is a merger of Chinese and Malay elements found in Malaysia and Singapore, and to a lesser extent Indonesia. Unlike say, Penang Laksa, Johor Laksa uses coconut milk, resulting in a creamier texture and more rounded flavours.It also contains
kerisik (grated, toasted coconut), dried prawns, lemongrass,
galangal and spices akin to curry. The garnishing comprises slices of onion,
beansprouts, mint leaves, Vietnamese coriander or 'daun kesum', cucumber and pickled white radish.
Sambal belacan (a kind of shrimp chili paste) is placed on the side. Finally, just before eating, freshly squeezed lime or calamansi juice is sprinkled on the dish. Unique to Johor Laksa is its Italian connection -
spaghetti is used instead of the normal rice noodles or vermicelli. This recipe may be challenging for beginner cooks as it involves a plethora of ingredients and is therefore more complicated to make. Okay, I'm not even a beginner and I found myself stretched making this dish! I've bracketed the Malay translations of some of the ingredients below.
Johor Laksa
Serves 10
125ml vegetable oil
2 litres coconut milk
500g fresh prawns
300g Indian mackerel (ikan kembung), boiled and flaked
1 kg wolf herring (ikan parang), grilled or boiled and flaked
100g salted fish (ikan masin)
2 small packets meat curry powder, mixed with water to form a paste
1 cup roasted, pounded desiccated coconut (kerisik)
1 cup tamarind juice (assam juice), mix tamarind pulp with hot water and strain
15 laksa leaves or Vietnamese mint (daun kesum), finely chopped
5 mint leaves, finely chopped
Salt and sugar to taste
Seafood stock:
Prawn heads/ fish bones (optional onion, dried shrimps, lemongrass and fresh herbs): fry till fragrant, add in water and bring to boil. Blend all ingredients well and strain.
Laksa paste:
1 ½ inch galangal, peeled
1 inch fresh ginger, peeled
8 lemongrass (serai), sliced
5 garlic cloves
½ cup dried shrimps, soaked in cold water and drained
1 ½ inch fresh turmeric (kunyit), peeled
30 dried chilies, soaked in boiling water and well drained
125ml roasted shrimp paste (belacan)
25 shallots, peeled
1 cup water
Ingredients for condiments:
2 packets spaghetti, boiled until cooked
2 cucumbers, peel, discard seeds and slice into thin narrow strips
250g bean sprouts
200g long beans or snake beans, sliced thinly
15 basil leaves, finely chopped
10 calamansi limes, sliced into halves
1 tablespoon pounded chili and roasted shrimp paste
Method:
1. Heat vegetable oil in a heavy pot. Add in the laksa paste and render the paste slowly. Fry till fragrant.
2. Add in meat curry powder (mixed with water), and cook over moderate heat until fragrant and oil begins to appear on the surface.
3. Add in all the flaked fish, dried fish, prawns, coconut milk and seafood stock. Add in fresh herbs (chopped), tamarind juice and roasted, pounded desiccated coconut. Add in salt and sugar to taste.
4. Simmer over low heat for 20 minutes until gravy thicken, then serve the laksa gravy together with the condiments stated above.
Lemon Ice Box Pie
Who doesn't love lemons? In a frozen pie at that!
Makes one 9-inch pie
Ingredients:
14 whole graham crackers or Digestives, broken
1/4 cup sugar
1/4 teaspoon salt
6 tablespoons unsalted butter, melted
Two 14-ounce cans sweetened condensed milk
1 1/4 cups fresh lemon juice, plus 2 tablespoons finely grated lemon zest
8 large egg yolks
Method:
1. Preheat the oven to 180C/325°F. In a food processor, pulse the graham crackers with the sugar and salt until finely ground but not powdery. Add the butter and pulse until the crumbs are evenly moistened; transfer to a 9-inch springform pan and press into the bottom and two-thirds up the side. Set the pan on a rimmed baking sheet.
2. In a medium bowl, whisk the condensed milk with the lemon juice. In another bowl, using a handheld mixer, beat the lemon zest with the egg yolks until pale. Beat in the condensed milk mixture until smooth. Pour the filling into the crust.
3. Bake the pie for 25 minutes, until the center jiggles slightly and the edges are set. Transfer the pan to a rack; let cool for 1 hour. Loosely cover the pan with plastic wrap and freeze the pie for at least 6 hours.
4. Wrap a warm, damp kitchen towel around the side of the springform pan to release the pie; remove the ring. Using a hot knife, slice the pie, transfer to plates and serve.
Tabbouleh
This tart, parsley-dominated Levantine salad made of nutty cracked wheat or bulgur mixed with wonderfully ripe tomatoes, cucumbers, and green onions, and lots of fresh mint is easily one of my favorites.
Serves 8
Ingredients:
1 cup bulgur wheat
1 1/2 cups boiling water
1/4 cup freshly squeezed lemon juice (2 lemons)
1/4 cup good olive oil
3 1/2 teaspoons kosher salt
1 cup minced scallions, white and green parts (1 bunch)
1 cup chopped fresh mint leaves (1 bunch)
1 cup chopped flat-leaf parsley (1 bunch)
1 hothouse cucumber, unpeeled, seeded, and medium-diced
2 cups cherry tomatoes, cut in half
1 teaspoon freshly ground black pepper
Method:
1. Place the bulgur in a large bowl, pour in the boiling water, and add the lemon juice, olive oil, and 1 1/2 teaspoons salt. Stir, then allow to stand at room temperature for about 1 hour.
2. Add the scallions, mint, parsley, cucumber, tomatoes, 2 teaspoons salt, and the pepper; mix well. Season, to taste, and serve or cover and refrigerate. The flavor will improve if the tabbouleh sits for a few hours.